
The aim of this guide is to help you and your team add products to your Shopify store through a simple step-by-step instruction that would exceptionally showcase your products.
Adding Products to Shopify has most likely the same process as adding products to BigCommerce, however, since they are different platforms, they differ on the specific steps.
Product pages are very important part of your eCommerce store as this is the main page where you can showcase each product and recommend them to your visitors or customers.
Always create product pages thinking of the customer’s perspective and providing what the customer needs to make that positive purchasing decision.
Thus, all important information, specifications, details and photos of the product should be available for the customers to give them an exceptional customer experience in your store that would eventually convert to sale.
Take note that the product page is where you sell your products. So make sure it’s at its best to showcase your products and win a sale!
The good thing with using Shopify is that adding products is so easy as all details simply need to be added on one single page, no need to click on confusing tabs. And it only require the needed and basic information so even beginners or those not-so-technical store owners can use it with ease and confidence.
To help you get started, you can follow these steps we’ve prepared for you.
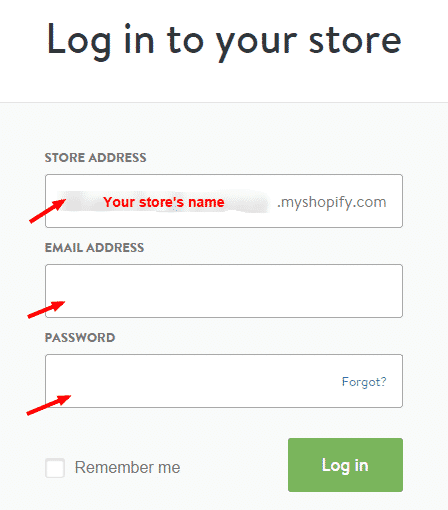
Step 1: Login To Your Shopify Account
The first thing to do is to make sure you are logged into your Shopify account. If Shopify is your eCommerce cart of choice but haven’t set it up yet, you may read this article first How To Set Up Shopify In A Matter Of Minutes.
Login with your store’s Shopify address, your email address and password that you’ve used to sign up.
Step 2: Go to Products > Add Products
Once you are signed in, you will see the Navigation options at the left side of the page.
- Look for Products option and click on it.
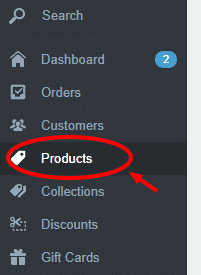
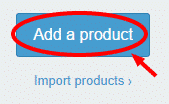
- And then click on Add Products button for the Product page to appear.
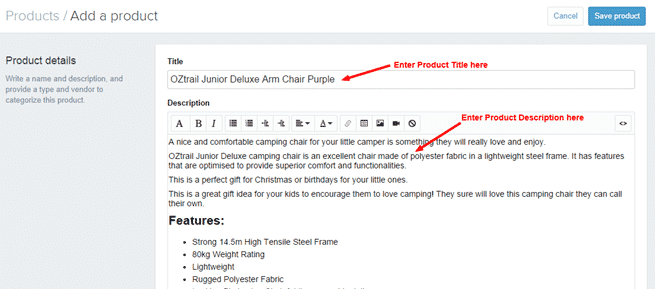
Step 3: Add Product Details
The first thing that we can add on the Product Page are the Product Details which consist of the following:
- Product Title
- Description
- Type
- Vendor
Product Title
The Product Title is the name you will be calling a specific product. Product titles should have a consistent format to have a professional look on your products when viewed in showcase view.
The product title should include valuable keywords and distinct description about the product. You can read this article on how to write outstanding product titles for your products.
Description
Shopify provides a space large enough for you to add product descriptions. This is where you can add the product’s specification, features, benefits, and all valuable information to help the customers in their purchasing decisions.
Product descriptions should be well-organized, unique and interesting. Copy and pasting from another site is not advisable as it doesn’t only hurt your search engine rankings, it also gives a poor impression to your customers.
Read this Small Revolution how-to guide How To Write Store Product Descriptions That Sell to help you write interesting and compelling product descriptions.
Type
In this field, enter a text that would classify the product. This is a mandatory field. Make sure you use concrete and exact text to classify your products.
Vendor
This is the field where you can credit the manufacturer, the supplier or the brand of your products.

Step 4: Add Inventory And Variants
The Inventory and Variants section is where you can enter the following product details:
- Price
- SKU
- Shipping Option
- Weight
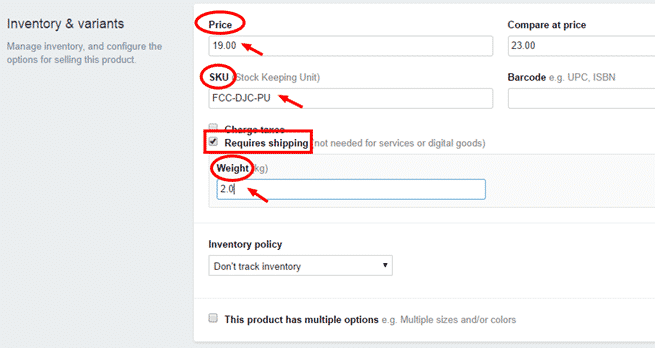
Price
This is where you can add the price you want to charge for a specific product. No need to add a currency symbol here. That will be set on your Shopify’s General Settings page.
SKU
SKU is short for Stock Keeping Unit. This is a unique identifier for each of the products in your store. This can either be found on the manufacturer’s website or directly from your supplier. If not, you can search Google for it. If you cannot find any SKU for a particular product, you can leave this blank.
Shipping Options
For shipping options, you can check or uncheck Charge Taxes and Requires Shipping check boxes. For physical products, Require Shipping should be checked, however, if your selling services or downloadable products, you can leave this unchecked.
Weight
The product weight is necessary for computing the shipping or freight cost of a particular product. If you do not know the exact weight of the product, you can do a weight estimation. The weight here should be in kilogram.
Under Inventory & Variants, you can also add product information like:
- Compare a Price where you can add a much higher price from a competitor,
- The product barcode supplied by the product’s manufacturer,
- Fulfillment if in case you activated a Fulfillment service to deliver a product,
- Inventory policy to track your inventory
- And multiple options to add sizes and colors.
Step 5: Add Product Images
After adding all details of the product, it’s time to add the product images. It’s very helpful for customers if store owners provide as much relevant product images as possible.
To name your images, make sure you use a consistent formatting and use dashes (-) to separate words instead of spaces or underscores (_). Make sure also that your images are on the same size.
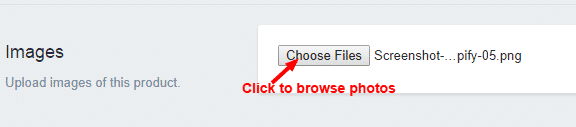
One downside in Shopify when it comes to adding products is that the uploaded images are not shown in thumbnail view. You need to finish all and save the page before you can check the product images that you’ve uploaded. It doesn’t have an option for you to name your images so make sure you properly name the images in your computer before uploading it to Shopify.
Here are helpful Small Revolution articles to guide you on improving your product photos/images:
- How To Learn From 23 Examples Of Exceptional Product Photography
- How To Use Multiple Product Photos
- And more from here Product Photos & Videos category
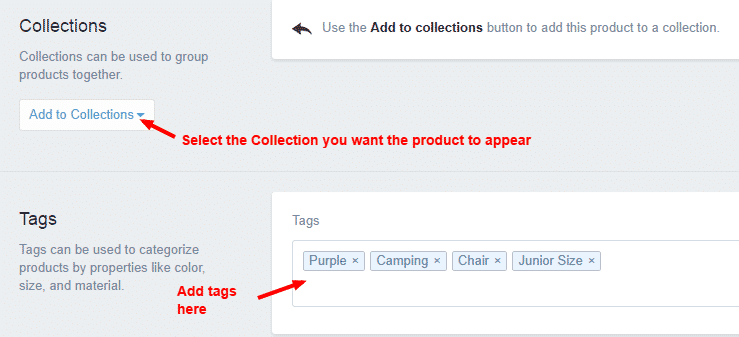
Step 6: Add To Collection And Add Tags
A Collection in Shopify is like a Category in BigCommerce. You can add a specific product to a specific collection where you want the product to appear in.
You can also add tags to categorize your products according to their color, size, material. You can add as many tags as possible, just separate them with a comma.
Step 7: Add Meta Data
The good thing about Shopify is that it automatically generates the Page Title and Meta Description for you. These are based on the information you entered on the Product Details section.
Most often, we need to change the Page Title and the Meta Description to improve its value. These are meta data that is shown on the search result pages. So it is necessary to add valuable information so people can easily learn about you and your products and win a click.
The Page Title and the Meta Description should also contain valuable keywords related to your products at the same time consider its value for customers and readers.
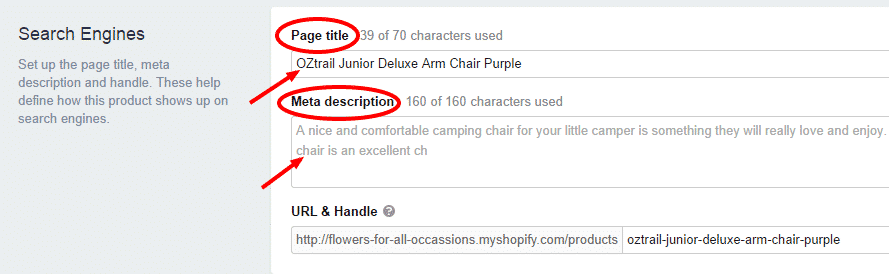
Do take note that Page Title and Meta description has a character limit.
To help you create attractive meta data for your products, read this Small Revolution how-to guide How Write Product Meta Data For Your Store as this gives you tips and a more details instructions on how to win a click through your Meta Data.
Step 8: Click On Save Product
After everything is on it’s place, check everything and make a quick review before click on the Save Product button found at the bottom right corner of the page.
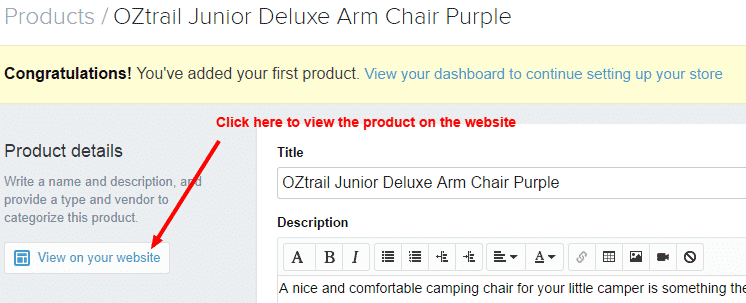
Step 9: View Product On The Website
After clicking Save Product, scroll up the page and you should have a Congratulations message on top, that means the product has been saved already.
Then click on the link “view on your website” to check your product on your website.
Final Checklist
To add products to Shopify is as easy as ABC. To have a bird’s eye view of the process, here’s a recap of the steps to guide you through.
- Login to your Shopify account
- Go to Products > Add Products
- Add Product details
- Add Inventory and Variants
- Add Product images
- Add products to Collections and add tags
- Add Meta Data
- Save Product and view them on the website.
1 Comment
Hello.
I have enjoyed your step by step guide to adding products to shopify. So well written and easy to follow. Would love to read more of your writing
Thank you
Ed