
The aim of this guide is to provide a store owner with a step-by-step process that can be given to an employee.
The guide is geared toward eCommerce examples, so your team will be able to create a basic Pinterest account for your store.
You need this how-to guide because Pinterest is now becoming a very good social ground to promote and market your products. You can meet and connect with people that share the same interest in your products.
Following this guide will help you create your Pinterest account through its comprehensive step-by-step instructions.
Step 1: Learn Why Pinterest Is Good For eCommerce
Social media is now one of the most effective ways to promote eCommerce and among the most popular sites for this is Pinterest. With over 70 million users including 500,000 business accounts, it is one of the most effective eCommerce platforms out there.
What makes Pinterest an especially effective eCommerce tool is that unlike Facebook and Twitter, it is not normally used for exchanging personal information. Users visit the site mainly to view and share products and ideas. 69% of Pinterest users have found products they have purchased or what to purchase.
The main concept of Pinterest is to create collections of the content found on the web. These collections are called boards which are visible to other users and can be ‘liked’ and ‘followed’. Boards contain photos – anything from clothing to recipes – that link to a specified source.
Many Pinterest users, or Pinners, that are not businesses create boards by browsing through other boards. If they see something they like, they simply pin it.
Clicking on the ‘Pin It’ button adds the photo or link to a selected board and makes it visible to its followers. Because content is mainly visual and very easily shared, using Pinterest boards are an ideal online marketing strategy.
If you want to dig deeper into how Pinterest can help your business, you may read the following articles.
- Verify the Pinterest account to let customers know that it is a legitimate and trustworthy source
- How e-commerce Pinterest accounts gain followers
- How Pinterest is Good for Business
Step 2: Create Your Account And Profile
1. First, go to http://business.pinterest.com/ and click ‘Join as a business’.
2. Then fill out the necessary information (eg: contact name, e-mail address, business name, profile image, about, and website);
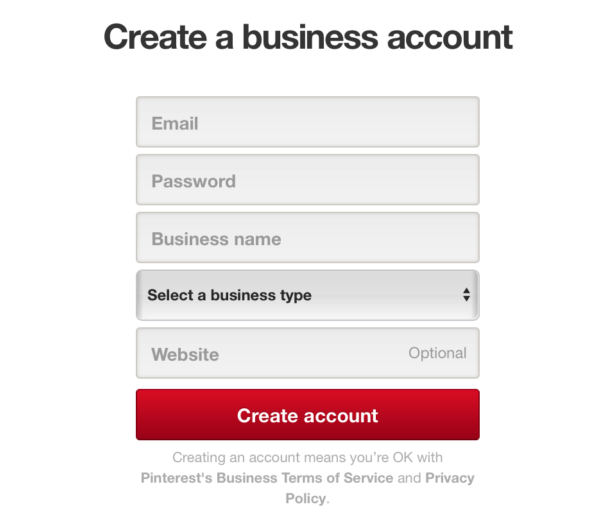
- The contact name should be that of the person managing the account.
- Make sure the select the correct business type. This is important because it helps Pinterest categorize the account, which will then make it more accessible to the target market.
- Use the business’ official logo as a profile image. A logo is important because it helps attract your target market and makes your e-commerce business more recognizable.
- Business names have a 37-character limit.
- The description should represent the business well but keep it short and concise.
- Add keywords and place them as close to the beginning of the title as possible. This will make the page easier to find.
- Descriptions have a 200-character limit.

Groupon provides a good example of a description. It is short but keyword-rich (“recipes”, “fashion”, “design”) and describes the business clearly. It also uses an official logo.
3. Once you have completed the necessary information and agreed to the terms, click on ‘Create Account’ on the bottom of the page.
You will then be automatically logged in to your new account and redirected to the Pinterest homepage.
Step 3: Create New Boards
Pinterest boards are albums or collections of photos relevant to the online business; photos of the business’ products and photos that inspire the use of these products or services. Boards will be the main attraction of the page. Follow these step-by-step instructions on how to create them.
1. Click on the Add symbol on the top right corner of your page. It is located right next to the business’ logo.
2. Click on ‘Create a board’.
3. Supply the required details for the board you want to create.
Create an appropriate title for the board. Add keywords and place them as close to the beginning of the title as possible. This will make the board easier to find.
These are good examples of board titles from Kids Club Thirteen. Notice how they are keyword-rich (“food”, “style”, “crafts”, kids”) and specific.
- Keep the description short and concise. Add keywords and place them as close to the beginning as possible.
- Board descriptions have a 500-character limit.
- Adding a map to your board is useful for:
Sharing appearances – If the online business is participating in an event such as a trade show.
Product availability – If products are sold in physical stores.
- Be sure to select the appropriate category for the board. This is important because it allows Pinterest to categorize the board, making it easier to find.
- The page should be public and accessible to all potential customers. Select ‘No’ in the ‘Keep it a secret?’ option.
4. After completing the necessary information, click ‘Create Board’. You will then automatically be redirected to the board.
- The maximum number of boards is 350. Make sure to have at least 20 boards. This is enough to make the page look packed with content at first glance.
Step 4: Add Pins
Pins are photos that make up a board. This is what Pinterest users will be sharing and liking. Follow these instructions on how to add pins.
1. Click on the Add symbol on the top right corner of the page. It is located right next to the business’ logo.
2. You will see two options for creating pins: from the web and from a computer. It is best to add pins from the web because the pin will automatically contain a link to its source.
If a pin is posted from the business’ website, it will be easier for a potential customer to find where they can purchase your product. Click ‘Add from a website’.
3. Paste the exact URL of where the content you would like to pin is located.
4. Click ‘Next’.
5. You will then be shown all the photo content from the URL. Hover over the photo you want to pin and click ‘Pin It’ on the left hand corner of the photo.
6. Supply the required details for the pin you want to add.
- Select the board where you want the pin to be. Make sure it is the appropriate board.
- In the pin description, make sure to include keywords that describe the content well and place them as close to the beginning as possible. This is important because it will increase the chances of the pin showing up in search results.
- Pin descriptions have a 500-character limit but keep them as short and simple as possible.
7. Click ‘Pin it’.
8. You will then see a message that says ‘Pinned to [Name of Selected Board]’. Click ‘See it now’ to view your pin and click ‘X’ to add more pins from the same URL.
Another way to add pins to a board is by pinning from other boards. This is usually used for content that is not directly within the online business but will help inspire Pinners to buy the business’ products or services.
Step 5: Pin From Other Boards
1. Hover over the image that you want to pin and click ‘Pin It’.
2. Supply the required fields.
- Select the board where you want the pin to be. Make sure it is the appropriate board.
- There might already be a description for this pin. Editing is optional but make sure there are keywords that describe the content well and that they are as close to the beginning as possible. This will increase the chances of the pin showing up in search results. Also, check for spelling and punctual errors.
3. Click ‘Pin It’.
4. You will then see a message that says ‘Pinned to [Name of Selected Board]’. Click ‘See it now’ to view your pin and click ‘X’ to return to the previous page.
Step 6: Organize Your Boards
Now that you have set up your boards, the next step is to organize them properly. The arrangement, categorization, and content of your boards are all important because they reflect your eCommerce store.
Board Content
- A board title must be specific and concise. This will make categorizing pins easier.
- Add keywords to the board title to make it easier to find in the search results.
- It is important that all the pins in each board are relevant. Make sure each pin is in the appropriate board.
- To edit the details of a board such as the name, description, or category, follow these steps:
Click on the business’ logo or name on the top right corner of the page.
Click on ‘Your Profile & Pins’.
On the board you want to edit, click ‘Edit’.
Make the appropriate changes and click ‘Save Changes’.
- Photos must be of high quality, eye-catching, and visually appealing. Additionally, they are all relevant to the board.
Here is the What’s Hot board from Essie, a nail polish brand. Most of the photos are repins from other boards but all are relevant and of high quality.
- Each board on your page will display 5 thumbnails of pins it contains. Have at least 5 pins in every board to fill them, otherwise, your boards will look incomplete or empty.
The first image is a board with more than 5 pins. The second image is a board with only 3 pins. Notice how the board with only 3 pins has empty thumbnails.
- Choose a cover pin for each board. This will be displayed as the main thumbnail of a board. Select the most attractive and eye-catching photo, one that will represent the contents of the board well.
Step 7: Select Your Cover Pin
- On your page, hover over the board and click ‘Change Cover’.
- Use the arrows to browse through your pins.
- Once you find an ideal cover pin, click ‘Save Changes’.
Step 8: Choose Your Number Of Boards And Board Placement
- The ideal minimum number of boards you should have on Pinterest is 20. This is enough to make your page look complete and packed with content. Also keep in mind that if you have too many boards, some of them will not be as easily accessible as others.
Nars Cosmetics has 22,791 followers with 33 boards.
Containerstore, one of Pinterest’s top business success stories, has 28 boards.
The popular How-To website WikiHow has also reached out to a wider audience through Pinterest with 55 boards.
- Boards are arranged in grids and can be placed in a preferred order.
Know which boards are the most important/helpful for the business. Place them on the top rows.
Sephora has placed important boards such as Trending Now on the top row where it is most visible.
Boards that contain makeup how-to’s are placed in the succeeding rows because they are not the main attraction of the page; rather, they are boards that support Sephora’s products by providing inspiration for makeup.
- You may rearrange your boards accordingly from time to time. For example, an e-commerce store selling clothing may place boards containing jackets on the top rows during cold seasons and boards containing tank tops during warm seasons.
For Spring, Cost Plus World Market has placed its Spring Collection board in the center of the top row for maximum visibility.
- To rearrange boards, simply drag them to the preferred location.
Step 9: Update Your Boards Regularly
- A steady flow of pins is important because it can increase the number of followers.
- Be consistent. Do not post 50 pins for three days straight and none at all for another three days. According to Ahalogy, 20-25 pins a day is optimum.
Learn From Others
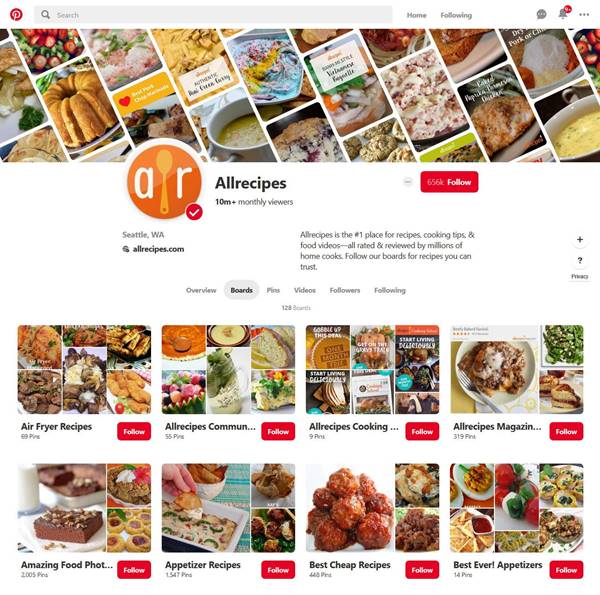
Allrecipes is a good example of an eCommerce Pinterest page. In the top bar you will see the logo and a short and clear description of Allrecipes.
Aside from products, there are many other kinds of content that can be helpful for an online business.
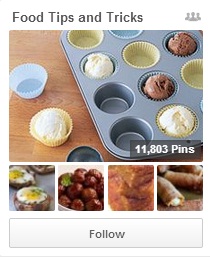
Whole Foods has a board called Food Tips and Tricks. This board does not contain products but ideas on how to easily make use of their products.
Lush works on building and boosting a good reputation by promoting corporate social responsibility.
Final Checklist
To sum it up, here’s a checklist of what you need to do to create your Pinterest board that would showcase your store as well as your products.
- Create your Pinterest account and work on creating your profile.
- Create boards, add pins and get pins from other boards to populate your boards.
- Organize your boards so they appear neatly.
- Select an impressive and compelling Cover Pin.
- Choose the number of boards and the placement of boards.
- And always update your boards so they appear lively and engaging.
Photo by Freepik / CC BY
25 Comments
You’re so awesome! I don’t believe I have read a single thing like that before. So great to find someone with some original thoughts on this topic. Really.. thank you for starting this up. This website is something that is needed on the internet, someone with a little originality!
Pretty! This has been a really wonderful post. Many thanks for providing these details.
Thank you for this informative post! It has shed light on a topic I was struggling to understand. Your writing style is engaging and the information is presented clearly. Great job!
Nice post. I learn something totally new and challenging on websites
Very well presented. Every quote was awesome and thanks for sharing the content. Keep sharing and keep motivating others.
Very well presented. Every quote was awesome and thanks for sharing the content. Keep sharing and keep motivating others.
Pretty! This has been a really wonderful post. Many thanks for providing these details.
Pretty! This has been a really wonderful post. Many thanks for providing these details.
I very delighted to find this internet site on bing, just what I was searching for as well saved to fav
Great information shared.. really enjoyed reading this post thank you author for sharing this post .. appreciated
This was beautiful Admin. Thank you for your reflections.
I very delighted to find this internet site on bing, just what I was searching for as well saved to fav
This article provides practical tips that can be applied immediately.
Nice post. I learn something totally new and challenging on websites
Good post! We will be linking to this particularly great post on our site. Keep up the great writing
Hi there to all, for the reason that I am genuinely keen of reading this website’s post to be updated on a regular basis. It carries pleasant stuff.
I really like reading through a post that can make men and women think. Also, thank you for allowing me to comment!
very informative articles or reviews at this time.
Great information shared.. really enjoyed reading this post thank you author for sharing this post .. appreciated
I appreciate you sharing this blog post. Thanks Again. Cool.
Great information shared.. really enjoyed reading this post thank you author for sharing this post .. appreciated
I am truly thankful to the owner of this web site who has shared this fantastic piece of writing at at this place.
Nice post. I learn something totally new and challenging on websites
I am truly thankful to the owner of this web site who has shared this fantastic piece of writing at at this place.
I very delighted to find this internet site on bing, just what I was searching for as well saved to fav