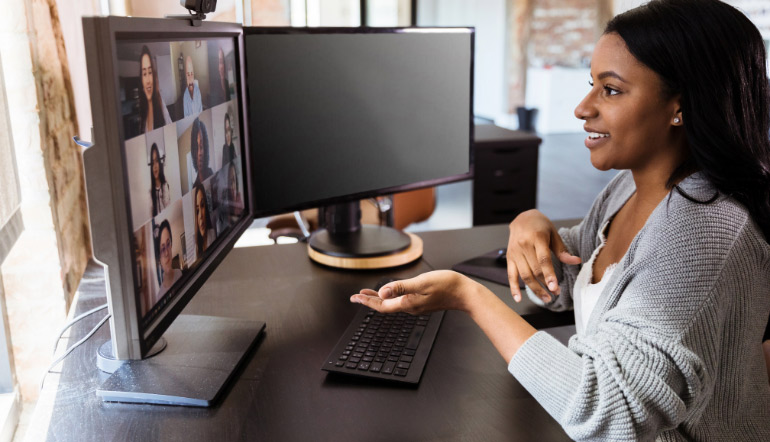
Don’t cringe and roll your eyes! Whatever you do, this is a fact of your working life and it’s not about to change. So, take a deep breath and embrace it.
Figure out what it is that worries you when it comes to team meetings. Are you shy? Do you worry about your accent?
These are all the things that you simply need to push through. You need to meet this challenge and you will. Once you finish your first successful team meeting, you’ll see that there was nothing to worry about.
Yes – simply push through it – does not sound that simple. But it is!
But what is your other option? Never have team meetings? Stay endlessly shy throughout your entire career? You’ll agree that these are not very good options for somebody who wants a long-term and successful online career. Don’t worry. You’ve got this. Your accent is just fine. Everybody has an accent. You look good. Everybody does.
You don’t know anybody in the team – you’ll meet them. As for all the other concerns that may worry you – you just need to be prepared. This is where we step in for the rescue!
Being prepared takes a load off your shoulders. So, try going through this lecture and by the end of it, you will be prepared for a team meeting as well as you can be. We will guide you through it from the moment you get your invitation, to the moment you press ‘end’ in your meeting window.
Even more. We’ll stick a little longer with you to make sure you did it all well. Let’s start!
Things You Can Do as Soon as You Get Your Meeting Invitation
The invitation is here and now you need to take a close look. You need to figure out your whens, hows and whys from it in order to prepare well.
1: When
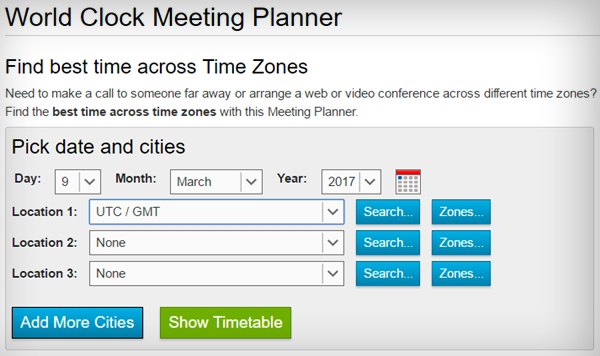
The invitation needs to contain the exact date and time of the meeting. Check and double-check the time zone! You don’t want to show up for the meeting in the middle of the night, do you?
Use World Clock Meeting Planner to know when your meeting is, for sure.
2: How
This is the modern, digital equivalent of your old-school where. While you are probably not able to put your entire international team into one room, there are many online tools to help you with ‘hosting‘ the meeting.
The most commonly used are Skype, Google Hangouts, GoToMeeting or it may a completely different tool.
If your invitation does not contain this information, kindly ask for it. You can suggest a platform in your question so it doesn’t point out that the invitation was lacking in details.
You can use something like: Just a quick question, do you want to have this meeting over Skype or Google Hangouts?
Probable answers are: Let’s use Skype/Google Hangouts. No. Let’s use GoToMeeting
Either way, you will get the knowledge you need, without sounding rude or emphasising somebody’s mistake.
3: Why
You need to know the meeting agenda so you can prepare suitable responses. If the invitation doesn’t contain it, ask for it. You can do it without being impudent if you ask politely and state your reasons.
“I’ve accepted your meeting invitation. Would you mind telling me what we’ll be discussing or what the intended outcome is for the meeting? I can then be better prepared.”
Getting ready for the agenda will do wonders for your pre-meeting anxiety. You will know what to say and what the meeting is about, so you’ll feel more under control.
Things to Do When You Have All the Info You Need
So, now you have of the basics. You know what the topic of your meeting is, when to be prepared and which software will be used. It is now the time to prep one step at the time.
If you don’t have the software that your employer chose for the meeting – download it and set it up. Learn how to use it, search YouTube or the software’s website and watch the tutorials. Try all the options out.
Set up your equipment, including speakers, headphones and microphone if you don’t have them already integrated in your laptop.
If you have the software already, make sure that it is updated and operational. Call your friend and test your equipment and software. You want everything to function correctly, so you can focus on what is being said during the meeting.
Also, make sure that you know where your mute button is in case you need to sneeze or there is a sudden noise in the background that you cannot muffle or stop altogether. However, don’t use hold on team meetings, because that is rude and disrespectful to your colleagues.
Now that you have a copy of the agenda, take a look at the agenda. What is the meeting about? Do you have any ideas on that topic? Come up with some. Make sure your presence is a valuable contribution to the meeting.
Review your own work. Where are you up to right now? What are you working on? When do you expect to finish? What is your next step? Are you waiting on anyone else in order to finish your tasks?
Know all the details and anticipate the possible questions, so you can prepare the answers.
Things to Do Right Before the Meeting
The moment has finally arrived! You are about to have your first team meeting in just a couple of minutes.
Show up early and do one final check of your equipment. You don’t want a sudden Skype update to cripple your computer and cause you to be late.
You prepared and you know all about your work. Still, keep the tabs of your browser with work-related things open. You may want to check a thing or two during the meeting and you don’t want the poor Internet connection to slow you down. Keep it all handy.
One last, quick checkup of your appearance and the surroundings. Is your hair OK? No weird things behind you? No chickens, loud dogs or siblings in the background? Good.
Here it goes! You are online and you are greeting your team! Your first team meeting has begun!
1: During the Meeting
Be the first online and greet everybody that arrives. Start with some small talk. How are you? Will only bring you to a dead-end Fine, and you?
Try to come up with some interesting topics for a short chitchat. Stay clear of politics and religion. For example:
I was just going through my friend’s vacation photos they took in Tahiti. That seems to be a magical place. Have you seen *insert current topic here* on the news?
Once everybody gets there, figure out who is taking the notes. Those will be very valuable after the meeting and an excellent reason for a follow-up. Share where you are with your work and what needs to be done.
If your work relies on somebody else and there have been some delays, don’t accuse them directly. It is in poor taste. Say something like:
I’ll be done with this list as soon as Jake sends me his data, which I expect to be soon. I’m sorry, correct me if I’m wrong, please, but shouldn’t I wait until Jake finishes up with his data first?
If you are in a meeting – be on the meeting. If you are not seen or heard and you don’t contribute anything to it, you may as well be absent, right?
So make sure you share your ideas and give your thoughts and comments on what other people are saying. Even if your idea gets rejected, it is still heard and you can learn from it.
While you are presenting your thoughts, make sure that you are calculating 2 to 3 seconds of delay that sometimes happens during video meetings. Leave room for questions and comments. This usually happens if there are more than two people in a video call.
And now for all the things that you SHOULD NOT be doing during the meeting. No emails, Internet surfing, texting or using your phone. Everybody else took the time to focus on the meeting so any of these actions means disrespect to those people and their time.
So, you presented your ideas, listened to others and commented on their thoughts, took notes and got informed on the topic of your meeting.
This is the perfect time to have that Well, that wasn’t that bad moment. You got this.
2: After the Meeting
Once the meeting is over, go through your notes. Fix the grammar and spelling lapses and check the spelling of the names of every person involved. Now double-check the names.
They are important. After revising your notes, send them to the other meeting participants for all reviews, comments and additions they think are necessary.
Basic Spelling, Grammar and Communication Rules
Once you land a job as a virtual assistant, it means that honing good communicative skills will be one of your top priorities. The most likely scenario is that you will be home alone, sitting behind your work desk, without an English teacher at your side.
This also rules out the ability to slide your chair over to your coworker and ask them what you need, in your own language. You can try, though, but you will most likely just hit the wall behind you.
While writing, your co-workers and employers won’t be able to see you or hear you. There are no facial expressions, body language and your voice to help you convey the message.
They are replaced by your language skills and style. Naturally, the first thing when it comes to proper communication is crossing that language barrier. English is most likely the language you’ll be using, so make sure you perfect it as much as you can. Start with basic spelling and grammar and continue with perfecting your style and composition.
Spelling
Don’t be one of those people who think that all their spelling issues are resolved with a spell checker. They do an awesome job, but they don’t understand your sentences. For example, a spell checker will not notice that you wrote ‘manger’ when you wanted to write ‘manager’.
It’s still spelt correctly, but it is not the word you are looking for. Of course, there are advanced spell-checkers like Ginger and NounPlus that are more thorough than your everyday, built-in spell checkers of your usual text editors.
Still, nothing replaces your own knowledge. Here are a few things you can do to improve your spelling.
- Use mnemonic devices to remember spelling rules
- Explore and write down commonly misspelled words. If you want some effective posters and don’t mind a swear word here and there, download Oatmeal’s fun posters
- Read, read, read and especially read this
- Write, write, write and write
- Exercise using online spelling courses and exercises
Grammar Rules
When it comes to grammar, there is some good news and some bad news.
The bad news is: there is no shortcut to proper grammar. It just needs to be learned and practiced. The good news is: the resources have never been easier to find and use.
Take Grammarly for example. It doesn’t only help you with your grammar, spotting the usual mistakes. It puts your sentences into a context which makes it much more precise and accurate when correcting your writing.
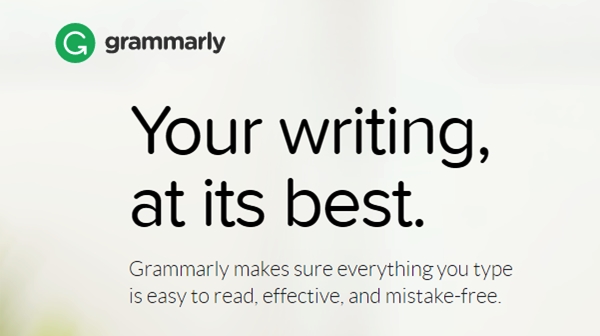
Remember: it’s IMPOSSIBLE to practice grammar regularly and NOT improve.
Here are some useful websites with a wide range of grammar exercises and explanations.
- BBC Skillswise – Helps you with your English immensely. You can use this resource to improve your writing, reading and even listening skills. It’s not just by chance that proper British English is sometimes referred to as BBC English.
- English Grammar 101 – Just what the title says. You will find tonnes of lectures on parts of speech, sentence structure, but also sentence scope, punctuation, and spelling.
- Oxford Grammar Course – It is based on the famous Oxford grammar books, used by ESL teachers around the world. You can choose from three levels.
- Future Learn: Inside IELTS – This free course is mainly designed to help those that prepare for the IELTS test, but it is a golden resource for anybody who wants to improve their language.
- Exam English – Compilation of tests, collected from the high authority websites in the field of English language. Great for those that want to test their knowledge.
- Learn 4 Good – Mainly a preparation course for those that plan on taking TOEFL test. Still, an amazing resource even if you don’t want to take the test.
A brief note: Whilst you don’t need to review the above websites in order to pass this lecture, we strongly suggest that you do so.
It’s in your best interest, for a long-term online career with native English speakers, that you improve your spoken and English English language skills.
Communication Tips
Now that your English is all polished up, let’s see what you should be doing with it. Namely, it is time to take a closer look at how you communicate with your employer.
Online chats via Skype and other apps are another story. Let’s focus on your emails, PMs and other types of written messages.
There are some general rules that you should consider, besides the email etiquette rules:
- Express only one idea in one paragraph
- Keep paragraphs as short as possible
- Keep sentences as short as possible
- If you can, use bullet points or numbered lists
When you finish up your email, read it one more time and try to examine it from the receiver’s point of view.
Upon reading it, do you understand what is required from you? Are there questions that need to be answered?
The answers to these questions need to be obvious to your reader after looking into your email.
Otherwise, you’ve just wasted a couple of minutes of their time and they still aren’t sure what you want from them.
Numbering questions help people keep their answers to the point. It also increases the chances that all of your questions will be answered and not lost in communication.
Use Screenshots to Paint Your Ideas
Every online worker is expected to be an effective communicator. It is one of the main things your employer expects from you. Being able to communicate efficiently is important for any online worker because it will:
- Make you look professional
- Save time needed for a task to be completed successfully
- Help avoid professional and personal misunderstandings
What does it really mean? That you can type well or talk eloquently? That too, but that’s not the whole story.
Communicating is far more than just speaking. It is all about explaining that idea or problem that you have in your mind, so that your co-workers and employers can understand it.
So, no need to limit yourself to just spoken words, right?
Get smart and resourceful in finding ways to communicate effectively with your online team. Use spoken and written words, examples, doodles and, of course, images. Show people what you mean! Literally, draw them a picture. More precisely, give them a screenshot!
Screenshots are an awesome way to communicate efficiently.
Learning is easier when we see visual examples.
But what are screenshots anyway? How do you take them? What exactly are they for? How are they going to help you become a better online communicator?
What Is a Screenshot?
A screenshot is an image taken to record what is currently visible on a computer screen. Some people call it screen capture, screen cap, cap, screen dump, or screengrab. It is basically like taking a snapshot of your computer screen.
Here is an example of a screenshot: (This is a screenshot of http://www.gazebosaustralia.com.au)
Why Would You Use It?
Simple. You really need it. Try and write an instruction about how to tie shoelaces. Just think about it. It is really hard to do with just using your words, right? It is actually, easier done than said!
Now, if you take a photo after photo of shoelaces being tied, and present them in the correct order, it will be a much more useful guide.
The same goes with your online work and expressing problems you run into. Using screenshots as a visual aid in your messages can help you with many things:
- Breaking the language barrier. Not confident with your written English skills? A screenshot can illustrate what you’re trying to explain better, without you struggling to find the right words.
- Replacing the technical terms. Experiencing a problem with a website or software but you’re not sure of the tech terms to use or even what the thing you’re looking at is called? A screenshot will help you point out what the problem is and where it is coming from.
- Showing the type of error you encountered. Have you experienced clicking on a link and ending up on an error page? Here is an example of a page error you might want to show your boss or teammates when you happen to encounter it:
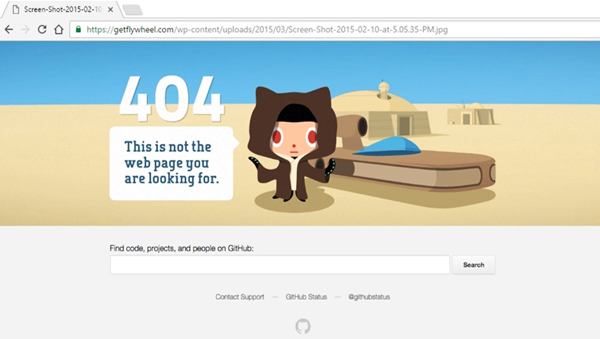
A screen of the error message will make it easier for your boss or teammates to understand what error you are getting instead of simply saying “I’m getting an error page.“
When Would You Use It?
- If you only need to show a small portion of your screen, there is no need to capture the entire screen including the menu and browser. Only capture important information.
Remember that screenshot of the http://www.gazebosaustralia.com.au/ from the beginning? Here is only a detail from that website in the form of a screenshot.

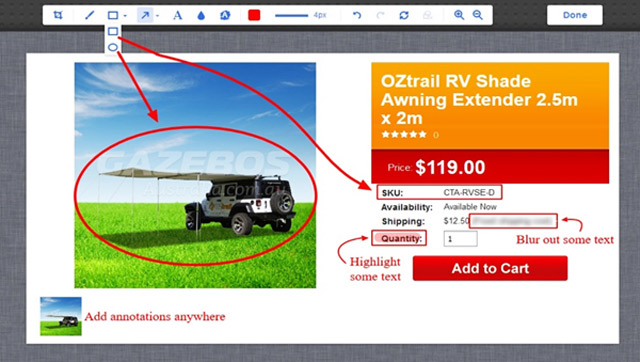
- Highlight areas in the screenshot by using the arrow and circle tools. Sometimes, just cutting out a detail from the website is not enough. You need to emphasise it further and make it more visible.
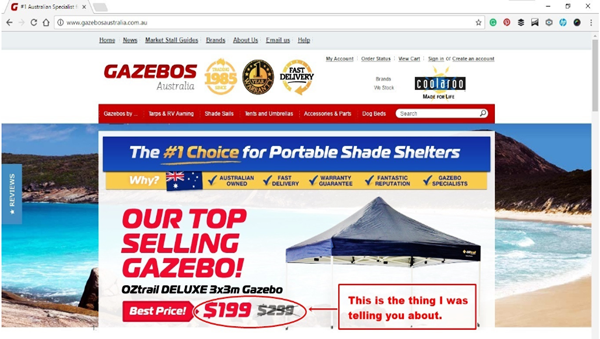
This is the same image with added red circle and arrow, emphasising the price.

- Use the text tool to add comments on areas of the screenshot. You will agree that words and images together make a clearer message. Here is another take on the same detail from the Gazebo website. This time, some text is included in the message.

In this way, it is not only obvious that you want to attract the attention to the price, but it also conveys a message about what you want to be done.
- Your screenshots should not be bigger or wider than 655px. Don’t make people scroll up and down to see your entire screenshot. It will minimise the convenience and that’s not what you want.
- It is advisable to use a filename that is directly related to the topic so it’s easy to understand what the screenshot is about. Nobody wants to think What am I clicking on here?
When your coworkers and employers go back to check on your issue one more time, it will be of great help if the screenshot names are intuitive. It prevents the rain of thousand clicks that you have to go through to open every single file to find out what’s in it.
- Double check your file name for spelling errors. It is simple – they look bad. When they look bad – you look bad. Therefore, don’t be lazy and check the file names one more time before presenting them to other people you work with.
As an online worker, knowing the importance of using screenshots would make any client think that you’re the type of professional who would go the extra mile just to make sure that everything is clear between both parties when discussing a project.
Now Let’s Take Screenshots
Step 1: Download the Awesome Screenshot Tool For Your Browser
Watch the video below to learn how to find a screenshot tool online and get it installed in your computer.
Step 2: Try Out Your Screenshot Tool
When you click on the Awesome Screenshot icon at the top right corner of your browser, you’ll see a few options on how you can take a screenshot of the page of your choice:
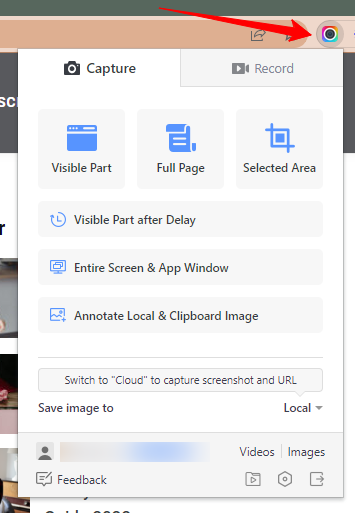
The choices are pretty self-explanatory, but here are a couple of words about them, just in case. The most commonly used option is Capture selected area. Let’s give it a try.
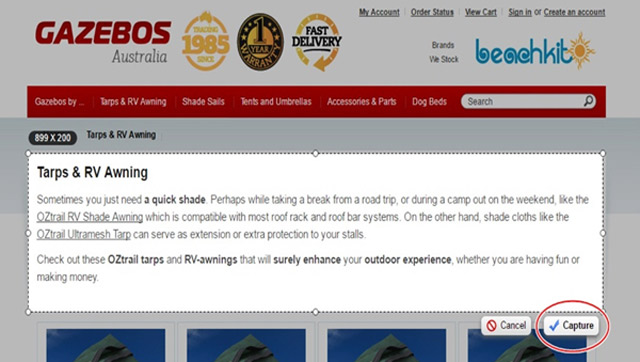
Once you’ve chosen a specific area you’d like a screenshot of, click the Capture button.
This will now bring you to a new page where you can edit your screenshots, highlighting important things, and even adding notes by using the tools below:
Happy with your annotated screenshot? Click Done and choose from these saving options:
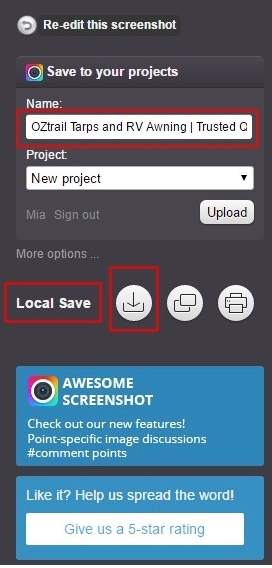
You have the option to save it locally, on your computer, or to your Google drive.
Other options, a but less commonly used options include:
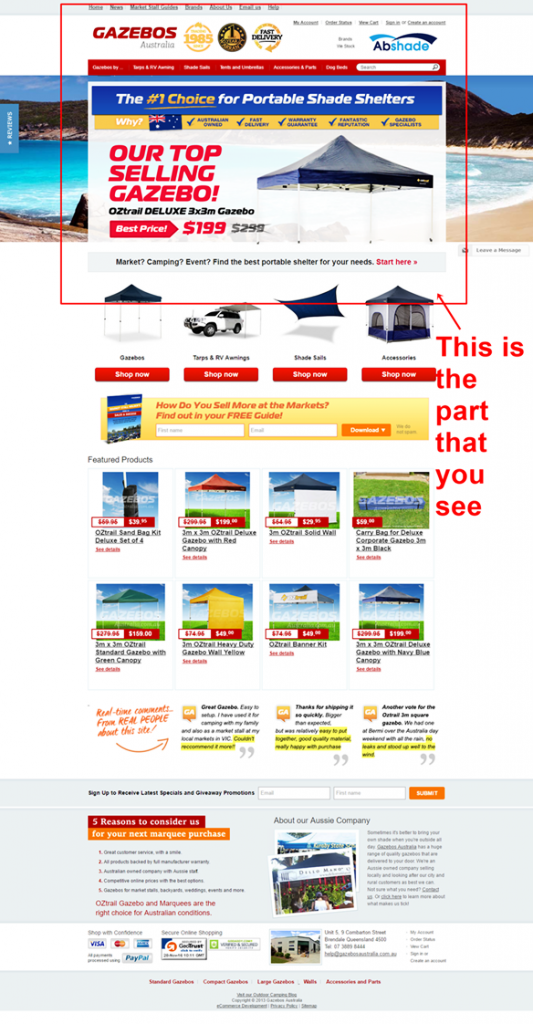
Capture visible part of page. In most cases, your computer screen is not as big as the website itself is. There is always, at least a little bit down there to be scrolled. This option will omit that part of a website in the screenshot.
It will only show the part of the website that you can see in the moment you take the screenshot. Also, this option of the Awesome Screenshot will exclude the browser frame from the image, as well.
Here is how it looks like:

There is also the option of Delayed capture. From the moment you choose this option, a timer will appear in the upper right corner. You can set it to 3 or 5 seconds in the Options.
Here it is:
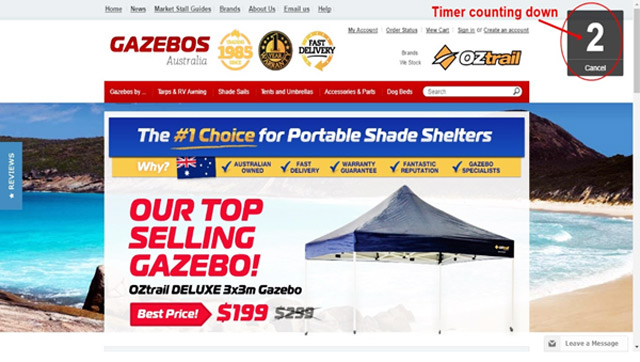
After the countdown, a screenshot will be taken. You can use this time to open an additional window, place your cursor at a certain position or something entirely different.
You can also Capture entire page. Contrary to the function Capture visible part of page, Capture entire page will make you a screenshot of the page regardless of how much of it you can see in your browser.
This is how it looks like:
Awesome Screenshot also allows you to upload other images from your computer and alter them using this app. This is precisely what the Select local image option does.
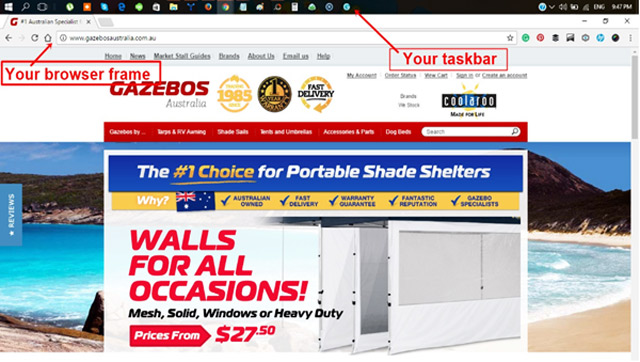
Capture desktop option will literally take a snapshot of everything that is on your desktop at that point. This includes the browser frame, your cursor and the lower taskbar if it’s shown on your desktop.
Step 3: Take Note Of The Following Guidelines
Taking screenshots isn’t as simple as capturing things on your screen. There are also important things to remember to make sure that your screenshots will help you communicate effectively and explain things clearly.
- If you only need to show a small portion of your screen, there is no need to capture the entire screen including the menu and browser. Only capture important information.
- Highlight areas in the screenshot by using the arrow and circle tools.
- Use the text tool to add comments on areas of the screenshot
- Your screenshots should not be bigger or wider than 655px
- It is advisable to use a filename that is directly related to the topic so it’s easy to understand what the screenshot is about.
- Double check the file name for spelling errors.
Use Screencasts for Fast Knowledge Transfer
If a picture can paint a thousand words, then a video sure says one hundred thousand more! No wonder that videos are one of the most effective techniques used in both learning and communication.
This is why screencasting has become one of the most important tools that business owners working with Virtual Assistants (VA) use today. Therefore, if you want a long-term and successful career as a VA, screencasting is a skill that you should learn.
New to screencasting? Don’t worry, this lecture will guide you on what a screencast is, what it does, and how it can help you become a more effective eCommerce virtual assistant.
Still, most of us are not so thrilled by the idea of making videos that include our faces and speaking voice. It is time to put that dread behind you. We will help you with that, as well. In time, you’ll forget you ever had issues making a screencast.
First, we start from the basics.
What, Exactly, Is a Screencast?
A screencast is a digital recording of computer screen output, also known as a video screen capture, often containing audio narration. Read the Wikipedia article here to learn more.
As a online worker, especially Virtual Assistant, you’ll either be making screencasts for others or perhaps you’ll be on the receiving end as the viewer. The idea is that you record your voice talking about something happening on your computer screen.
Here are a few links to instructional screencasts to give you a better idea:
A screencast can be the best communication method to guide someone when using new software or a website or even when attempting to explain how to fix a complex problem.
While screenshots can do a pretty good job at illustrating a static screen and making instructions a whole lot clearer, a video of can do the job better if you need to show interaction with a webpage.
As a Virtual Assistant, recording screencasting should be something you are familiar with like the back of your hand.
Why Do Virtual Assistants Need to Use Screencasts?
1: Better Communication
Communication is always better when done as naturally as possible – even if it’s just through computers and other devices.
Don’t confuse screencasting with video calls!
A video call happens in real time. Your client calls you and you pick up and then you discuss the project while seeing each other on the computer screen. A screencast, on the other hand, is a recording of computer screen output. How does this help in communication?
Timezone problems will be a thing of the past. If you’re working with people from different time zones, screencasting will work wonders in keeping the communication smooth for both parties.
If your boss has a new task for you or a few comments/feedback on work you’ve done, they can simply record a screencast of it.
Writing is slower and sometimes, less precise. Not everybody is good with written words. But, every VA knows how to talk. A quick screencast is more detailed, precise and less time consuming than a written description or instruction.
2: Fast Feedback
Screencasting can also be a highly effective tool for giving feedback as it allows your employer to provide comments while showing corrections on the computer screen.
If your boss has a list of feedback on a project you have worked on, he can simply record a screencast of his computer screen, looking at your work, and pointing out the things you did right and those that need a few revisions or improvement.
Now, this screencast of your employer’s feedback will be available for you to watch as soon as you start your shift tomorrow. Wouldn’t it be easier to understand a feedback video instead of just a list of comments?
You can turn the tables and provide your employer with a screencast of the changes you’ve made to their online store.
3: Flexibility
You can turn back time. I mean, press rewind. That’s the best thing about a screencast. When you didn’t get something the first time, you can always rewind and go back and watch it again without having to ask your employer or colleagues to repeat the message.
4: New Employee Orientation
Some employers like to welcome a new member of the team by providing a visual orientation.
This not only shows that your client is happy to have you onboard, orientation screencasts are also a great way to brief a new member of the important company operations, processes, rules, and regulations so that you are not completely clueless on your first days at work.
Seeing and hearing your boss actually gives a nice, personal touch to the entire orientation process. It makes it easier to connect and relate to the company you are about to become a part of.
If you end up in a management position within your company, keep this tip in mind.
5: Easy Training
Another useful use for screencasts is training materials. This usually follows after the orientation. When you’re new, and will have to learn some processes or use tools that are completely new to you. That’s when a screencast comes to the rescue.
Some employers prepare training materials and your boss might have a series of screencasts for you to watch to get familiar with the team’s processes.
Haven’t used Photoshop before? A screencast of a beginner’s guide to the basic functions on Photoshop will definitely help you out.
New to a certain eCommerce platform? A screencast or a virtual tour on the entire platform will help you get familiar with it.
6: Troubleshooting
If you are having trouble using software or getting errors on a website, a screencast that shows these problems and how they happen will definitely help make troubleshooting easier.
Once the problem is sorted out, your boss can make another screenshot on how to solve it. And everyone in the team can refer to this screencast if they ever encounter the same problem.
You can also do your own screencast to send your boss. Let’s say, your boss sends you a new task to work on but there are instructions that confuse you, websites that aren’t loading, and software that is completely new to you and would like more explanations for.
A screencast that shows all of your comments, questions, and basically all of your concerns will make it easier for your boss to know what kind of help you need to be able to accomplish the task faster.
7: Sharing Ideas
Screencasts are a gem of a tool for eCommerce employers. They can record orientation videos, tutorial videos, and feedback videos and save them all for the new members of the team to watch and rewatch anytime.
This saves both time and effort because your employer won’t have to repeat himself every time a new virtual assistant joins the team.
You can also share your knowledge with your teammates through screencasts. If a few members of the team are having trouble using software that you use on a regular basis, you can record a screencast for your teammates and explain it!
And when another virtual assistant ends up needing the same help, all you have to do is share the same screencast you’ve shared your other teammates.
Are You Feeling Shy?
First thing you have to understand before you read any further:
You SHOULD NOT avoid making screencasts.
For the reasons listed above, you can tell that screencasting is a skill that will impress your employer and colleagues. It may not be a minimum requirement for gaining employment, but it will certainly set you apart from other people who don’t have this valuable communication skill.
Still, you’re not thrilled about it. We get it.
While everybody loves getting instructions via screencast, not many people love being on the other end of that camera. There are mainly two things that people hate about screencasting:
- How they sound
- How they look
Luckily, you can change both of these things.
1: Your Own Voice
The very idea of recording your voice or face will make the most of us cringe. Have you ever heard a recording of your own voice? Awful, right? Well, maybe to you. Others think it’s just fine.
That’s how everybody else hears you all the time. Here are some scientific answers to the question why we hate our own voices. Think about it for a moment. Listen to a recording of a family member or a friend. You don’t think their recording is horrible, do you? Well, that’s how others hear you. So, it’s all in your head.
You sound just FINE.
If you just cannot get over it, there are things that you can do about it. But you are not going to like it! It involves A LOT of recording. Even worse – you’ll have to listen to it over and over again. Here’s why:
First, when you get used to your own voice, it will not sound so bad after all. Science proved this!
Secondly, you can identify the exact things you hate about your voice and work on them. Hate your high pitch? Lower it. You use a lot of ahem, so, well, like? Practice getting rid of those.
The sounds you make are not the only ones that can be heard on your recording. Mind the background noise. Make sure there are no animal sounds, kids crying, people talking or yelling, or even traffic.
Another thing that you might be worried about is your accent. Now, that’s definitely nothing to worry about. Did you know that one of the most famous and renown experts in English language, David Crystal wrote a book on English LANGUAGES? Listen to him talk about it. You’ll feel better!
Yes, that’s right – plural! English is so diverse and rich these days that there is enough room for all the accents in the world.
2: Your Appearance
Surely, you may want to make screencasts in which your face is not shown. They are nice and useful, but they are not as nice as the ones that feature your face in the corner, why? Simple – your face actually showing makes it more personal.
Leave all your worries about how you look. Did your job description contain words like Model-like appearance necessary? Or Resembling Adriana Lima is obligatory? No?
Well, there’s your clue. People hire you because of your expertise, competence, strong work ethic and the fact that you make awesome screencasts with your face showing.
You will feel a lot more confident and a lot better about yourself, if you know your hair looks tidy and your face is clean. This goes double for the lipstick on your teeth and the spinach between them. Check quickly for those things.
It’s not just about you, it is also about the light and your background. Make sure there’s nothing weird behind you. A mirror, funny looking poster on your wall, clothes or other stuff scattered around your room – all these things need to go away.
Good lighting helps. If your light source is behind your back, nobody will be able to see you well. It is best if you are facing your source of light.
3: Screencasting Tools
Now, it’s time to decide which screencast tool to use. This is going to be both easy and difficult. Easy because there are a lot of screencasting tools available on the Internet. And difficult because out of all the options available, how would you know which one to choose?
Each of these screencast tools has different features, usability, limitations, and compatibility. Choose one that you think will work best for you and then practice with it for a few days.
For this lecture, we’re going to take a closer look at two of, what we think are, the best options for eCommerce virtual assistants like yourself.
4: Screencast-O-Matic
Screencast-O-Matic is a great screen and webcam recorder that lets users capture video from the computer screen and share it with other people. All you need to do is create an account and you can start recording right away with a quick click on the Start Recording button.
Other than the Java(TM) Plug-ins that need to be installed on a computer for it to work, there is really nothing else you need to install on your computer because the tool itself is browser-based.
There are also editing and video enhancing features available but only on the Pro version that you can get for $15 per year. These are going to be very useful especially when you need to enhance your videos and add more functionality.
You can check out the intros to FREE and PRO versions of Screencast-O-Matic and see the difference for yourself. Want to give it a try?
Here is a screencast made for beginners like you on How To Use Screencast-O-Matic.
5: Jing Project
Jing Project is a FREE and convenient tool that you can download and use without any limitations. Mainly, it is a screencast tool. But it can also be used for screenshots. Remember that Jing videos are limited to 5 minutes per screencast.
Once you make your screencast with Jing Project, you get to upload it to screencast.com and share the link in any way you like. There are the free and the Pro option and they differ mainly in storage size and monthly bandwidth.
Naturally, Jing offers a lot of written and video tutorials that you can use to learn how to make the most of this awesome tool. It’s easy to master and convenient to use. Just what a beginner in this sort of work needs.
In Summary
Screencast is a powerful way of communication and making interesting and informative screencasts is a very desirable skill for a virtual assistant.
To be able to do so, you need to overcome your shyness in front of a camera and do your best to master this skill. You can achieve this with practice.
The benefits that you get are worth it. Screencasts ensure:
- Better communication
- Fast feedback
- Flexibility of communication
- Easy new employee orientation
- Easy training
- Clever troubleshooting
- Effortless idea sharing
For starters, try Screencast-O-Matic and/or Jing Project for your first projects and you’ll probably stick with these two excellent apps.
Frequently Asked Questions
1. What is a screencast?
a. It is a digital recording of computer screen output, also known as a video screen capture, often containing audio narration.
b. It is when your boss glances at your computer screen over your shoulder while you’re working.
2. A screencast can be the best communication method to:
a. guide someone when using new software or a website
b. explain someone how to fix a complex problem
c. make complicated instructions a whole lot clearer, especially if you need to show interaction with a web page
d. All of the above
3. What are the advantages of using screencasts to help you become a more effective eCommerce virtual assistant and why you should know how to use them?
a. If you’re working with people from different time zones, screencasting will work wonders in keeping the communication smooth for both parties.
b. Screencasting can also be a highly effective tool for providing fast and precise feedback on a project you and your team have worked on, as it allows all team members to provide comments while showing corrections on the computer screen, and then continue working independently.
c. You don’t have to bother your colleagues to repeat the message it you didn’t understand it at first. Instead, you can always rewind the screencast, and save everyone’s precious time and energy.
d. Some day, your employer may ask you to brief new members and to prepare training materials to help your new colleagues to get onboard and get familiar with your company’s processes and tools.
e. All of the above and much more!