
To be a successful online marketer, one needs to produce good quality, interesting articles for people to read and search engines to index.
Your task as a copywriter is to create enticing, useful content that incorporates a wide array of sources and materials. What this means is that you are NOT just writing a regular text-heavy essay.
Instead, people prefer to read articles that incorporate photos, illustrations, videos, quotes, tweets, infographics, charts, statistics, factoids, photo galleries, testimonials and more.
Adding these components to your blog content makes it far more interesting for both readers and search engines.
Imagine an article about a pop star without photos and quotes! Would you find it fun?
Or to illustrate it further, just take a glance at the layout of the following blog posts (none of them being the worst or perfect examples). Which of them would you rather read:
- Support: How Do I Intstall The USB Wi-Fi Adapter To My DVR+ CM-7500? [sic]
- Things You Should Do Before Drilling a Lock or
- Electric Bikes & Retirees – The Top Reasons to Ride as You Age?
Let’s guess: you find the last one the most appealing, right? The first example even contains a typo in its headline (‘Intstall’ instead of Install’). You see?
In order to be successful with your writing work, you’ll need to become a master of these three skills:
- Quality writing – write well using good grammar, spelling and construction techniques;
- Selling online – sell ideas and products when you write;
- Creative presentation – be creative with your ideas, pitching new concepts and incorporating many types of media into your content.
Having learnt how to come up with numerous fresh ideas for your blog posts in the blink of an eye and how to plan your blog articles thoroughly and effectively, now it’s time for you to upgrade to the next level of the blog post writing process.
Namely, the aim of this lecture is to teach you, step-by-step, how to write blog posts for an eCommerce store to aid the marketing efforts and to improve customer engagement and reach.
In other words, you’ll learn how to properly structure your articles for the web as well as how to format the content appropriately to make it more appealing and easily readable.
Let’s begin with the overall basics about structuring content for the web i.e. tips on how to write a superb blog article that gets read and possibly sells a product as a result.
Structuring Your Article for the Web
It is important to keep in mind that articles are structured differently for the web than they are for school or university. In this subsection, we’re going to present the main guidelines, which we’re going to elaborate further on throughout the lesson.
It’s true that every article should have an introduction, body paragraphs and a conclusion.
However, for online marketing purposes, the paragraphs are much shorter to make it easier to skim-read and the points are usually more emphatic and controversial in order to be interesting.
The introduction should set the scene and create some intrigue. It should encourage the reader to read further!
The basic rule of thumb with paragraphing is to use one idea per paragraph. It’s also advisable to place your point in a clear-cut sentence in each paragraph so that it’s obvious both to you and the reader.
Furthermore, the appropriate style for the audience and language variation, as well as consistent capitalisation go without saying.
The conclusion should always contain a strong call to action, a final call for the reader to either buy a product, learn something else from you, or perhaps make an enquiry.
This is just a summary of the main points we’re going to discuss further in the lesson. It’s meant for you to get the gist at the very beginning before we dive into every single detail.
Now, let’s take a closer look at all the core components of a decent blog post.
Essential Elements of Your Blog Post
Suppose you’ve already carefully chosen your topic, come up with effective related keywords and decided on the blog content format. We were talking about these in the previous lesson Blog post basics: planning, remember?
Next, you have to consider the basics.
In the subsections to come, we’re going to deal with the key elements that make up every successful blog article:
- A compelling headline
- An interesting introduction
- A persuasive body
- A tempting conclusion, and
- A strong call to action
So, let’s dive deeper into each of them.
A Compelling Headline
As you probably already know, a headline is the first part of a blog article the readers will see. Your primary goal is to make sure it’s NOT the last and the only piece of your content people will read.
It should tell the readers what they will get in exchange for the time they spend reading your article.
Which of these would you rather click on:
Rules for matching shoes and bags
or
17 Need-Now Fabulous Shoes & Bag Combos to Accent Your Look With?
Not difficult to guess since the first option looks quite dull, doesn’t it? You got it.
A captivating headline is what makes the reader decide to read the content. Being so powerful, you should put considerable effort into creating it.
Thus, evoke a sense of mystery and urge to make the reader think about the topic and want to know more so desperately that they click to find out what they want immediately.
You wonder whether to write your headlines first or last? Here’s the win-win strategy!
It is advisable to create several working titles to keep you on the right track before you start writing. Then, when you’ve completed the article, choose the most appropriate one and tailor it to perfectly fit your content.
Our lesson, The art of the headline, contains all the details you need to know about:
- How to craft working titles
- How to create magnetic headlines
- What their key features are
- Alluring headline examples, templates, and much more
Feel free to refer to it while mastering this both skill and art.
Being satisfied with the form of your headline and the message it conveys is awesome but here are some technical issues you should NOT neglect.
Use Consistent Capitalisation in Your Headlines
It’s important to use consistent capitalisation when writing your blog headlines and subheadings in order to appear professional.
There are different styles and rules when it comes to capitalising headlines, but the most commonly used ones are to capitalise:
- All major words, that is to say:
- Noun (Article, Information, Content)
- Pronouns (Ours, Her, It, Anyone)
- Verbs (Is, Are, Learn, Write)
- Adverbs (Effectively, Fast, Successfully)
- Adjectives (Persuasive, Compelling, Easy, Important)
- Subordinating conjunctions (Because, Although), as well as
- The second part of hyphenated major words (Carbon-Neutral)
- All words consisting of four letters or more
This leaves only minor words of three letters or fewer like conjunctions (and, or, nor, but), articles (a, an, the) and prepositions (as, at, by, for, in, of, on, per, to) which need NOT be capitalised unless they are the first words in a headline.
It’s either up to you or your employer to choose the rule and stick to it, that is to say, apply it consistently to all heading levels (H1, H2, H3, etc) throughout all blog posts within the store.
Let’s check out these rules applied to the following pairs of examples:
- 7 Simple Ways To Keep Foot Pain At Bay (incorrect – all words capitalised)
- 7 Simple Ways to Keep Foot Pain at Bay (correct – ‘to’ and ‘at’ are minor words – prepositions which are not at the beginning of the headline so they should be in lowercase)
- How to Know When it is Time to Buy New Dancing Shoes? (incorrect – ‘it’ is a pronoun and ‘is’ is a verb and they should be written in capitals)
- How to Know When It Is Time to Buy New Dancing Shoes? (correct)
- Knowing Where to Turn to When You Want to Pair Shoes And Bags Perfectly! (incorrect – the second ‘to’ even if it is a minor word should be in capitals because it’s a part of the verb, whereas ‘and’ shouldn’t be capitalised since it’s also a minor word – coordinate conjunction)
- Knowing Where to Turn To When You Want to Pair Shoes and Bags Perfectly! (correct)
Got it?
Once you’ve come up with a perfect headline for your blog article and decided on the capitalisation rule to follow, the introduction which will draw your readers deeper into the content is your next concern. Let’s see what you can do about it.
An Interesting Introduction
Your introduction is as important as the headline. Before we start explaining why just briefly compare the following blog post-introductory parts.
Our first example is Manual vs. Electric Lock Picking from CLK Supplies.

You probably wouldn’t be attracted to a blog post starting like this one. There’s neither reader engagement nor any smooth transition to the body paragraphs.
Also, there are no specific reasons why anyone (or even the target reader – a locksmith) would want to read this piece of content and how exactly they could benefit from it summarised in the introduction.
No matter how compelling the headlines are, which of these articles would you continue reading?
After noticing the difference between our examples you get the importance of good introductions so we can move on to their basics, right?
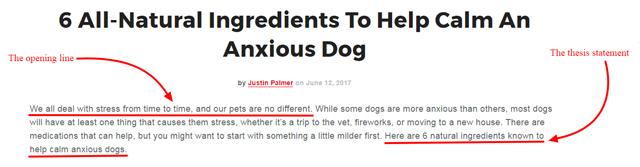
The very first sentence of your post is called the opening line. You should use it to the fullest to capture the attention of your readers so that they will stay and read on until they finish the post.
Apart from catching people’s attention, a good introduction must also summarise the purpose of the article. It should be done in the last sentence of your introduction a.k.a. your thesis statement.
Here’s an example from iHeartDogs: 6 All-Natural Ingredients To Help Calm An Anxious Dog.
Now, please take a glance at another example from Bonnie & Clyde: Diet And Nutrition For Your Dog: What Is Essential?
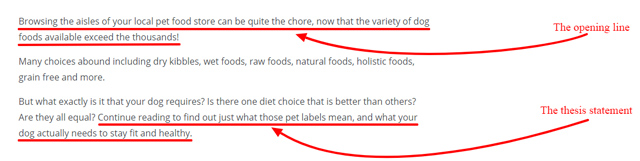
You see how they make the readers agree with what they say in the first sentence thus drawing them into reading more? The purpose of each article has also been clearly stated in the last sentence of their introduction.
You can achieve that if you know exactly what your body paragraphs consist of. But how can you possibly know that when you’ve just started writing the introduction?
Here’s the secret.
Similarly to headlines, although being the first to get read, introductions should be the last to be written.
Furthermore, introductions MUST have a HOOK for the reader to stick around, such as an anecdote, a quote, a question or any similarly intriguing component that will grab your readers’ attention and encourage people to read further.
Here are 10 brilliant examples of how to open your next blog post with a bang. Check them out.
You see?
You’ll gain more detailed knowledge of all the elements of a successful introduction if you refer to the sources suggested below. They’re abundant with great examples, too.
Do not hesitate to refer to a simplified guide on how to write an introduction with several accompanying effective examples and another useful article that can help you learn how to write irresistible blog post introductions.
You may also want to read Neil Patel’s ultimate guide to writing blog post introductions or check out these examples of how a stunning introduction helps you connect with your reader.
Enjoy your reading!
…
Done? Great! We can move on now.
Another crucial constituent of every blog post is its body. Let’s analyse its main features.
A Persuasive and Coherent Body
Anyone can write a factual article that teaches the reader something new. However, the magic occurs when you can write an article that the reader actually wants to read and then takes action based on what they’ve learned, as you already know.
In writing the body of your post, make sure to include the ‘what’s in it for me’ (WIIFM) element for your readers. This could be several benefits, useful information, or facts about your topic. In other words, you’re supposed to address your readers’ concerns and needs in great depth.
Think about specific topics you’ll discuss in each subsection. How? Let’s see.
If you are going to discuss a product, for instance, you can write a review that tackles both sides of the coin. The perspective of your customers and you as a business is one concept that you can write a post on.
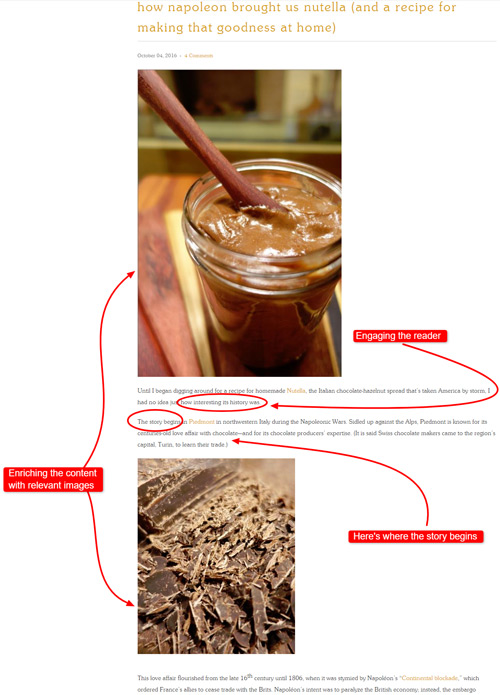
Then, if you are writing about selling wines, for example, it is a good idea to use a storytelling approach that discusses the history of the top wines in the eCommerce store you work for. Not only does this make the blog post interesting and informative but it is also entertaining at the same time.
Here’s an example of the storytelling approach in use (although it has nothing to do with wines): How Napoleon Brought Us Nutella from Earlywood. Go ahead – check it out.
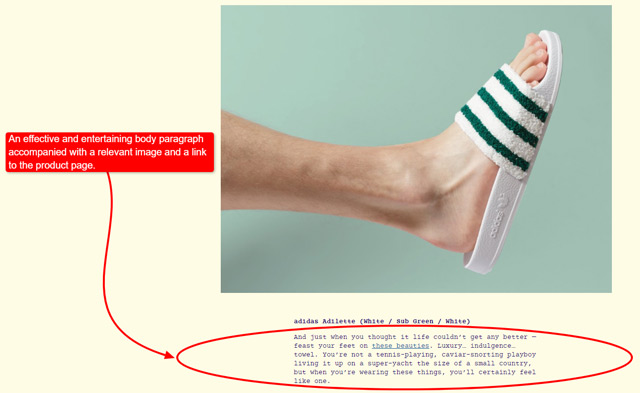
Here’s another example of a relatively interestingly presented and entertaining content within a body paragraph, Pica – Pics: Sandals taken from OiPolloi. Although there’s much room for improvement in this article, the focus here is on the effect of this very paragraph accompanied with a relevant image and a link to the product page.
One of the key factors to remember when writing the body of your post is to make it matter to your readers.
Also, remember to include relevant keywords both in the body and in the headline of your post because that will enhance the store’s search engine traffic. However, beware of keyword stuffing!
You’ll find out more useful information on all these secrets of fantastic content and incorporating keywords in it if you follow the links to our lessons Use effective, persuasive language and Successful keywords research.
Last but far from the least important part of your article is a conclusion. Here’s why.
A Tempting Conclusion
The central purpose of each blog post part is actually to get the next sentence read.
Congratulations! You’ve made your way all through to the final part. An engaging conclusion is close to the end of your writing journey, but it’s still NOT the end.
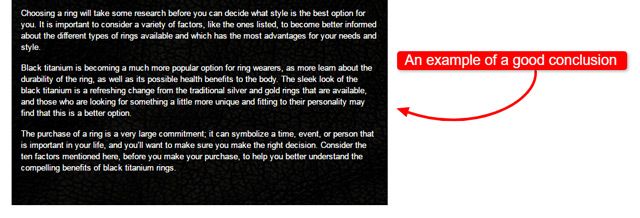
Take a look at a good example of a blog post conclusion within Top 10 Reasons Black Titanium Rings Are Compelling from Titanium Buzz.
Here’s another decent example of a concluding paragraph of Dog Massages: Top Techniques You Can Do At Home – Canine Therapy from Bonnie & Clyde.

Now is the right time to make your reader want to perform an action based on what they’ve read in your article and the final invitation follows in your CTA (which may also be and usually is incorporated in the conclusion).
Look at these examples to see how it should be done.
Conclusions in the following two example articles, Bridesmaid Style: Mix. Match. Love. and Styles So Nice You’ll Wear Them Twice, have been taken from Modcloth.


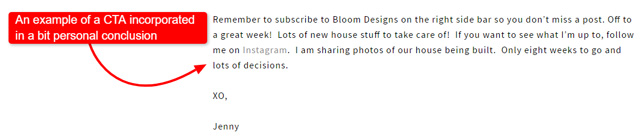
Another example of a CTA incorporated in a bit personal conclusion is from Bloom Designs’ Rainbow Bars.
In a nutshell, sum up your readers’ learnings and make them act right away! If you do this properly, your audience will come back for more.
Now, let’s refer to basic guidelines when it comes to creating powerful CTAs.
A Strong Call to Action
A compelling call to action (CTA) is a fundamental element of every blog post. As its name suggests, it’s urging people to take an action.
This need NOT necessarily be to buy a product (so-called ‘hard conversion’) but to take some steps that will later convert a reader to a lead and even a sale (known as ‘soft conversion’), such as to:
- Download a free e-book
- Subscribe to a newsletter
- Fill in an enquiry form
- Reach out to a store’s customer service team
- Leave a comment or share a post and so forth
The CTA should be compelling enough to get the reader to act immediately. They should click through to engage further with the website.
If the action is not taken immediately, it probably NEVER will be and the entire opportunity is wasted. A visitor will just remain a visitor and not generate a lead or a sale.
The CTA is the link between the visitor and a lead.
On top of that, a good CTA empowers a copywriter (you) to strengthen the connection between an online store and its potential customers. It also increases interactivity.
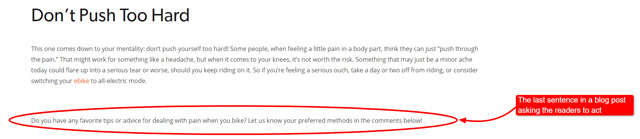
This part of your blog post is usually (but not necessarily) the very last sentence where you ask the reader to act, which could be in the form of a comment, a social share, a like etc. as shown in the example below No More Knee Pain – Six Tips for Safer Cycling taken from Evelo.
Similarly, CTAs can be placed throughout the content as done in Moosejaw’s Layering Guide below.

Writing a compelling call to action encourages readers to engage with you and other readers, making your blog post alive and pleasing to the eyes of the search engines at the same time. (By following the link provided, you’ll learn all you need to know about creating fantastic CTAs.)
You think you’ve finished the whole process now? Well, you’re wrong. It’s not the time for a sigh of relief yet.
Why? Because you still can and have to enrich your content to dazzle your audience and drive more traffic to the blog. So, keep reading to find out how.
Including Additional Resources
We already mentioned you should forget about regular text-heavy essays you used to write at school, right?
What’s more, remember to spice it up a bit so as to add value to your content. Here’s how you can easily achieve that.
Adding Links to Your Blog
It is not an exaggeration to state that the entire concept of the Internet is based on hyperlinks (abbreviated to ‘links’). The very first web pages were created with hyperlinks, enabling the reader to ‘jump’ from one digital page to another one.
People use those links to discover more information, as does Google. Multiple hyperlinks are precious for every blog post. Not only do they add variety to the content but they boost the store’s search engine ranking. Thus, don’t hesitate to include them in your articles!
There are two types of links you can use in your blog:
- Internal/inbound links or links to other pages within the same online store (e.g. product pages, or other blog posts that are relevant to your new post), and
- External/outbound links to references you’ve used in your post (links to other websites, other companies, forums, comments, surveys and anything else which is highly relevant to the content).
Make sure to have both types of links in each post you publish to increase your blog’s credibility and to make it search engine-friendly. You’ll find out why and how as soon as you learn how search engines evaluate different links.
Links to the store’s products help Google find their products, thus also helping their customers.
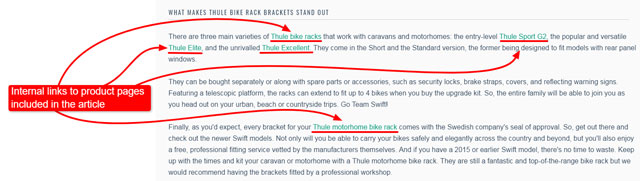
Therefore, there’s no reason why a link to one of the store’s products, pages, or something else related to the store can’t be included in an article just as in our example below. Don’t you think so?
Here’s another example of inserting external hyperlinks to the credible sources in an article.

However, when inserting external links, always link only to reputable websites and double-check whether the link works before you include it in your article.
You don’t want to send your customers to dead websites or pages with malware, do you? It would seriously damage any store’s professional reputation.
What’s more, don’t include links to products for the same keyword phrase over and over again because you’ll get demoted for spam. For example, don’t always link anchor text ‘market stall’ to a product in Gazebos Australia. Instead, link to the product using a variety of words and make sure the link is relevant to the story.
Read the following short articles to learn more about different types of anchor text and what it can do for your SEO:
What else can help your article become more vivid and fetching? Top-quality images, of course!
Adding Attractive Images
A simple and easy way to enrich your blog article and make it more dynamic is by adding various multimedia content, most popular of which are images.
Here’s an example of Williams Sonoma’s simple yet media-rich content with a high-quality relevant image included and a video tutorial presented instead of detailed written ‘how-to’ instructions.

Effective, isn’t it? But where do you find all those attractive relevant and free images?
If you are to discuss a product that is sold in an eCommerce store you work for, it is essential to use the photos that they already have. You may also request from the suppliers a copy of the best image that you’d like to include in your post.
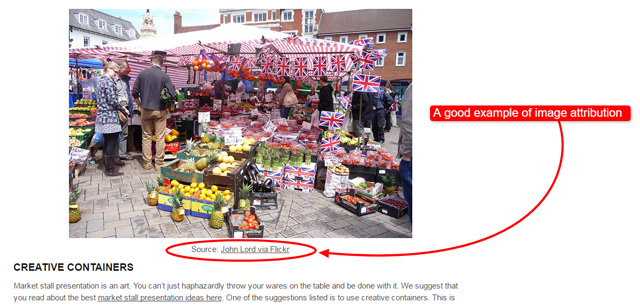
Similarly, you may search and use photos/images from Creative Commons. Just don’t forget to use proper attribution and to link back to the originator and owner. Also make sure you understand their license definitions.
Include a link to the exact location of the image. For instance, do NOT link to a Flickr account only, but to the exact URL of the image, so it can be found again on that person’s Flickr account.
Here’s a good example of proper image attribution from Gazebos Australia for you to check out.
Apart from knowing how to find, save and use good images (follow the link to learn that), it’s highly advisable to double-check copyright restrictions of the images you’ve used. You don’t want to get sued for infringing copyright, do you?
In addition, don’t forget to create ALT tags for those outstanding photos when you upload them onto your blog. ALT tags are used to describe photos/images on web pages to make it easier for search engines to ‘read’ them. You’ll find more relevant details in the sources we linked to.
Also, refer to our lesson about proper image attribution to learn more.
What’s more, here’s Buffer’s complete guide to creating awesome visual content. You’ll find out why it’s so important, what types of visual content there are, best tools for creating them, as well as tips on making visual content people will love.
Once you’ve included all the necessary details in your article to make it shine, you just need to take care of good formatting. Read on to find out what exactly you should do and why.
How to Format Articles for Easy to Skim-Reading?
People do not read online. They mostly skim or rarely scan. This is a fact that is backed up by many eye tracking studies.
What exactly does it mean? It means that people’s eyes tend to glance around your content and look for places to rest because it’s rare that someone is highly concentrated to read a text on the Internet from the top left to the bottom right corner.
Your task is to make it easy for them to skim the articles first before they decide to read them in more depth.
You wonder how you can achieve that ALL of your content gets read?
Besides making it valuable and enticing enough, the formatting tips and tricks presented in the following subsections will help you write better articles your customers (and search engines) will LOVE.
Undoubtedly, they’ll help you turn skimmers and scanners into readers since you’ll provide their eyes with enough places to rest within your article.
Note: Additionally, in our lesson Working with Google Docs, you can learn exactly how to apply all these formatting options while working within a Google document.
Write Short Paragraphs
Keep your paragraphs short by using 1 to 2 sentences in each one. At most, you might use 3 sentences when writing for the web. It is far easier to read succinct sentences (ideally containing up to 25 words) and brief paragraphs than to read large blocks of text.
Check out the following examples and see which one is easier to read.
Example #1
If you stand back to look at this text taken from Essential Tips to Ensure Market Stall Success from the very back of your room, the only thing you’ll see is a grey blur. Isn’t it quite boring-looking?
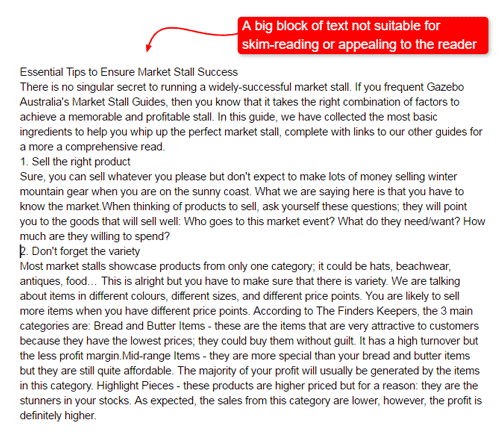
Got the gist?
You won’t see the words ‘dancing’ around the page. In other words, there’s NO rhythm, cadence, or movement here.
Now we’re going to take you through the basics of how to format and layout articles for your blog posts to make them easily readable and appealing to the reader.
Let’s apply the necessary formatting to our big block of text step by step. Ready?
Example #2
Now we’re going to break up the big block of text into shorter paragraphs.
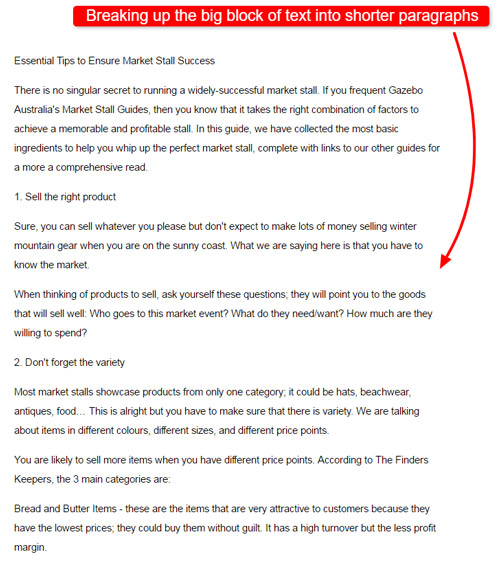
You see? It looks more appealing and easier to read now (and this is just the first step). Thus tend to write NO more than 3-4 lines within one paragraph.
Don’t forget to be concise presenting one clear idea per paragraph, as we’ve already mentioned. If you start shifting to a new idea, it belongs in a new paragraph.
There are some simple ways to tell if you are on the same topic or a new one. You can have one idea and several bits of supporting evidence within a single paragraph. You can also have several points in a single paragraph as long as they relate to the overall topic of the paragraph.
Nonetheless, if the single points start to get long, then perhaps elaborating on each of them and placing them in their own paragraphs is the route to go.
Also, make sure that the real point appears in a distinct sentence within the paragraph. If it does not, your paragraph has NO core.
Remember – if you CANNOT figure out what the real point is, your reader cannot either.
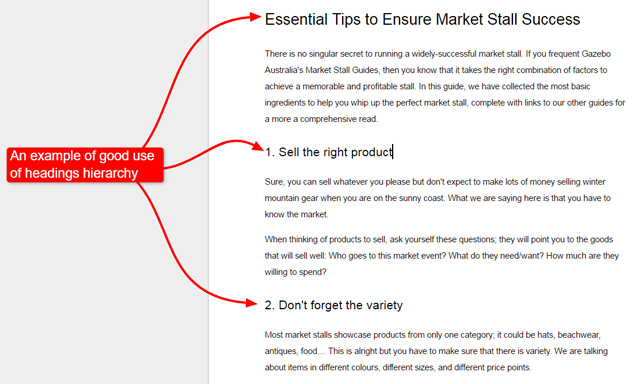
Dividing the whole article into smaller sections is highly advisable, too. Here’s where you can make good use of subheadings.
Use Subheadings
People often want to skip ahead to a particular part of your article so let them do so. Make it easy for them to find what they are looking for by using subheadings. You should refer to the headline writing guidelines we’ve mentioned before and learn how to craft compelling subheadings, too.
Moreover, use H2, H3, and H4 tags to divide up the content and put it into clearly separate sections. Pay special attention to the headings hierarchy.
There HAS to be a sequence (H1, H2, H3…) according to their importance (H1 being the most important, main heading and H6 the least important subheading) because that information transfers to a blog web page via HTML, which strongly influences the store’s web page.
Here’s our example text with a good use of subheadings:
Please, also refer to the lesson about Google Docs we’ve already mentioned for a detailed guide on how to change the styles of different subheadings.
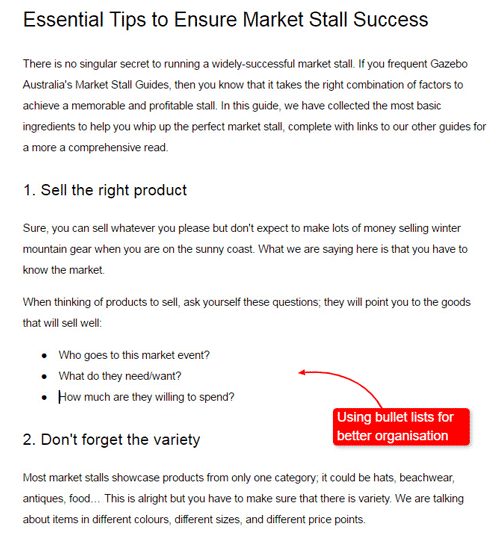
Present Information in Lists Whenever It’s Possible
Readers will often skip straight to numbered and unnumbered/bullet lists so be sure to incorporate them in your article if it is possible, at least to summarise the main points.
For instance, you can use various types of bullet points to clearly present your ideas such as tips, ‘how to’ step-by-step procedures, characteristics of a product and the like.
Doesn’t this look more organised?
We bet it does!
Ideally, your lists should contain NO more than 5-7 points.
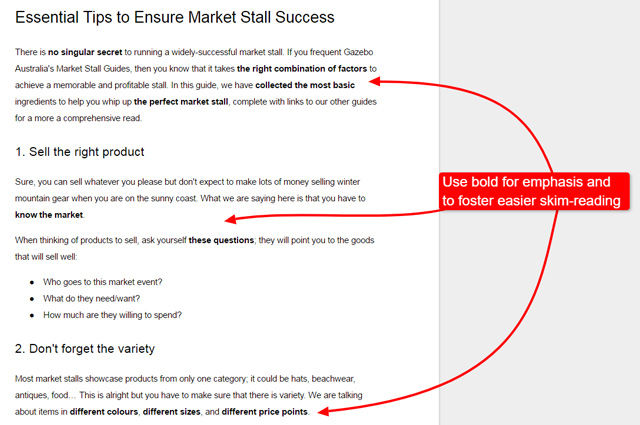
Highlight Important Chunks Using Bold and Italic
Use these to highlight what you find important. Why? Because people’s eyes often skip to bolded or italicised words. They are like a visual anchor so give the readers what they like with this.
Isn’t this much easier to read than the block of text presented earlier in the lesson?
How to format articles for easy to skim-reading?
People do not read online. They mostly skim or rarely scan. This is a fact that is backed up by many eye tracking studies.
What exactly does it mean? It means that people’s eyes tend to glance around your content and look for places to rest because it’s rare that someone is highly concentrated to read a text on the Internet from the top left to the bottom right corner.
Your task is to make it easy for them to skim the articles first before they decide to read them in more depth.
You wonder how you can achieve that ALL of your content gets read?
Besides making it valuable and enticing enough, the formatting tips and tricks presented in the following subsections will help you write better articles your customers (and search engines) will LOVE.
Undoubtedly, they’ll help you turn skimmers and scanners into readers since you’ll provide their eyes with enough places to rest within your article.
(Note: Additionally, in our lesson Working with Google Docs, you can learn exactly how to apply all these formatting options while working within a Google document.)
Write short paragraphs
Keep your paragraphs short by using 1 to 2 sentences in each one. At most, you might use 3 sentences when writing for the web. It is far easier to read succinct sentences (ideally containing up to 25 words) and brief paragraphs than to read large blocks of text.
Check out the following examples and see which one is easier to read.
Example #1
If you stand back to look at this text (taken from Essential Tips to Ensure Market Stall Success) from the very back of your room, the only thing you’ll see is a grey blur. Isn’t it quite boring-looking?Click to magnify
Got the gist?
You won’t see the words ‘dancing’ around the page. In other words, there’s NO rhythm, cadence, or movement here.
Now we’re going to take you through the basics of how to format and layout articles for your blog posts to make them easily readable and appealing to the reader.
Let’s apply the necessary formatting to our big block of text step by step. Ready?
Example #2
Now we’re going to break up the big block of text into shorter paragraphs.Click to magnify
You see? It looks more appealing and easier to read now (and this is just the first step). Thus tend to write NO more than 3-4 lines within one paragraph.
Don’t forget to be concise presenting one clear idea per paragraph, as we’ve already mentioned. If you start shifting to a new idea, it belongs in a new paragraph.
There are some simple ways to tell if you are on the same topic or a new one. You can have one idea and several bits of supporting evidence within a single paragraph. You can also have several points in a single paragraph as long as they relate to the overall topic of the paragraph.
Nonetheless, if the single points start to get long, then perhaps elaborating on each of them and placing them in their own paragraphs is the route to go.
Also, make sure that the real point appears in a distinct sentence within the paragraph. If it does not, your paragraph has NO core.
Remember – if you CANNOT figure out what the real point is, your reader cannot either.
Dividing the whole article into smaller sections is highly advisable, too. Here’s where you can make good use of subheadings.
Use subheadings
People often want to skip ahead to a particular part of your article so let them do so. Make it easy for them to find what they are looking for by using subheadings. (You should refer to the headline writing guidelines we’ve mentioned before and learn how to craft compelling subheadings, too).
Moreover, use H2, H3, and H4 tags to divide up the content and put it into clearly separate sections. Pay special attention to the headings hierarchy.
There HAS to be a sequence (H1, H2, H3…) according to their importance (H1 being the most important, main heading and H6 the least important subheading) because that information transfers to a blog web page via HTML, which strongly influences the store’s web page. (To find out how it works, follow the link provided.)
Here’s our example text with a good use of subheadings:Click to magnify
Please, also refer to the lesson about Google Docs we’ve already mentioned for a detailed guide on how to change the styles of different subheadings.
Present information in lists whenever it’s possible
Readers will often skip straight to numbered and unnumbered/bullet lists so be sure to incorporate them in your article if it is possible, at least to summarise the main points.
For instance, you can use various types of bullet points to clearly present your ideas such as tips, ‘how to’ step-by-step procedures, characteristics of a product and the like.
Doesn’t this look more organised?Click to magnify
We bet it does!
Ideally, your lists should contain NO more than 5-7 points.
Highlight important chunks using bold and italic
Use these to highlight what you find important. Why? Because people’s eyes often skip to bolded or italicised words. They are like a visual anchor so give the readers what they like with this.
Isn’t this much easier to read than the block of text presented earlier in the lesson?Click to magnify
Nevertheless, carefully choose the chunks you’ll present in bold, italics, or even CAPS for emphasis because it means that the customers’ attention should and will be attracted to those parts of your text.
Only make the keywords and customer-oriented phrases stand out.
What’s more, be mindful of overusing these formatting options! If you highlight everything, nothing will actually be emphasised.
Add hyperlinks for variety
Use links to provide extra depth and qualification of an idea as we’ve explained in one of the subsections above. Hyperlinks boost the store’s ranking in search engines because they love following links, remember?
Apart from these, they also add variety and foster skim-reading. Great, isn’t it?
So, let’s add more value and variety to our initial example (block of text).

Let’s help our readers rest their eyes on our article even more, shall we?
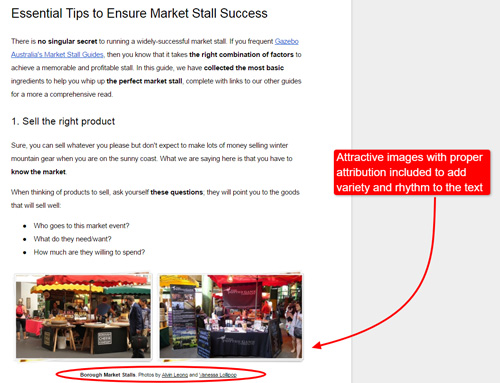
Images can help the readers rest their eyes
Images are another useful resource which can stimulate reading. We’ve talked about them earlier in the lesson but mentioned them here just to state that they’re great captivating devices to be used in your articles because readers rest their eyes on such visuals.
So far it should’ve been fairly self-evident that an audience of an online store goes mad for a great product photography. Therefore, intersperse your content with great photographs and they will love you for it.
Let’s make our example more lively and energetic with this marvellous yet so simple tip.
Applying the mentioned web usability principles when writing will make your articles easier to read, help the search engines, and improve the overall impression of the store. These are all standard copywriting skills that you should learn.
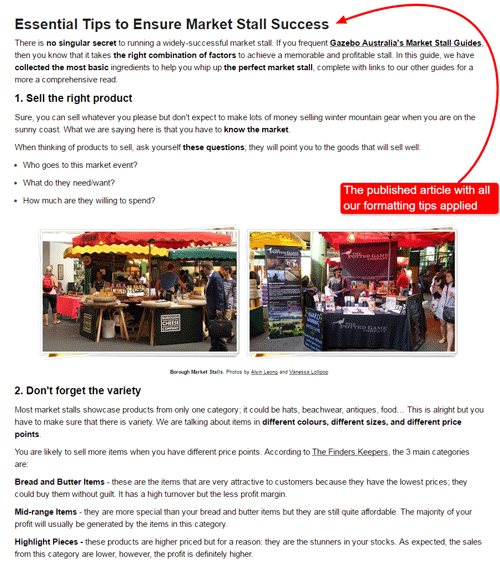
Just have a look at the changes we’ve made to our example text and added a bit more of a ‘dance’ in it with a couple of subheadings, bullet points, bold phrases and the rest.
Don’t you agree it looks much better after we’ve broken up that big block of text?
Here’s the published article with all our formatting tips and options applied:
Now you really are close to the end of the writing process. There are just a few steps to take to make sure everything’s exactly as you want it to be.
Editing and Promoting Your Blog Post Also Matters
When you’ve created a valuable piece of content enriched with various media, images, links, quotes and the like, you’d certainly want to confirm everything’s perfect and in its place before you hit that ‘Publish’ button.
After that, you’ll want as many people as possible to read and react to your blog post, right?
Here are the next steps you should take to achieve that.
Proofreading and Editing Your Content
Once you’ve finished writing the final draft of your blog article, it’s of immense importance to take the time to proofread and edit your post for all grammar and typo errors. Here are some of the most common mistakes to avoid.
Ideally, you can double-check your writing after some time if there’s no tight deadline or you may seek the assistance of the other staff members to help you proofread the final draft. You can also use Grammarly or many other different tools/spell checkers to help you.
In addition, you should pay special attention to the following while proofreading:
- Be careful to remain consistent with the language variation you use: British or American English spelling.
Learn the differences between British and American English and learn when it needs to be applied to which website. For instance, use British English for British and Australian audiences, and American variation for non-British and non-Australian audiences.
A very simple example of American vs British English is color vs colour. For American audiences, you would use ‘color’, but for non-American audiences, you would typically use ‘colour’.
- Style is another important issue NOT to be neglected in your writing.
Should you write with a more formal approach? Or should you write using abbreviations and slang? Is the style formal or casual? This depends on who you are writing for. Use an appropriate writing style for the audience and channel.
If you are writing on behalf of a large, multi-national company such as e.g. Alsco, then your writing style should be formal. On the other hand, if you are writing tips and hints on Facebook, your writing style should be more relaxed. Got it?
After polishing up your piece of content, it’s time to promote it, isn’t it? Let’s see how to do it.
Promoting Your Post
There are numerous methods to promote your blog post to get more readers onto your blog. Otherwise, there’s no point in writing it, remember?
You can use social networks such as Twitter, Facebook, Google+, Pinterest, and others to share the link to your post. If you have subscribers, you can send them email alerts whenever you publish a new blog post.
It’s vital to make it extremely easy and effortless for the reader to share your content.
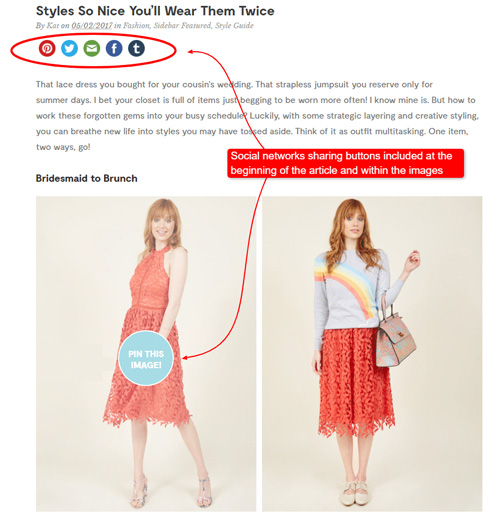
This can be achieved by inserting social networks sharing buttons in your blog article, even within the images included, as shown below.
Example #1 Styles So Nice You’ll Wear Them Twice by Modcloth
Example #2 Healthy Habits You Can Easily Fuse Into Your Day by Korwater
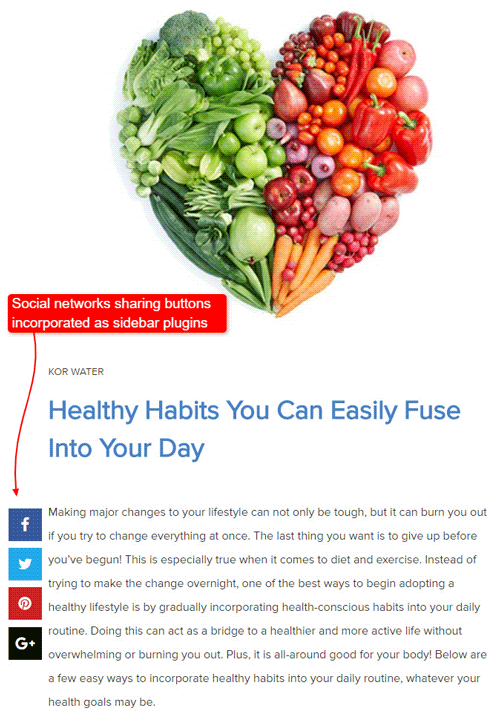
You see? Keeping these sharing buttons in the reader’s line of sight makes sharing your valuable content just a click away from the reader. Use them and avoid the hassle taking more chances for your article to get widely shared.
Whatever promoting method you choose, make sure it’s adjusted to your target audience, the online store you’re working for, and the products you’re promoting within your articles. OK?
Eager to learn even more about writing effective blog posts? Great! You should be! In the following subsection, you’ll find plenty of websites that will teach you each and every little detail about blogging. Keep reading and learning and don’t forget to enjoy it!
Suggested Reading
You can check out CopyBlogger’s 11 Essential Ingredients Every Blog Post Needs (an infographic) which is a collection of the best tips that help make good blog posts.
Comparatively, you should check out Hubspot’s How to Write a Terrible….Blog Post to see the opposite.
We’d also recommend these helpful sources:
- https://www.quicksprout.com/2016/07/25/a-step-by-step-guide-to-writing-a-compelling-article-introduction/
- https://www.incomediary.com/30-great-examples-blog-post-styling
- http://www.verveuk.eu/news/71-terrific-templates-for-blog-post-title-ideas/
- http://neilpatel.com/blog/the-uncensored-guide-to-promoting-a-blog-post/
- https://coschedule.com/blog/how-to-promote-your-blog/
- http://www.practicalecommerce.com/6-Pointers-for-Creating-Blog-Content
- http://www.practicalecommerce.com/10-Great-Retailer-Blogs
- http://www.practicalecommerce.com/3-Content-Lessons-from-Top-Performing-Blogs
- http://www.practicalecommerce.com/9-Blogging-Lessons-for-Ecommerce-Merchants
- http://www.practicalecommerce.com/Write-Better-Blog-Posts-Pyramid-Style
- http://www.practicalecommerce.com/7-Keys-to-Ecommerce-Blogging-Success
- http://www.practicalecommerce.com/4-Tools-to-Simplify-the-Blogging-Process
- https://problogger.com/how-to-craft-a-blog-post-10-crucial-points-to-pause/
- https://problogger.com/heavyweight-help-ultimate-guide-to-creating-amazing-content-that-draws-readers-into-your-blog/
- https://www.sistrix.com/ask-sistrix/onpage-optimisation/seo-basics-internal-link-optimisation/
- https://www.poweredbysearch.com/blog/7-types-of-anchor-text-you-can-use-to-avoid-a-google-flag/
- https://www.lightstalking.com/a-guide-to-creating-mood-in-your-images/
- https://problogger.com/12-tips-to-snap-readers-out-of-passivity-with-calls-to-action/
- https://problogger.com/blogging-for-beginners-2/
- http://www.poynter.org/2011/10-questions-to-help-you-write-better-headlines/140675/
- https://www.nngroup.com/articles/headings-pickup-lines/
- http://www.copyblogger.com/brilliant-writing-tips/
- https://www.webcredible.com/blog/content-usability-writing-web/
- http://mashable.com/2011/09/12/website-usability-tips/#l2GVl4SJY5qP
- http://www.copyblogger.com/copywriting-101/
- http://www.copyblogger.com/do-keywords-in-post-titles-really-matter/
- https://www.webdesignerdepot.com/2009/08/20-tips-on-how-to-write-for-the-web/
- http://www.lssc.edu/faculty/heather_j_elmatti/Shared%20Documents/MMC%202100/AP%20Style%20Guide.pdf
- http://www.digitalmarketer.com/write-better-blog-posts/
- https://blog.hubspot.com/marketing/how-to-write-blog-post-simple-formula-ht
- http://www.wordstream.com/blog/ws/2015/02/09/how-to-write-a-blog-post
- https://problogger.com/writing-blog-content-make-it-scannable/
- http://www.problogger.net/archives/2006/02/19/using-titles-effectively-on-blogs/
- http://www.problogger.net/archives/2006/02/18/writing-good-content/
- http://www.problogger.net/archives/2015/09/03/how-to-write-brilliant-blog-posts-5-tips-from-psychology/
- http://www.problogger.net/archives/2015/04/03/30-high-impact-ways-to-level-up-your-writing/
- http://www.problogger.net/archives/2015/05/22/5-basics-to-having-your-post-go-viral/
- https://problogger.com/3-growth-hacking-strategies-for-bloggers-to-quadruple-their-blog-traffic-without-seo/
- https://problogger.com/how-to-create-massive-value-content-blow-your-readers-minds/
- http://www.problogger.net/archives/2015/05/11/3-content-tweaks-to-increase-your-blog-traffic-without-spending-a-penny-2/
- http://www.problogger.net/archives/2015/06/19/how-to-build-your-blogs-audience-with-long-form-evergreen-content/
- http://www.problogger.net/archives/2015/09/17/10-ideas-for-finding-blogging-inspiration/
- http://neilpatel.com/blog/click-here-16-hacks-thatll-get-your-call-to-action-buttons-clicked/
- https://econsultancy.com/blog/6771-how-to-write-for-the-web-23-useful-rules/
- https://www.enchantingmarketing.com/writing-for-the-web-vs-print/
- https://www.usability.gov/how-to-and-tools/methods/writing-for-the-web.html
- http://okdork.com/why-content-goes-viral-what-analyzing-100-millions-articles-taught-us/
- http://4syllables.com.au/resource/
- https://owl.english.purdue.edu/exercises/
Yes, you need to read all of the above BEFORE you start writing. Yes, there’s A LOT to read. Get started!
Fortunately, you’ll notice that all of these articles have common points. It’s entirely up to you to learn those points and apply them to your work.
In Summary
A properly planned and written blog post with readers in mind makes a better and more fruitful outcome. This is a beneficial way to gain more exposure for an eCommerce store while providing useful information to your readers, a.k.a. customers and prospects.
By now, more and more eCommerce store owners and copywriters are learning the best practices and the importance of writing outstanding blog posts.
Luckily, common blogging blunders can be prevented even before you write the first draft. Stick to our essential guidelines and you’ll be able to succeed at winning new readers and turning them into customers in the long run.
Since people don’t actually read online but skim, your main goal as a copywriter is to make it easy for them to quickly skim the articles and write persuasively enough to make them want to read in depth. Moreover, you have to make them want to take actions based on what they’ve learnt in your article.
In order to achieve that, remember the following when writing your blog posts:
- Properly structure your article for the web and format it for easy skim-reading (use short paragraphs, concise sentences, subheadings, lists, highlight important phrases, add additional resources for variety).
- It’s necessary to include at least one strong call to action in every article.
- Add photos to make your post interesting and social networks sharing buttons for easy social sharing.
- Add ALT tags when you upload your photos/images.
- Always add links to other posts/pages on your website.
- Add links to other credible websites particularly resources with relevant and helpful content.
- Proofread and edit every post.
- Promote your blog posts to reach your target audience.
It’s time to show us what you’ve learnt so far. Please answer the questions in the quiz that follows. We’re sure all of us will be proud of the knowledge you’ll demonstrate.