
Wondering now why we are choosing a how-to article to be one of the different types of blog posts you will learn? Actually, the reasons are numerous and they’ll be presented to you in the next subsection.
Besides showing you the importance of these articles, the aim of this lesson is to help you create a how-to blog article in a high quality and effective manner so that readers can easily understand and follow the how-to steps. Thus, you are going to learn the following:
- How to do planning for the articles
- How to structure the articles
- How to do editing and finalising the articles
The key to an effective how-to article is coherence. Each step must be arranged logically with all the others in a way that makes it easiest for the reader to follow.
Ready to set off? Here we go!
The Importance of How-to Articles
As we said, the reasons you must learn to create these blog posts are numerous, but here’s the summary of the most prominent ones relevant for you.
Firstly, you HAVE TO know how to write different types of blog posts if you really want to be a successful copywriter. It is simply because you will not always write the same blog types. Sometimes you will have to write listicles, short posts for social media fodder and yet sometimes how-to articles. Providing variety in blog types is precious!
Secondly, this is a piece of writing where huge creativity level is not required! It is actually very practical. A very easy, step-by-step writing process which is loaded with facts and sequential instructions. And learning easy and simple processes is always fun and undemanding, right?
Lastly, when you are in an eCommerce business the goal is always to be close to the top of the page in the search engine after someone googles your store or a product, right? Well, the “how to” phrase is like gold when it comes to searching the Internet! It is the most popular search phrase in Google. Also, since you’re educating the reader how to do something, it’s highly shareable.
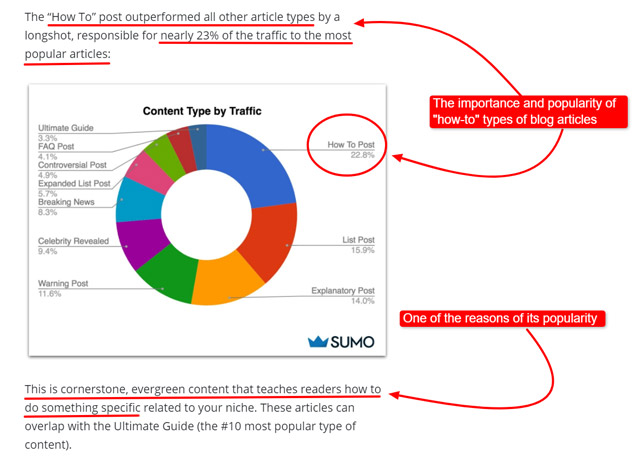
That’s why this type of evergreen content is also popular. In this Sumo article they “analysed the highest trafficked content based on 175,000,000 visitors to find out what type of blog posts get noticed”.
Guess what they found? Is it necessary to say that “how-to” articles are #1?
Just remember how many times have you personally typed this phrase when you needed something! Countless, right? Combining this phrase with a product from your store is super important in order to get into the snippet area which would be an amazing result!
For example, if an online store sells computers and writes a fantastic how-to guide on how to assemble one, Google will recognise that and give it that preferential treatment. In other words, it will present it as a snippet i.e. rank it at position zero in the search results as shown below when someone enters the search phrase “how to assemble a computer”.
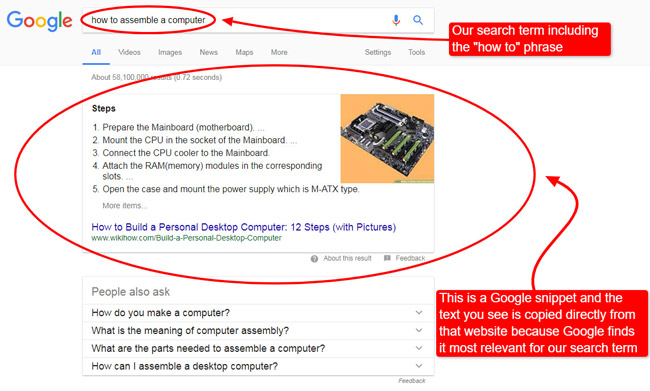
This means the search engine considers this article as the most relevant and authoritative search result. Here’s the big secret – Google loves facts! Google didn’t write the text in the snippet, but copied it from the website. This is like catching the golden goose!!! You win the big SEO prize for your store by creating such a piece of content.
What does the following quote tell you?
- Unfortunately many e-commerce sites are just static catalogs or e-brochures, and not “shopping assistants”. Robert Rose, CMI.
Read the rest in B2B Marketing Experiences: Building the Best E-Commerce Content Marketing Strategy to learn more about the best eCommerce content marketing strategies.
So, the “how to” phrase is super important and when it’s combined with your own product from your store, and if you can get it into the snippet area then it’s an amazing result. That’s why you MUST know how to write this type of blog posts.
Note: To find out more about the importance of snippets and why you as an eCommerce copywriter should care, refer to the articles within the Further reading section at the end of this lesson.
Additional tips on how to create popular articles on your blog:
Now that you’ve realised how significant how-to articles are, let’s start with the planning phase. However, remember that the eCommerce is our focus, so the goal is to apply all the principles presented in this lesson to how-to articles specifically for online store products i.e. their usage.
Phase 1: How-to Articles – Planning
In order to write your article in the best possible way, firstly you have to make a good plan. In this chapter you will find out what are the most important steps you have to complete.
Step 1: Identify Your Readers
When doing this, a great tool you can use is asking the right questions!
Who are you writing for? What type of readers will be reading your how-to article?
Write down the answers once you have identified them and keep them in mind as you write your list.
Writing is a conversation and successful writers can both stand in their audience’s shoes, and get inside their heads. They understand the need to make a someone care about what he or she is reading.
The easiest way to get started it to imagine that your perfect reader is sat across from you. Just follow the conversation: what does she or he want to hear? That’s what you need to write.
Read more about it in How to write a killer ‘how to article’.
Step 2: Identify Your Objective
What is the aim of your how-to article? What do you want your audience to learn?
This will serve as a guide or general outline so you won’t be tempted to go into topics that do not necessarily need to be elaborated on. Write down your objective and come back to it if you are not sure of what to include and what not to include.
In terms of eCommerce, think about the actions that can be done with the products you’re supposed to advertise and sell with your article, then attach those actions to how-to phrase. For instance:
- How to build…
- How to buy…
- How to set up…
- How to assemble…
- How to construct…
- How to clean…
- How to wash…
- How to take care…
- How to make…
- How to create…
- How to design…
- How to apply…
Got it?
This brings us to the magic formula for the titles of your articles:
HOW TO + ACTION + PRODUCT
Check out this real-life title examples:
- How To Design Your Own Market Stall
- How To Achieve Market Stall Success
- How to Take Care of Your Outdoor Shade Sails
Let’s talk more about the titles now.
Step 3: Create a Working Title
A working title is the initial title of your article as you are writing it. It doesn’t have to be perfect and may change as you go on writing but it will also serve as a guide to keep you on-topic. It’s vital because it sets the tone and the path for you to follow while writing.
Once you have finished your list, come back to your working title and check if it accurately describes your list. If not, rewrite it.
It may also be helpful to write down several working titles so that you are not limited to just one. You can learn more about this in our lesson The art of the headline, so please, refer to it.
Now, consider this example of the most powerful and famous “how-to” headline ever:
How to Win Friends and Influence People
Before Dale Carnegie’s classic book “How to Win Friends and Influence People” was conventionally published, he sold it by mail order with that same title as the headline of the sales letter. Certainly Carnegie’s content was compelling, but that headline is brilliant all by itself.
You see how the headline structure is powerful? You’ve got benefit number one right after “How to,” with another benefit following the word “and.” Simple, right?
Read the full article this part has been taken from here – CopyBlogger: How to Write a Killer “How To” Article That Gets Attention.
So, when we apply the same principle to the eCommerce industry, we could come up with a title like this one for example:
How to clean your Ugg boots and make them last longer.
In this case, Ugg boots are the product we’re selling, cleaning them is the first benefit, whereas making them last longer is the additional benefit. Actually, something similar already exists in this article Ugg: Care and Cleaning Instruction. Isn’t it great?
Remember the magic formula we mentioned in the previous subsection? That’s exactly how it works!
Mind you – your title MUST include the “how to” phrase!
Step 4: Find Your Sources
Not sure what to teach your customers how to do? Here’s a wonderful suggestion from the Sumo article we mentioned earlier in the lesson.
Find some inspiration with Quora. Type your topic or keywords within your niche into the Quora search bar and check out the recently asked questions to find more blog post ideas related to your topic.
You wonder why researching before you write is crucial?
Research will ground your article in fact. Good details to include with your how-to are:
- Statistics
- Definitions
- Anecdotes (short, illustrative stories about yourself or someone else)
- Quotes and examples from people like the reader or from popular books on the subject
- References to other media (film, television, radio)
- Helpful tools, resources or products (if many, consider creating a sidebar)
- References to local venues or events (if for a regional/local publication)
The above is taken from Writer’s Digest. Make sure you Writer’s Digest: Write a How-to Article in 6 Easy Steps.
These are just a couple of hints, but there are plenty of other ways to generate ideas for your blog posts.
When you’ve gathered some valuable ideas, it’s time to come up with your article outline. Keep reading to find out what it is.
Step 5: Create a Template
Your template or outline will serve as a guiding format for your how-to article. It consists of the following:
- Introduction – Describes what the how-to guide is and what readers can learn from it
- Body – Enumerates each item in your list, provides descriptions and examples
- Conclusion – Ends the list with a reflection of what readers have learned.
When it comes to the main body part, pay attention to the following advice from KnowHowNonProfit: How to Write a How to.
The how-to template is structured so you can divide up your main text into easy-to-follow steps. Think about how you can structure your advice in this way so it comes across as a simple step-by-step guide.
- Give each step a heading which describes what the step is about.
- Each step should cover one self-contained task or ‘stage’.
- Make sure you write the steps in the order that they should be carried out!
Now, it’s time to finally structure your how-to article. Let’s see how to do it.
Phase 2: How-to Articles – Structuringnew Lecture
After you did all the steps when it comes to planning, the next thing to do is actually structuring your article. Going step by step will keep you on the right track and make the process of writing easier, since you will know exactly what you are going to write.
Step 1: Write the Introduction
A compelling introductory paragraph is crucial for hooking your reader. Within the first few sentences, the reader will evaluate whether your article is worth reading in its entirety. Taken from WikiHow: How to Write Articles. Also, refer to their How to Write a How to Article for more precious ideas and tips.
The introduction is where you will give an interesting short summary of what you will be teaching your readers and how it will be useful to them. Furthermore, it is your chance to show your audience that you are a credible source for learning a how-to guide.
You may also opt to write the introduction after you have finished writing all the how-to steps. Then you will know what the actual content is and it will be easier to introduce it.
How to Boost Sales One Step at a Time is a good example of a how-to guide. Refer to the article as an example and follow these steps when writing your introduction.
1. Write an opening line that catches the attention of your readers by stating how the guide can be beneficial to them.
‘When you think about setting goals for your business, reaching a certain number of sales or meeting a particular revenue target might be the first things that spring to mind.’
Letting readers know the value of your guide encourages them to keep reading.
2. Explain how your readers can easily go through your step-by-step guide.
‘One way to make larger goals more achievable is to break them down into smaller steps that are under your control.’
As a continuation of how the guide can be beneficial to readers, let them know that whatever you are teaching is doable by going into more detail about how it will be done.
3. Transition into the body.
‘…we asked Etsy sellers to share their tips for doing…’
There are different ways to transition into the body. As with each step in this guide, think about what will be more comprehensive for your readers. Is it better to know these tips before starting with Step 1 or will it be easier to understand if the tips are incorporated in the steps?
Also, refer to this excellent Step-by-Step Guide to Writing a Compelling Article Introductionto check more tips and examples.
Let’s go into detail about the body part now.
Step 2: Write the Body
The body contains all the necessary steps in your how-to blog post. This is what readers actually want to know and learn from. Make sure it is consistent with what is said in the introduction.
These steps can be made up of a combination of items in bullets, numbers, headers, or paragraphs. Format it in such a ways that will be the easiest to understand.
- Give each step a header describing what it is about
- Make them as short as possible. You will be elaborating more about it in the description and sub-texts
- Each step must be in bold/numbered to make it more visible to your readers
- Provide descriptions for each step
- Discuss each step further through sub-steps
- Provide examples or pictures
- Even after explaining the steps thoroughly, it is always better to provide pictures. They will serve as a reference for readers to know if they are doing the right thing
- Using pictures does now only make steps easier to understand, but it also makes the how-to guide look more doable and less intimidating
- Make sure that the steps are arranged chronologically
- Start with the most basic step and then explain more complex ones, one by one. Transition from one step to another by using words like “then” and “next“
- In your last step, let your reader know they are almost finished with the guide. Transition into the conclusion by using words like “lastly” or “finally“
- Think about your writing tone
- Active voice emphasises the user and is easier to read and understand. In most cases, especially in user manuals, you should use active voice. In active voice, the subject and verb in the sentence are clear. In passive voice, the subject is unknown and is acted upon by something that is not known or not stated. Passive voice uses verbs that include a form of “to be”
Compare the two sentence below.
Passive voice: Supplies that will be needed to complete this project include a hammer, a screwdriver, and a rubber mallet
Active voice: To complete this project, you will need a hammer, a screwdriver, and a rubber mallet
The sentence that uses active voice makes it clear that the reader is the person who will complete the action. By using the active voice, you will make your writing more clear, concise, and direct.
- Active voice emphasises the user and is easier to read and understand. In most cases, especially in user manuals, you should use active voice. In active voice, the subject and verb in the sentence are clear. In passive voice, the subject is unknown and is acted upon by something that is not known or not stated. Passive voice uses verbs that include a form of “to be”
Read more detail to better understand how-to guides – Online Learning: Five Tips for Writing a User Manual
Have we mentioned you should always keep it simple and straightforward? Sure we have.
Check out these Benefits of Writing Articles or Blog Posts in a Simple Language.
Great! You’ve done the body, which is the biggest part of your article. It’s only left to wrap it up, so let’s see how to deal with the final part of your how-to article, shall we?
Step 3: Write the conclusion
There are several ways you can conclude your how-to blog post.
- Give your readers a recap of what they have learned
- Keep it short by asking them a question
- Pick a call-to-action
You may also include all three of these in your conclusion. The most important thing is to leave a strong impression and remind the readers that they have gained new knowledge through your list.
Because the last step in the example has made it obvious to readers that the article is about to end, the writer opted not to write a conclusion. However, asking them a question or picking a call-to-action engages your readers as well as wraps up the article effectively, not leaving it hanging.
Ask your readers for a review of your how-to guide or to check out your Facebook page, for instance.
Nice work so far! You’ve reached the final phase of your writing process, but it doesn’t mean it’s the least important and you can relax.
Quite the opposite! Let’s show you how to finalise your article properly.
Phase 3: How-to Articles – Editing and Finalising
Your writing is complete and you are tired but happy with the work done. Get some rest, and when you feel your mind is clear again go through the next steps in order to edit and finalise your article.
Step 1: Proofread and Edit Your Article
Read and reread your entire how-to blog post for products. Correct any errors you may have made and improve anything that needs improvement.
Step 2: Ask Someone to Read Your How-to Post
An outsider’s opinion can give you a fresh perspective of your article and will help you find more ways to improve it. Ask them if your how-to guide is clear and concise.
Step 3: Finalise Your Title
Does your working title still accurately define your how-to blog post? If not, change it. Make it as accurate as possible.
Step 4: Choose a Perfect Image
Use visual media, such as images and videos, to support your written content, not as a substitute for it. Also remember you must include detailed and meaningful titles and alt text with your images and videos, and that all videos should have subtitles available.
Read more tips on creating a how-to guide by following the link.
This will serve as a thumbnail and click-through for your article and will appear on your blog and when it is shared on social media. Make sure it is eye-catching but also highly relevant i.e. representing your how-to blog post well.
Step 5: Make Sure You Avoid Common Mistakes
Ready to get started? Make sure you don’t make any of these common mistakes.
- Too much text – break up and illustrate your content to make it more enjoyable to read.
- No value – reward those who take the effort to download and read your guide with detailed, quality content. Creating a guide that doesn’t contain any unique information will not win you any new customers.
- Too short — a guide needs to go into more depth than, for example, a blog post.
- Too salesy — don’t use a guide as a thinly disguised sales document. In order for it to be successful, it needs to provide genuine value to the customer, not just to your business.
- No promotion — there’s no point investing in creating a guide if you don’t promote it afterwards. And keep promoting it: think about adding a link for it within relevant future emails, etc.
Read How to write a really useful how-to guide from Write My Site to get more in-depth structure advice and find out about other important DOs and DON’Ts.
After completing this step, you’re ready for publishing! Congratulations, you’ve done it!
However, there’s always more you can learn and do if you want to hone your copywriting skills to perfection. What follows are some more useful tips for you to bear in mind, so keep reading.
Additional Guidelines
Here are a few more things to remember when writing your how-to blog post:
Formatting is very important. Make the how-to article as easy for your readers as possible. In order to do this, the format must be uniform throughout the entire guide and must contain headers and numbers, such as in the examples provided throughout the lesson.
- Don’t use terms that are too technical. Avoid jargon, acronyms, or specialty words that your readers might not be familiar with. If you have to use these words, make sure you use plain English to explain what they mean.
- Don’t leave any room for readers to think twice. Make sure each sentence is as clear and coherent as possible and cover all necessary topics. Anticipate the questions readers might have and address them.
- Use examples. Instructions that come with pictures to illustrate each step make it easier for your readers. Always use high quality photos.
In addition, explore some more tips on how to write an effective article presented in the video below. Although they’re about articles in general, you’ll find many guidelines that are applicable to how-to articles, too. Neglect the “By line” mentioned in the video.
They also present the following formula for writing articles:
C – collect ideas
O – organise them
D – draft your article
E – edit it
R – revise it
Apart from this, take a peek at another guide on how to write a perfect blog post and learn from it.
Now, let us show you how others did it properly so that you can explore some good practices and learn from them.
Samples of Good How-to Guides
Take a closer look at these samples of good work.
- This how-to guide combines steps, visual and plain English language. More than other guides it focuses on using illustrations to teach the customer how to use the product. Go ahead – check it out! There’s a lot to learn from it!
- Here’s another well-structured how-to guide with easy-to-follow to-the-point steps accompanied by video instructions. That’s the way to do it!
- Bulletproof: Recipe: How to Make Bulletproof Coffee … And Make Your Morning Bulletproof – another great example with clearly presented steps, photos, and a video guide, just in case you missed it.
- Ties: How to Tie a Tie – includes fantastic visuals accompanied by clearly explained steps. Idea taken from Search Engine Land: 9 Examples Of Link-Worthy Resources For E-Commerce Sites presenting examples of link-worthy resources for eCommerce sites. Check it out!
- Ties: How to Roll Up Your Sleeves the Right Way another fantastic example similar to the previous one.
As we’ve already mentioned, you can always learn and achieve more. Thus, here are a few more resources for you to read carefully and take the valuable tips you find there into account once you start producing your own how-to blog articles for an online store. Enjoy the reading!
Further Reading
Learn more about Google snippets:
- Search Engine Journal: 9 Tips on How to Rank for Featured Snippets
- SEMrush: Get Your Ecommerce Site Ready for Christmas with “Products” Rich Snippets
- Smart Insights: 5 Important E-commerce SEO Tactics for 2017
- RS Websols: How To Write Content That Will Appear In Google SERP Snippets
- Search Engine Land: How to rank for ‘position 0’ in 3 simple steps: A featured snippets primer – consider the excellent examples included here
- Wix: SEO Trends: How to Rank Higher on Google in 2018
- DashBurst: Google Search: What Are Rich Snippets and Why Should I Care? – According to this article, rich snippets are bacon bits to search engines. Read it and find out how and why.
- MOZ: 5 Essential E-Commerce Rich Snippets for Your Store
Learn more about how-to articles:
- Know How Non Profit: How to Write a How-To
- Web Hosting Secret Revealed: A Blueprint for Writing How-To Guides for Your Site
- Site Point: 7 Tips for Writing an Effective Instruction Manual Related Topics
- Practical eCommerce: Content Marketing: How to Write a How-to Article
- Hubspot: How to Write a Blog Post: A Bookmarkable Formula + 5 Free Blog Post Templates – free templates included
- CopyBlogger: How to Write an Article in 20 Minutes
In Summary
How-to articles are important for you to learn because they provide variety in blog types, are factual, easy to read, a no-brainer to write since they don’t require much creativity or huge research, and are extremely popular.
When creating this type of blog content for an online store, always remember the magic formula to follow:
“How to” phrase + action + product
Remember?
In order to create an effective how-to article, you also need to:
- Identify your readers first and keep them in mind as you write your list.
- Identify the objective of your how-to article as this will serve as your guide to keep you on track.
- Create a working title that accurately describes your list.
- Create a template that serves as your guiding format.
- Write an interesting introduction.
- Write the body with all the necessary steps and discussions.
- Write a conclusion that leaves an impression and reminds the readers of the knowledge that they have gained through your list.
- And lastly, edit and finalise your how-to article by rereading, correcting errors, and choosing relevant visuals to include.
Great! You’re now ready to write how-to blog posts! But, before that, just quickly show us what you’ve learnt.