
Visual communication is, indisputably, the predominant way of online communication. Sounds like something from a textbook, doesn’t it? All those big words and abstract ideas, right? The sentence itself is not wrong, but it could have been written better. For example, we could have said:
Almost eeeeeverything you see on a website is an image of some sort!
Surely, there is text and there are videos, but the biggest amount of the website that you see are the images. The most obvious images are the photographs, of course.
However, all those banners, ads, buttons, frames, logos, graphics…all those are images of some sort.
This means that there is no way you will be able to work in an industry like eCommerce in which everything is conducted online and NOT know a thing about image editing.
No, you are not suddenly starting a career in Graphic design or graphic editing. You simply need to know your way around images because you’ll be dealing with them, a lot.
You already know how to pick a good image and how to use paid and free resources. You also know all about image attribution, as well.
Now, let’s take those images and edit them a bit!
We’ve told you all about where to find images, unless you are provided with those by your employer. Now, we’re about to show you a great, free piece of software and teach you how to do some basic image editing in it.
We chose PhotoScape because it is free, regularly updated, easy to use, packed with options and has a great knowledge base and a plethora of instructional videos.
Obviously, let’s start with downloading and installing PhotoScape on your computer and then we’ll teach you how to do some of the basic editing that is important for eCommerce.
Download and Install Photoscape
First of all, check your operating system, so you would know which version of PhotoScape you should use. You can check it if you click to What’s my OS?
For Windows 10 or Mac, you should use PhotoScape X. For earlier versions, use PhotoScape 3.7. Go to the PhotoScape Download page and follow the instructions from this video. Remember that you need to download the appropriate version.
Keep in mind that the tutorials from this lesson will sometimes be for the older and sometimes for the newer version. While the appearance of your software may differ, the functions are mainly the same and under the same menus.
So, there it is! Your own PhotoScape version. Now let’s see what you should do with it.
Here is the list of options PhotoScape has:
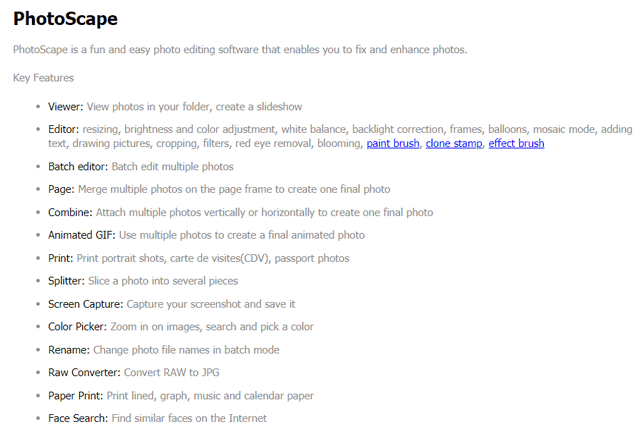
You may be thinking to yourself “oh, I’ll never learn all that!”. The good news is – you don’t have to. It’s highly unlikely you’ll have to use Face Search, Raw Converter or Paper Print. You already know how to make and annotate Screenshots.
Don’t worry and don’t feel overwhelmed. We cherry-picked the options you’ll most likely need and assembled a list of tutorials about how perform all those tasks. Neat, right?
For example, take a look at this real-life example from Amazon:
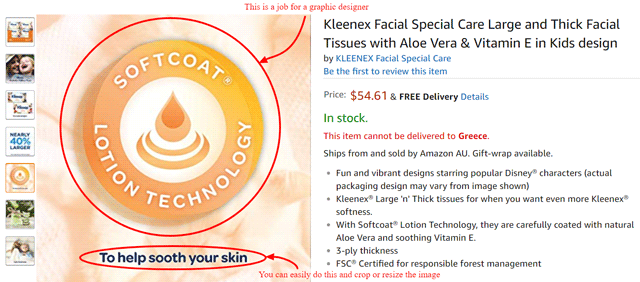
Don’t worry about creating logos and such. Those are not your tasks. You need some skilled graphic designers to do that.
However, you can place some text over an image, make sure the image is of the right size or focus the image on one of its details, while trimming off the unnecessary parts.
First of all, let’s just point out that there are two main uses of PhotoScape. The one is to view your images and the other one is to edit them. We’ll mostly deal with editing, but here is how the Viewer works.
If you need to do some more complex work than just flipping and rotating, you need to open the image in Editor. You can do that by right-clicking on the image and picking Editor option or simply by dragging and dropping:
Resizing and Cropping an Image
Resizing an image means changing the image dimensions. These dimensions should be expressed in pixels. For example 1000×500.
When you resize an image, PhotoScape tries to maintain this weight-height ratio. For example, your image dimensions are 1000×500. The ratio is 2:1.
If you bring the width from 1000 to 100, the height will also shrink by 10. It will become an image with dimensions of 100×50 pixels. Watch this video to see how it’s done and how you can even resize only one dimension of an image. Learn how it reflects the image subject.
Cropping, on the other hand, means that you are trimming the image around a section that you want to be the main part of the image. It means removing the unwanted parts of your image.
There are many ways to crop an image and experienced graphic designers can truly do wonders with this option. However, that’s NOT your job. Some basic cropping is all you need. See the different cropping options PhotoScape offers and learn them.
Brightness and Colour Adjustment
Now you have your image in the correct size and you cropped it so that it looks great, it’s time to deal with the image brightness and colour. Adjusting these two values means that you will have better images that will look more professional.
There are some pre-set brightness and contrast adjustments that you can choose from in PhotoScape:
If you want to adjust your image brightness and contrast manually, you can do that, as well.
These two videos above solve your problems when it comes to image brightness and contrast. However, there is also a very smart way to deal with the image colours. Your best bet is to adjust the colours by using the Colour curves. You can see the results instantly:
The video shows the effects that manipulating the Saturation curve has. However, in the same way, you can manipulate the Luminance and Colour.
These are general touch ups when it comes to colour. For more advanced tips and tricks, you can learn how to adjust the colour in images that have too yellowish or bluish shade to them. Such tint usually happens when a photo is taken inside or with dimmed lights.
It’s easily fixed by using White balance:
Another useful tool is the Colour replacement tool. It can be quite handy when you get a photo of a product that usually comes in several colours, but you only have the photo of your product in one colour. You can add the rest. Like this:
Adding Text Layers
Scroll back a bit to that example from Amazon. Remember how we said you don’t have to create logos, but it would be nice if you could add a text layer on any image. That can create a better product photo, Facebook post or even an ad. Here’s how it’s done:
Combining and Framing
You can combine an image and some text. Great. But why not combine an image with another image? PhotoScape allows combining and you can simply drag and drop images. It will arrange it vertically, horizontally or in tiles.
You can make collages in two ways. You can either use pre-set templates for collages and simply drag and drop images you want to the be a part of your collage.
The other way is to simply add an image or a background and then simply add the other images on it and arrange them in any way you like.
Furthermore, it is possible to add a nice frame to your collage or a single image. There are a lot of pre-set borders that you can use and adjust to your liking.
Saving and Naming
Once you create an image that you need and make it just perfect, the next thing you should do is name it and save it.
As for the file naming, please make sure you check first if your employer has some naming conventions they already use. If not, you can, then create your own.
Create naming convention by following the rules from the course you just took – File Management Best Practices.
If you change your mind, you can always rename your image.
While saving an image, think about the image type. For most photos, it is best to use the JPG format. There are also GIF and PNG formats that work well for the web, but they are mostly for graphics that need to have straight lines.
JPG can sometimes blur those lines. On the other hand, GIF and PNG cannot show as many colour shades as JPG. That’s why they are not the best option for photos.
PhotoScape creates JPG files by default.
Also, keep in mind that PhotoScape saves a backup of your files. This can consume some space on your hard drive, so make sure you turn that option off when you’re not working on anything too important.
People will have their preference. Some use Photoshop, GIMP, Canva or any other of the many image editing software pieces. Perhaps your employer will ask you to work in some other program, but if they don’t, you can use PhotoScape.
After all, it is most likely they will just be concerned about you doing the task well and saving your result in the proper format.
In Summary
PhotoScape is an excellent and feature-rich photo editor that you can use for many purposes. If you are working in eCommerce, you will have to deal with simple image editing sooner or later, regardless of your position in the company.
There are two versions of PhotoScape. The first one is for those that use Windows versions earlier than 10 and the PhotoScape X is the version for Windows 10 and Mac users.
At this point, you don’t have to know all the functions and features of PhotoScape. You can do most of the tasks given to you at this point by learning how to:
- Resize and crop an image
- Adjust brightness, contrast and colour
- Add text layers
- Combine and frame an image
- Name and save an image
Frequently Asked Questions
1. Which OS matches PhotoScape X?
a. Windows Me and Mac
b. Windows 10 and Mac
c. Windows 10 and 7
2. When creating a collage, what are the two ways to do it?
a. Tiles or free arrangement
b. Freely or using templates
c. Vertically or horizontally
3. What option is available to you when you want to adjust the yellow and blue tint on photographs?
a. White balance
b. Blue/Yellow balance
c. Colour balance
4. What are the three curves you can manipulate to adjust colour in PhotoScape?
a. Vertical, horizontal and custom
b. Brightness, colour and contrast
c. Colour, luminance and saturation
5. Which is the type of crop tool that can straighten the image?
a. Perspective crop
b. HD crop
c. Custom crop
6. How do you change just one dimension (width or heaight) of an image?
a. It cannot be done. Ratio is always respected
b. Uncheck Preserve subject ratio
c. Check Preserve subject ratio
7. To resize an image to precise dimensions, how should those dimensions be expressed?
a. In inches
b. In centimeters
c. In pixels
8. What is the command name for showing the image details in Viewer?
a. Exit info
b. Exif info
c. Image info
9. What are some of the options for the Viewer mode?
a. Viewing, rotating, flipping
b. Viewing, resizing, cropping
c. Rotating, resizing, cropping
10. How to create images of a product in more colour variants if you have only one product image?
a. Colour curve
b. Colour picker
c. Replace colour