
You’ve decided to make a smart career move and here you are – getting ready to enter the online world of work. So far you’ve realised that it takes a lot of dedication, effort and above all firm self-discipline.
Luckily, you’ve got strong personal discipline and organisation. After all, you’re used to drawing up comprehensive to-do lists on a daily basis, right?
Listing all your tasks in order of priority is the first thing you do before you start your working week and day, isn’t it? Great! Then, there’s nothing spectacularly new for you in this lesson, right?
WRONG!
Let’s set things straight from the very beginning – what we’re going to talk about here are NOT tools for your personal to-do lists such as e.g. TickTick or OmniFocus, but some serious huge project management tools that the majority of successful international online businesses rely on.
So, the story is NOT about how you as an individual can accomplish your various daily tasks both business (e.g. meet Jeff from X company to discuss Y, write a weekly report for X project, reply to X’s email about an enquiry) and private ones (e.g. book a hotel for the summer holiday, buy diapers, call mum).
On the contrary! It’s about an online working environment which is necessary for every serious business organisation dealing with remote teams and complex projects and tasks. And you’re getting ready to enter one such company, aren’t you?
Luckily, you’ve come to the right place to learn:
- why every serious online worker needs to be familiar with project management tools
- what exactly they are used for and which are the most popular ones
- the basics of how a few of these popular tools (Basecamp, Trello, and Asana) work:
– how to set up a free account and get started
– how to structure your profile
– how to manage other team members
– how to set up and manage projects
– how to create and manage tasks within projects
– and many more details depending on how interested in the topic and motivated for success you are
So, let’s get going!
Why Do Online Workers Need to Be Familiar With Project Management Tools?
You wonder why an eCommerce employee needs basic knowledge of project management tools? Simply because ALL professional businesses usually have such a tool and you are eager to become a part of one such business, aren’t you? Sure you are.
Then, asking this question would be like getting a regular 9-5 office job and asking your new employer why you have to go to the office every single day. Got it?
That tool can be observed as your virtual company premises (or an office) where all the jobs are completed.
OK. But most start by organising their work just using email. Why don’t all those growing online businesses just keep using emails the whole time?
Hmmm… Well, it’s similar to asking the above mentioned employer from our example why the whole team of e.g. 50 people cannot just work from his/her or their own homes. Why do you need business premises at all? You see?
Who could possibly manage all those people and organise the work like that? Happen to know someone? We doubt such a person exists at all.
Every company strives for success just as any individual does, right? In order to become successful and recognised, companies add more complexity to their work over time, which requires bigger expert teams so there are many things going on in a business after a while.
For instance, your employer has to take care of monitoring and managing all the worldwide team members, their collaboration, communication, individual performance, workflow, deadlines, budget, risks, documentation and many more other things.
That’s why it becomes tremendously difficult to manage all the conversations and ongoing projects just in email as before. So, they need a solid project management tool to help them get more organised and profitable as they’re growing and improving.
Don’t you agree such tools are fantastic solutions to all those never-ending email chains with numerous CCs and BCCs? Definitely, but what exactly they’re used for? Read on and find out.
What Are Project Management Tools Specifically Used for (And Which One to Choose)?
In short, they are used to organise all the communications in one spot for a single team because online teams usually work globally and in different time zones. These tools help global online teams save a lot of time and effort, share their thoughts, ideas and knowledge, and collaborate on various projects and tasks more effectively.
Moreover, with such a tool everyone in the team becomes more productive and knows exactly what’s going on in every phase of a project from beginning to end so they can keep focused on what’s important and track their progress.
It’s easier to prioritise your work and meet deadlines, as well as stay updated whenever and wherever you are since these tools help you stay in sync across various devices. Isn’t that super convenient?
Also, you can add numerous files, attachments, comments or notes there so the time you spend in meetings becomes reduced. And this is just a quick overview!
To find out more about the reasons for using project management tools, their benefits and advantages, please, refer to (all or some of) the following sources (neglecting the advertisements, but focusing on the key points):
- Benefits of using project management software
- 6 benefits of using a project management solution
- Benefits of using project management software
- Reasons to use an online project management tool
- 5 benefits of using project management software
- Project Management Benefits: Communication and Getting Things Done, All in One Platform
Isn’t it nice to get control of everything that’s happening in all the projects you’re involved in? Indeed. Have we mentioned that these tools can be used free of charge on certain conditions? Fabulous!
Wondering which tool to use? No worries for you since it’s totally up to your employer.
There are various project management tools to choose from, and some of the most popular ones we’re going to cover in this lesson are:
But how do you know which project management tool will your future employer use? Do you have to know absolutely everything about every single tool to make sure you can get and keep that precious online job? Of course not. Don’t worry!
The truth is – if you really thoroughly learn how these three tools work, you’ll be able to apply the same basic principles to nearly any other project management tool you come across.
How come? Well, it’s because they’re ALL about managing communications and tasks within projects so none of them is radically different from others. Great news, right?
Now, let’s master the basics of how these three tools work so that you can say you have some knowledge of them once you come into an online business. That’s a great way to stand out from the crowd, isn’t it? Ready? Here we go.
How Do Project Management Tools Work?
In the subsections to come, we’re going to walk you through the basics (and more if you please) of the mentioned tools you need to understand if you want to pursue an online career in the eCommerce or any other profitable industry.
Here’s what you MUST KNOW HOW TO:
- set up an account, structure your profile and get started with all these three tools (for free),
- set up and manage projects i.e. organise, name, edit, properly place or archive them, mark them as important or done/completed, add tasks, upload files/attachments, track progress, set due dates etc.
- create, manage and assign tasks to the team members or yourself (basically the same details as for projects),
- manage teams/other users and communication i.e. to invite people to collaborate with you, add them to different projects, communicate with them publicly or privately, tag them in a conversation or project, see their deadlines and the tasks they’re working on, and the like.
A lot to learn, right? Yes, but we’re here to guide you through your learning and research process, and make it as easy and fun as possible, so relax and enjoy the learning!
Let’s start with our first tool – Basecamp.
All You Need to Know About Basecamp
In this subsection, we’re going to walk you through the latest version of this tool – Basecamp3. Before you start experimenting and learning how it works, you need to find out what it looks like, right?
Step 1: Acquaint Yourself With the Basecamp Interface
For start, take a peek at how Basecamp works (the same 2-minute demo video as below included here too) and get familiar with what it looks like.
Do you now realise what difference these tools make in managing online teams and huge projects in comparison with the chaotic email chains? Sure you do. That’s why you should keep learning.
Here you can also check what’s new in the latest version – Basecamp 3.
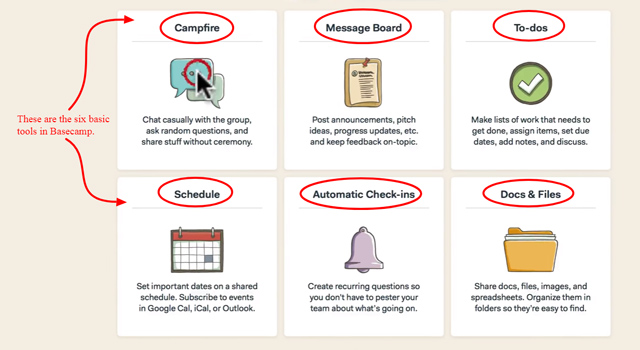
In a nutshell, here are the basic functions and options this tool offers (more on them further in the lesson):

And these are the basic tools users have on their disposal within every project or team (also, more details a bit later):
Here’s another short video showing what these six tools are usually used for – Basecamp 3 – Intro & Overview.
Time to have a closer look at Basecamp now!
However, you can’t run before you learn how to walk, can you? Thus, we’re going to show you how to create a free account to enable you to further explore it. First things first. Here we go!
Step 2: Create an Account in Basecamp
Watch this great step-by-step video tutorial from Lynda.com to learn how to sign up and set up a free account in Basecamp 3.
Wasn’t that a piece of cake? Now, it’s time to dive into all the basic features of this tool. Let’s do it!
Step 3: Get To Know the Different Sections Within Basecamp
To figure out how this tool is organised, watch the following short video and learn how to use the different sections to manage a company:
- HQ (Headquarters) – for everything that’s going on within the whole company
- Teams – for people who have the same role within the company (e.g. marketing, sales, design etc.)
- Projects – for people from different teams who are doing some work together.
Let’s finally kick the tyres, shall we? To put this tool to proper use, we need to set up a project before we start creating separate tasks within it and assign them to the team members who will be working on that project. Here’s how to make the initial step.
Step 4: Create a New Project
Thanks to another video guide from Lynda.com you’ll see that creating a new project in Basecamp is also as simple as creating an account. Check it out.
You see how easy it is to get started with Basecamp 3? No need to worry! You can do that!
Let’s move on to exploring all the other options and functions the latest version of this tool offers from basic to more advanced ones. Ready? We bet you are.
Step 5: Master the Basecamp Basic Functions and Options
BHS created a series of fantastic comprehensive Basecamp 3 video tutorials. In Tutorial #1 – Basics they cover the following:
- Logging in and accepting the email invitation to Basecamp;
- Utilising the Launchpad and general organisation landing page options;
- Editing your profile information and notification settings;
- My Staff options:
– My Assignments
– My Bookmarks
– My Drafts
– My Recent Activity - Other main features
– Latest activity
– Pings
– Hey!
– Campfires
– Reports
– Find option, as well as
– Help section in case you need help
Watch the first tutorial and enjoy learning!
Now when you’re thoroughly familiar with all the ABCs of this tool, it’s time to dig a bit deeper into starting and managing projects and teams.
Step 6: Start a Project or Team
Another excellent BHS video Tutorial #2 – Starting a Project or Team will walk you through these subtopics:
- how to start/create a team or project within Basecamp 3
- the difference between teams and projects
- changing default settings for your project/team name and description, renaming and changing the individual tools
- inviting people to your team or project
- archiving and deleting projects or teams, and
- utilising project using functions such as the Client feature and Templates
Isn’t it fun? As we promised at the beginning, now we’re going to take a deep dive in the tools within projects we’ve mentioned in the introduction.
Step 7: Learn About the Basic Tools for Projects and Teams
Tutorial #3 – Basic Tools for Projects & Teams created by BHS will go over the most commonly used and basic tools available in Basecamp 3:
- Message Board
- To-do’s
- Schedule, and
- Doc’s & Files
Remember them? Let’s learn how they can be put to good use!
Nice! You’ve just learnt all the basics of Basecamp 3! But, why wouldn’t we take you a step further and teach you how to use a few other invaluable tools in Basecamp? Eager to learn? Let’s waste no more time!
Step 8: Learn More About Other Powerful Tools for Projects and Teams
In the next BHS video Tutorial #4 – Advanced Tools for Projects & Teams you’re going to learn how to use other more advanced tools available in Basecamp 3:
- Campfire
- Automatic Check-In’s, and
- Email Forwards
Here it is:
Congratulations! You’ve mastered the latest version of Basecamp project management tool! We’re proud of you! You should be, too!
Revision Time
Here are several more valuable resources we strongly recommend if you want to revise what you’ve learnt so far and even to find out more.
- Master the Basecamp basics – contains short videos about various options within Basecamp but with a slightly different approach, covering topics such as e.g. how and why to use discussion threads instead of chats, emails or meetings; how to stop getting notifications from a particular project or team; when to split off a new project for more privacy or more focus – creating projects within projects, and the like.
- Basecamp 3 Help – contains these categories:
– Quick Answers to users’ FAQs
– Precius How-to Guides to ‘help you get started on the right foot’ as they say, and
– The Manual – a fabulous comprehensive and neatly organised set of in-depth guides on every single feature in Basecamp3. - Basecamp 3 project management – 2017 Beginner Introduction Tutorial
- Basecamp YouTube Channel with tons of wonderful helpful videos (just to point out the Basecamp Help playlist)
- Basecamp Tips & Tricks
Isn’t this awesome? We encourage you to go over these tutorials to reinforce your learning and consolidate the knowledge you’ve just gained.
As soon as you do that, we can proceed to our next tool – Trello.
All You Need to Know About Trello
Another great project management tool we’ll help you master is Trello. So, let’s make you a valuable online team member and help you learn how to work and communicate remotely as effectively as possible using this tool.
Step 1: Get To Know the Trello Interface
Find out what Trello looks like and get to know the key terms and navigation by following this free quick reference provided by Go Skills:
First, you need to get familiar with how to use the main menu at the top of the screen and the three key terms used within the Trello application.
Trello Dashboard
- Displays all of the boards associated with your account in tile display format.
- Allows you to star boards that you want to access more frequently to the top of the page.
- Can be accessed by selecting the Trello logo in the middle of the navigation menu.
Menu Bar
- Boards – allows you to quickly access all of your boards.
- Search bar – allows you to search for specific boards, lists, or cards.
- + button – allows you to create a new board, personal team, or business team.
- Username – allows you to select and edit options specific to your profile.
- i (Information) icon – allows you to receive tips and news from Trello.
- Notification icon – displays all notifications specific to you.
3 Key Terms
- Boards – allow you to manage and organise your information. Contain lists and cards.
- Lists – are displayed within boards and allow you to group multiple cards together.
- Cards – are displayed within lists and allow you to capture information within a single note.’
Here comes more about essential concepts and terminology you need to know.
Step 2: Get Familiar With the Key Concepts and Terms
First, go through this Board Basics guide to get thoroughly familiar with the key terms – boards, lists, cards, various basic and extra menu options, settings, and the like.
Got it? Good. You’re ready to make some serious moves in this tool now.
Step 3: Introduce Yourself to Working With Trello
Here’s an overall introduction to working with Trello. You can either choose to watch the video demo or to read the non-video guide (which can be found below the video or if you follow the link). Or you can do both if you please.
This is just to take a quick peek at the basic features and how-tos on adding cards to lists within boards, assigning tasks with due dates to team members, adding labels, notifications, subscriptions, and comments within tasks, moving cards between lists, filtering, archiving, and creating cards by email, and some other basic features of the board menu.
Now, when you’ve got the overall impression of what it looks like and how it works, let’s take a closer look at the most important functions of this tool that help online teams get better organised, work more productively, and communicate easily.
In addition, here’s the official Trello guide which will also help you get up and running with this tool.
How about setting up an account now?
Step 4: Create a Free Account
Watch this short video tutorial Signing in to Trello by Lynda.com to learn how to create an account.
A real no-brainer, right?
Here are some further resources regarding your Trello account to help you manage your account settings such as:
- changing your username or your avatar/profile photo
- changing, adding, or removing an email address
- logging out
- deleting or recovering the account
- protecting it, managing the security and privacy settings, and the like
Now you’re ready for more specific information. So, let’s get going!
Step 5: Learn How to Get Started With Trello
Now, go through this Getting started with Trello walk through and learn how to set up teams and boards. After learning this, you’ll be able to:
- create a new team
- invite the members to it
- create a new board
- add lists to your board
- add cards to your lists
- add members to cards and boards, and
- manage your board privacy and visibility settings
Isn’t that a nice start?
Also, for more thorough guides on every aspect of using Trello, refer to the link to check out that treasure house of precious detailed information on everything you may need to know about working with boards, lists and cards, for example: creating, editing, moving, copying, archiving, filtering or searching for them with special operators, adding/removing members and attachments, assigning tasks to people, setting due dates and times etc.
Did it? Great! Let’s take it a step further!
Step 6: Get Collaborative With Trello
This Collaborate guide claims to offer best practices for ensuring top-notch collaboration with your whole team. Check it out. You’ll learn:
- the difference between Subscribe and Add A Member options
- how to leave comments and mention/tag people
- how to mark cards done
- how to stay updated and see what’s not getting done
- how to get connected across various devices to e.g. hold meetings without a hassle, and much more
To find out more about Trello teams options, e.g. how to delete a team, change the admins, remove people from a team, associate boards with teams, or set the visibility, follow the link provided.
How convenient these tools are! Let’s learn more!
Step 7: Boost Your Productivity With the Extra Features
Power-Up Productivity guide promises to turn your boards into a productivity powerhouse. Go through it and take a deeper dive into some of their additional helpful features a.k.a. Power-Ups.
For instance, learn how to enable Calendar, different integrations and extensions available for this tool to get more done, and find out about much more advanced truly helpful options.
Here are also some Team Administration tips for those who want to know a bit more about keeping your team organised and on the same track.
You want even more than this? That’s the spirit! Here it comes!
Step 8: Become a Trello Pro
Trello Pro Tips guide presents shortcuts, tricks and tips on ‘how to go from Trello zero to a Trello hero’. Checked it? Isn’t it excellent? After exploring this, you’ll be able to use Trello like a pro!
This tool is a sort of an empty canvas (as are Basecamp and Asana). That’s why there are plenty of ways to use it since it can be perfectly customised to everyone’s unique individual or business needs. It also integrates with many other different tools.
Awesome for those who have an idea about how to organise their business, but it can be a bit scary for those who don’t.
For those without a clue how businesses can be organised with this tool, here is their official inspiration page displaying numerous board ideas from Trello user community. Take a glance at a few sample boards if you please:
You see how many various options and possibilities it offers?
Another way of becoming a productivity professional with this tool is to follow their blog or to attend their free Trello Webinars.
Revision Time
Now, watch this great one-hour Getting Started With Trello webinar, which will go over absolutely everything you need to know in order to start using this tool.
The topics summed up in this video hosted by their Product Marketing Manager Brian Cervino are:
- Creating a team
- Trello board basics
- Creating a new Trello board
- Collaborating in Trello
- Trello essential features
- Trello tips & tricks
You might also want to bookmark this concise Trello tour for quick future reference.
Further Resources and Suggestions
Since this flexible tool lends itself to almost limitless options on how to organise a business, we suggest you watch some videos of different people showing various options and ideas.
Also, you can find out more hacks and tricks to maximise your productivity with this tool.
Enjoy watching and reading, and don’t hesitate to explore the tool yourself!
- Tutorial: How To Use Trello As An Online Project And Task Management Tool
- 5 Useful Trello Hacks with Scott Friesen | Simpletivity
- How to Organize Your Workflow – Trello Review!
- How To Use Trello To Be Super Productive In Your Business
- How to use Trello!
- How we use Trello for Project and Workflow management
- Webinar – Better Boards For Team Collaboration
- 7 Ways To Track Important Tasks In Trello
- Effective ways to filter your Trello board
- Trello 2017 Introduction Tutorial
- Using Trello to Manage Multiple Projects
- Ways to Use Trello
- The Trello System (How To DOUBLE Your Productivity)
Now you’re into project management tools, you won’t find it difficult to learn how to use another one. Keep up the good work!
All You Need to Know About Asana
The third tool we’ve chosen to introduce to you is Asana. Check out this slideshare about Kicking off Asana for a quick introduction.
Since you’re probably getting started with this tool, the best place to learn all you need about it is certainly the fantastic official Asana Guide (or more precisely their Quick start page, but we’ll get back to it a bit later).
However, let’s start step by step so that you don’t get lost in the ocean of new information. Fundamentals first, right?
Step 1: Familiarise Yourself With Asana and Learn How to Navigate It
In order to get to know Asana interface and learn how to navigate it, follow the link and quickly check what it looks like and how to move around.
Eager to get on board? A bit more patience, please. Before you start, it’s also wise to refer to this Onboarding checklist to make sure you understand how Asana is structured, how it works, and what you can do there.
Got it? Great! We can set up a free account then.
Step 2: Set up an Account
Learn how to create an account and manage your account settings in Asana (log in, log out, password reset, merge accounts and deactivate them) in order to start using and exploring the tool.
Step 3: Learn How to Manage Your Profile Settings
Learn how to manage your profile settings to adjust the details of your account: your profile name, photo, a quick summary of who you are and what you do, your contact details, availability status, notifications, changing passwords etc.
You’re finally ready now!
Step 4: Get Started With Asana
This is the right place to get started with this tool quickly and easily. Remember the Quick start page from the beginning? That’s it.
Checked the page?
OK. This was just an overview of the basics. Some may find these ABCs enough for the beginning, whereas others may feel they need more detailed instructions, demonstrations, and examples, of course.
If you belong to the second group (and all serious online workers do), here we go with the details step by step!
Step 5: Create Your First Project
Ready to create your first project? As you’ve probably noticed, Asana has a wonderful support so let their friendly representative guide you through the process.
Here’s what they advise you below their video tutorial.
‘Follow these steps to start your first project in Asana:
1) Create a new project with a descriptive name, and identify specific goals.
2) Add project members who will be collaborating with you.
3) Create tasks in list or board view that will help you reach your goals.
4) Post status updates to keep everybody up to date on how things are going.’
Those who prefer written explanations on how to set up a project, find and access it, choose its permissions, and move projects between teams may refer to this written guide Understanding projects.
Ready to dig deeper? Let’s move on!
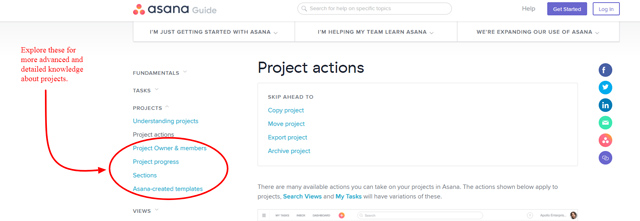
Step 6: Learn About the Actions You Can Take On Your Projects in Asana
To learn how to move, copy, archive/unarchive, export/import, edit, find and delete a project visit the Project actions guide.
What a thorough guide, isn’t it? Yet, it’s full of visuals thus easy to follow, right?
In case these basics are not enough for you and you want some more advanced knowledge about projects, their management, tracking their status and progress, organising project sections, adjusting project permissions and more, feel free to explore the guides suggested below.
Pay attention to the top left corner of the Project actions page suggested at the beginning of this subsection and you’ll find them.
Moreover, you can view the status and progress of every single project you and your colleagues are working on using the option My Dashboard
Each project is divided into smaller subordinate units called tasks. It’s time to learn the fundamentals of working with tasks in Asana so that you can organise, manage and prioritise your daily duties. Let’s go!
Step 7: Learn How to Manage Tasks Within Projects
Task actions will show you what you can do with tasks in this tool i.e. how to create tasks, move, copy, merge, print, search, delete, or restore them, assign them to someone, associate them to corresponding projects, adjust task permissions and much more.
Furthermore, their Task fields guide goes into more detail such as how to:
- mark tasks as complete or incomplete,
- set, change and remove due date and due time to each task,
- set tasks as recurring or repeating in case they need to be completed on a regular basis,
- add tasks to projects, remove them, and see/find which tasks belong to which project(s),
- add detailed descriptions to tasks to provide directions, instructions and context for them,
- approve, praise or (un)like a task or someone’s work,
- create, add, rename, remove, or delete tags to categorise certain tasks, make them stand out, or track their progress.
What’s more, you can track and organise your own or your colleagues’ work using My Tasks option (a short video tour included). Also, you can keep yourself updated on all tasks and projects you’re involved in by checking the notifications using My Inbox option (a short video tour also included).
Again, for those who want to dive deeper and find out even more about what you can do with tasks in this tool and how to do it, here are the recommended guides. You’ll find these step-by-step guides at the top left corner of any of the two previously mentioned pages related to tasks.
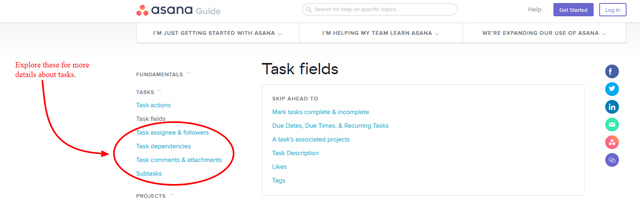
If you refer to these, you’ll learn about posting,undoing and (un)pinning comments, as well as adding and removing attachments related to tasks.
You’ll find out how to create and modify subtasks within already existing tasks, how to add assignees and followers to tasks, what their roles and permissions are, and how to remove them. In case you’re extra curious, you can peek into details about task dependencies, too.
Anyway, all these tools are built primarily for team work. So, it’s time to learn something about organising teams with Asana.
Step 8: Manage Teams in Asana
Learn about Team basics with this guide on how to create, join, and manage teams, adjust the team settings, permissions and approvals according to the roles (a video tour on Understanding teams included).
As an eCommerce VA, you’ll certainly be responsible for inviting, removing, and managing team members within your company team, approving their membership requests, adjusting the team’s permission settings and the other similar tasks.
To learn how to do all that in Asana, check out this Managing a team guide. Or let their warm and helpful representative show you how to invite teammates to Asana.
The Team Page with its two main views – Conversations and Calendar – offers an insight into ALL your team’s work. For detailed information on what and how exactly you can do there, please also refer to the page Team calendars & conversations.
Step 9: Understand How Different Types of Conversations in Asana Work
Firstly, learn the difference between team and project conversations, and the basics on how to start/create a conversation in this tool, respond to it or (un)delete it, all that with the help of this guide – Understanding conversations.
In the previous subsection, you’ve learnt about Team Conversations. Remember? Now, compare it to the Project Conversations and learn how to access them, adjust permissions, and manage various notifications.
Here’s a video showing some quick tips on how to improve your team communication.
Wow, that’s a lot of new information about Asana! Feel a bit overwhelmed and confused?
Revision Time
Don’t worry! Here’s a fantastic reminder you can always turn to. Just take a look at this 12-minute Asana lesson series and revise all the basics in the blink of an eye.
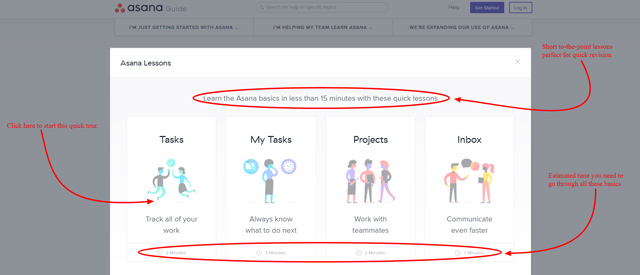
Isn’t it wonderful? Follow the link above and go through the Asana basics again (in case you haven’t already or you forgot something).
If you want more detailed revision and have more time, here’s a 30-minute demo video about how to use this tool.
Or if you prefer slides, here’s another great reminder on How to use Asana:
Done? All good now, right? Sure it is. You might also want to bookmark one of these pages in case you need another quick reminder in the future. It’ll definitely come in handy.
Great! Now you’ve learnt all you need to become a successful and productive member of an international online team (even more than just basics if you were thorough enough). Congratulations!
Of course, there’s always more knowledge you can gain if you’re interested. Asana also offers a separate neatly organised page of their precious Resources. Don’t hesitate to check it out to find out further necessary details about this tool.
Those who want to become proficient Asana users may explore the tool further, go through their every single guide, or even create a free account to check how it works in practice. Why not? Make the learning fun!
In case you need to use Asana within your future online team, bear in mind that there’s a YouTube channel How to Asana where they share latest tutorials and tips, so you can subscribe if you want and need to.
Now it’s time to summarise everything you’ve learnt in this lesson. Let’s do it!
In Summary
Project management tools are valuable and useful because they allow remote team members of an online company to organise and track their work and communications better, collaborate more effectively, and become more productive.
Since you’re getting ready to become an important member of an eCommerce online team, you must know at least the basics of the most popular among these tools (Basecamp, Trello, Asana) so that you can help your career and your employer’s business thrive once you start working.
That essential required knowledge includes the following:
- setting up an account and being familiar with the basic features, options, terms and the like within each tool so that you can start using it (hopefully with little or no help from your future employer);
- creating and managing projects as well as separate tasks within each project (e.g. assigning tasks, setting due dates, marking them done, attaching files, and the like);
- managing group and individual conversations within teams related to particular projects and tasks to ensure smooth communication and collaboration.
The main objective of honing all the skills in this lesson is to get you onto solid ground once you start working and using these tools on a daily basis. Now, show us what you’ve learnt!
Frequently Asked Questions
1. What are the benefits of using project management tools for online and other businesses?
a. They enable all team members to be more productive and focused on what’s important.
b. They save a lot of time and effort when it comes to organising all projects and managing communications within remote teams working in different time zones.
c. They help businesses collaborate easily and become more profitable.
d. All of the above
2. Is it possible to set due dates for tasks within all three tools you’ve learnt how to use in this lesson?
a. No, it’s not possible in Trello only
b. Yes, it’s possible in Basecamp, Trello and Asana
c. No, it’s possible in Basecamp only
3. If you delete a card in Trello, it’s never actually deleted i.e. lost forever but archived so that you can always restore it.
a. True
b. False
4. Where can you keep yourself posted on everything that happens (and you have access to) within an online company which uses Basecamp?
a. In My Inbox menu
b. In My Notifications menu
c. In the Hey! menu
5. Which of these tools displays all the actions taken within particular projects in a timeline format?
a. Asana
b. Basecamp
c. Trello