
There’s some bad news and some good news.
Actually, the bad news isn’t that bad. They merely say that you will have to learn what HTML is. The worst part about it is that it doesn’t stand for Hot Tea with Milk or Lemon.
The good news is – we’re here to take step-by-step through this process of learning HTML basics in plain and simple English. By the end of this lesson, HTML will be as appealing as a cup of Hot Tea with Milk or Lemon to you!
The same goes with other specialised terminology you need to learn a bit or two about, like HTTP, HTTPS, FTP, URL, TLD, WYSIWYG, CMS, CSS, tags, codes…
All those letters look a bit mind-boggling to a newbie like you, don’t they? Perhaps a few weeks ago you were almost clueless about computers, but today you want to earn your living online since it’s the future?
First, we’re going to explain to you why this knowledge is necessary. Then, we’re going to deal with some details about content management systems and HTML.
Why? Let’s say you are trying to get a job in a restaurant kitchen and you are hoping to work with a superstar chef. However, you’re not sure why there are so many different knives in the kitchen and what are they for.
The experienced superstar chef would be pretty annoyed with your ignorance about such basic stuff, wouldn’t they? Not knowing these basics would make you look unprofessional, difficult to work with and uninformed. Not the qualities you want in an online worker, are they?
Now, read that example again, but replace the superstar chef with online employer and knives with HTML basics. Got it?
Don’t worry. That’s why we’re here, to introduce this whole new world to you as smoothly as possible.
So, sit back, relax, and enjoy the ride. Ready? We bet you are.
The Importance of Knowing Your Beans About the Online World
This is important. You will be a better worker if you know more about your new working environment.
So, let’s continue with the restaurant analogy to illustrate just how important it is to learn the basics about the online world if you want a successful online career.
As we already said, working in an exclusive restaurant kitchen is impossible to imagine without knowing the basics such as: what a refrigerator is, what it’s used for and how, how to open the door, how to turn on an oven, or how to use the sink to wash the dishes.
You see? It’s the foundation of your online life and work.
We already established this in the introduction, but let’s take it a step further!
Then, how come it somehow turns out to be a problem to certain individuals when they’re eager to learn and work this way? Here’s the underlying issue.
Since this all seems like very basic stuff, you might think to yourself: ‘Well, if I walked into a restaurant kitchen, I’d know how to turn the oven on.’ Right?
But here’s the big question:
Would you REALLY know it? Really?
– Would you know what temperature to turn it to for baking bread or cake, or for roasting turkey or chicken?
– Would you know how long it had to be turned on if you had to heat it up to 300⁰C?
– Would you know what sort of pan to use for what temperatures or types of foods: those with thin or extra thick bottoms?
You see? We could go on and on with the list of specific questions but you’ve already got the point.
At face value, when working with the web, people similarly think they CAN use the Internet just because they’ve got a computer, a keyboard, two eyes and arms pretty much for as long as they can remember. But that’s mostly NOT true.
You may think you know how to cook when being able to boil an egg or make toast with jam on it. Well, that’s fine, but it’s vital for you to understand that a more serious meal (e.g. roasted duck with sage, onion stuffing, and applesauce) and professional cooking are miles away from this.
Yummy! Anyway, back to the point.
The same difference is between hanging out on Facebook and Snapchat and being a professional online worker.
When you get into the high-class restaurant kitchen (the Internet and online store in your case), you’ll truly want to learn and fit into that new working environment as soon as possible, won’t you?
Above all, you’ll work with the head chef and other experienced skilled cooks there (that is to say: your employer and other online professionals from all over the world). Thus, you’d certainly want and have to know your way around the kitchen and preparing food because those people would NEVER want to work with you otherwise.
Moreover, they’d find you extremely annoying. Do you want to be considered an ignorant pain in the neck once you start your online career? Would you like to work with one? Definitely NOT!
That’s why it’s tremendously important for you to learn these basics in order NOT to aggravate your far more experienced and skilled co-workers.
To set you straight about it: you’re NOT expected to know absolutely EVERYTHING, e.g. the full HTML, JavaScript, C++ or any other programming language to start working as a copywriter or a virtual assistant within eCommerce industry.
However, what you MUST know are the basics, such as:
- How to work with some content management systems, what they are, and how they can help you in your line of work;
- How HTML works, what it is, how browsers interpret it, what the basic HTML codes are, and what it all has to do with e.g. the formatting you apply to your blog post;
- How to transfer content such as a blog article or a product description from your working document into a CMS;
- How to cross-check between your working document and the corresponding online page your audience can see, as well as why this is all important.
You may still feel puzzled by the terms we’ve mentioned above, but remember what we’ve said: we’ll try to keep it less technical and as easy as possible for a beginner to understand.
So, let’s dive into the basics of working with content management systems first.
Working with WYSIWYG CMS
Huh? Working with what now?
Don’t panic! After reading this subtitle, any tyro would probably hide under the bed and wait for the air to clear up. You can do that, too, but it will still be here when you decide to come out.
So, why wasting your time, then? Let’s get down to work! We’ll be using plain English most of the time, we promise.
Defining the Key Terms
Before we start explaining to you how these systems work, it’s necessary to define the key terms.
CMS stands for Content Management System. In the simplest words possible – it is where you type the texts you want to publish on a website, as well as where you put your other content – images, videos and such.
Ever heard of WordPress? That’s one of the examples. Here is how it looks like.
Now, let’s give you a bit more technical and advanced definition: CMS is a piece of software or a web application that runs on the server and enables multiple users with different levels of permission to edit any type of digital/website content (text, images, video, or audio content etc.) easily and without much technical know-how.
Sounds great, but you probably wonder how it’s possible for people to create digital content and maintain web pages without being experts or at least a bit familiar with computer programming.
Well, it is realisable in practice thanks to the WYSIWYG editor which is usually included in a CMS, among many other helpful features.
WYSIWYG stands for ‘What You See Is What You Get’. You’re not sure how this is applicable to our story? A comprehensive explanation follows.
Instead of learning how to write codes or hiring an expensive expert to do the coding for your website whenever you need to make even the slightest change to it, this system allows you to drag & drop objects onto the webpage.
What’s more, it allows you to see the real-time end result while you’re making the changes or creating your piece of website content.
In other words, it literally enables you to see the content displayed on the website while you’re creating or modifying it. Amazing, isn’t it?
In a nutshell, here’s a video showing web content management and WYSIWYG made simple:
Back to our kitchen analogy! If the Internet represents a classy restaurant kitchen (your working environment), then content management systems would refer to the tools that make preparing your perfect meal (your content) as easy and quick as possible.
For example, a complex and advanced way of baking a wonderful loaf of bread would mean that you need to take the time to measure all the ingredients, then mix them and knead the dough with your hands.
Then you need to leave it to rest while you preheat the oven. After that, you need to form a loaf and place it in the oven, carefully waiting for the right moment to take it out.
A more CMS-like solution would be to simply put the ingredients into a mini-bakery, choose a program that you need, push a button and wait until it’s done.
So, what would be a mini-bakery from our story in terms of eCommerce needs?
As you’ve probably noticed, there are a myriad of content management systems offering various options, but you’ll probably use the ones being integrated with the most popular eCommerce platforms – BigCommerce, Shopify, or WooCommerce. It’s totally up to the store owner.
Now let’s see why you’d find this precious tool so handy once you start working in an online store.
The Benefits of CMS
The primary purpose of a CMS is to empower even a novice in this field to create, edit, upload, or publish content on an online store’s website, which means this is a great opportunity for you to hone your skills and shine once you get a job in the industry.
Remember – the more knowledge you gain, the more your employer will appreciate you!
So, let’s see why content management systems are so beneficial.
- First of all, they’re user-friendly since they’re made to make a life of any less technical individual easier and their online work as effortless as possible.
- Secondly, this functional, affordable, and simple to use tool supports collaborative work directly on your employer’s website.
It means that you and your co-workers will be able to create, update, or publish various content (such as blog posts, images, news, product catalogues, descriptions, and prices) and make other necessary changes to the website all by yourself, from anywhere, at any time that suits you, and with a minimum of IT skills required.
Doesn’t this collaborative tool remind you a bit of Google Docs or Google Spreadsheets? Yes, but they are your working documents ‘behind the scenes’ (e.g. while you’re writing a blog article or product description) and this tool is in use e.g. when it’s time to transfer that content onto the store’s website and to push it live.
- Thirdly, you can control the editing privileges for each of the team members. Some may be permitted to view the content, while others may edit it as they see fit.
This enables easier content management, consistency, and avoiding potential confusion of multiple people simultaneously applying changes to the same piece of content by ensuring that each staff member can change only the sections they’re responsible for.
How convenient that is!
- And the last, but not the least important, CMS gives you a certain level of autonomy from a website developer or other external IT expert, for instance, whenever you need to update your content.
You can change product prices to offer discounts, publish a new blog article, or correct a typo you’ve just accidentally noticed in a product description or blog post.
These minor tasks would NOT be on any IT professional’s priority list for sure. That’s why you MUST learn how to do them, not only to save time, but to be highly competitive when you enter the eCommerce market.
Yes, we’re aware that it may look overwhelming and confusing at first. But once you get the hang of it, you’ll be amazed!
Here’s more information on how a CMS manages the entire lifecycle of web pages, from creation to archival, and what its business benefits and goals are.
Moreover, here are some sources comparing the most popular CMS and eCommerce platforms, and discussing their advantages and disadvantages:
- LinkedIn: 10 Best E-commerce platforms for your online business
- Viget: Choosing a CMS and E-commerce Combination
- Javelin Group: CMS vs eCommerce platform – one, the other or both?
- CMS Critic: Top 10 Open Source eCommerce Platforms
It’s true that using a WYSIWYG web editor enables you to build and design a whole website by generating HTML codes automatically due to its drag & drop interface. However, you should be familiar with the essentials of HTML coding since it’s the backbone, the basic building block of the World Wide Web.
Remember that mini-bakery from before? While you can and should use it to make your life easier, you should also know how it works and how to make the bread the old-fashioned way.
Your mini-bakery can break down, or it can start baking less delicious bread, over or underbake it. In order to fix these issues, you need to know all about baking the bread, so you can adjust the temperature, ingredients or make an entire loaf on your own.
The same is with the CMS and the HTML coding. You should use CMS, but you should know a bit about HTML, as well, in case your CMS results need a bit of fixing and adjusting to be perfect.
That’s what will make you stand out from other potential employees whose expertise stops the minute their CMS isn’t working right.
In the subsections to come, you’ll learn what HTML is, how it works, how browsers interpret it, what some of the basic HTML codes are, and how understanding HTML can help you in the eCommerce industry.
Basic HTML and How It Works
Simply speaking, HTML tells a browser which part of a web page is e.g. a heading, which part is a hyperlink, a table, or an image, which is plain, normal text, and the like. Thanks to HTML, all web pages look the same everywhere they appear online.
So, in more technical terms: HTML is important because it defines the role and the structure of each segment of every web page content.
OK, you got the importance of learning HTML, but you’re still not sure what exactly it represents? Here’s what.
HTML stands for HyperText Markup Language. It’s a set of so-called codes (symbols) like a sort of ‘a language browsers speak’, which tells a browser how to display a web page.
Those codes or tags are surrounded by angled brackets (more about the codes in the following subsections and the video below). A browser ‘reads’ them in a linear format, and interprets i.e. ‘translates’ them into what you see on a web page. We could say it’s like a ‘backstage’ of a website.
It’s possible to view the HTML code of almost any web page on the Internet by pressing CTRL/Command + U, or by right-clicking and selecting the option View page source.
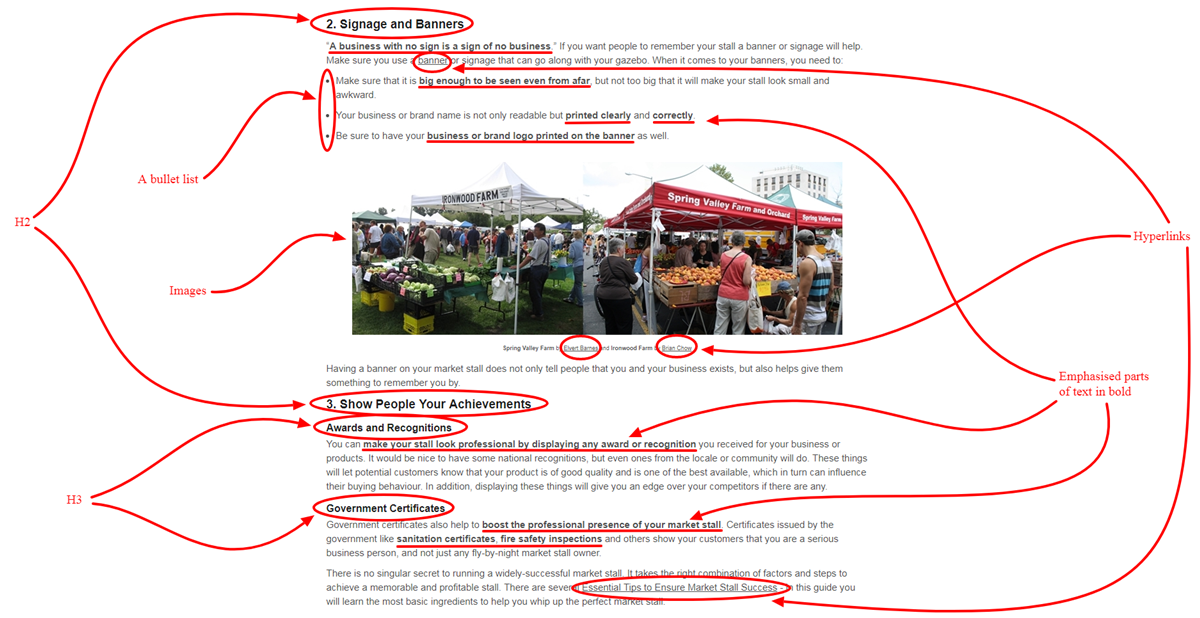
Here’s an example of how a visitor sees a web page – a part of the Ultimate Checklist for a Professional Market Stall from Gazebos Australia:
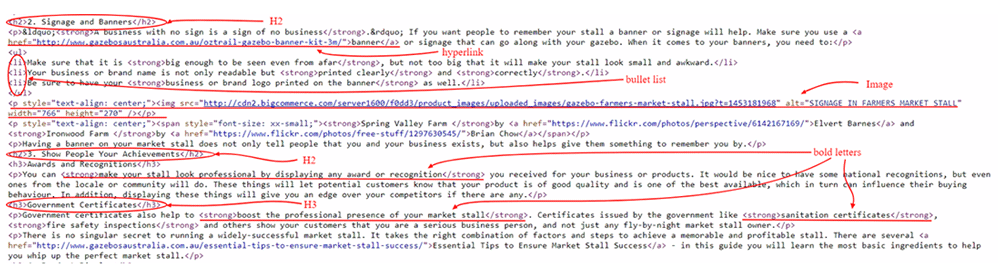
And this is what the same web page source looks like:
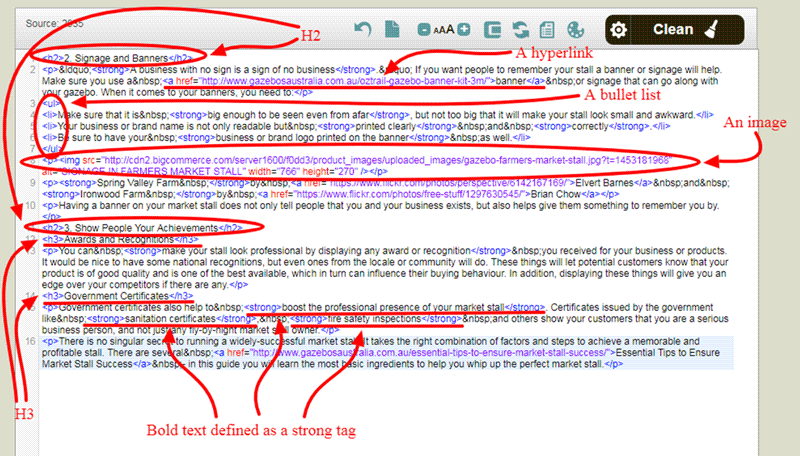
You will find that the same part of the content would look something similar in a CMS editor, as well.
Don’t let all these codes and tags frighten you at the very beginning. They’re quite easy to learn and we’re going to deal with each of them in detail in the following subsections.
But before that, here’s also a short introductory video explaining what HTML is all about.
Although it’s true that HTML got much more complex these days than it was ever before, luckily, you must know only several basic codes which we’re going to illustrate here. So, no worries! By the end of this lesson, working with essential HTML will be a child play for you.
In case you still wonder why you need this, let’s remind you of the main reason:
when you make a change in the CMS, it actually updates the HTML.
In order to avoid formatting errors, save time, and to reduce any other obstacles you may face in creating and managing a web page, you’ll want the following HTML codes to be your best friends.
Now, let’s get into some more detail!
How to Define Normal or Plain Text
It’s always best to start with an example, right? That’s why we’re going to show you what a part of text from our previous example looks like within an HTML editor, along with the corresponding codes or tags. So, here it is:
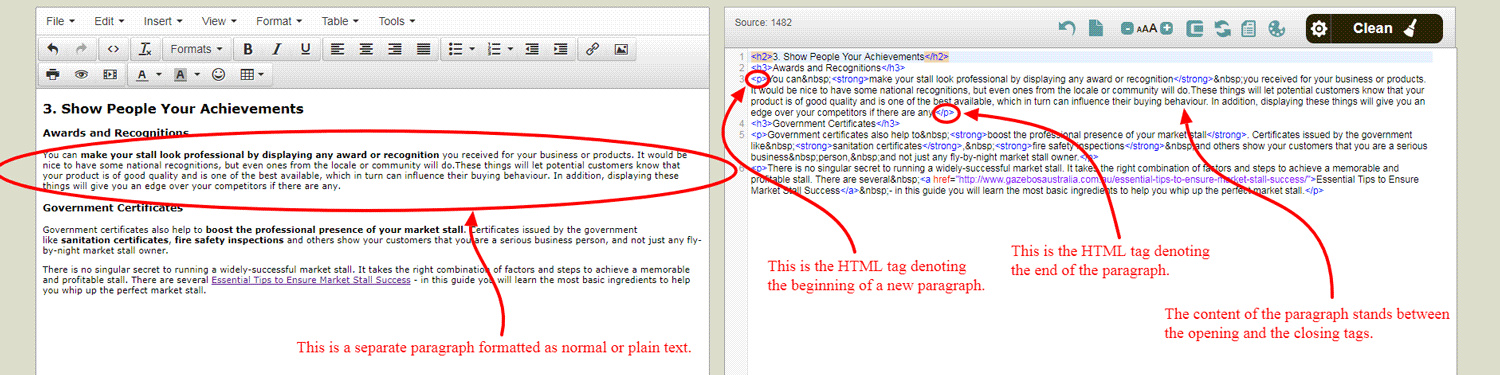
You can see a regular page view on the left, while the HTML codes/tags can be seen on the right for comparison.
You’ve probably noticed the difference between the symbols at the beginning and at the end of the codes. Those at the beginning denote so-called opening tags, such as <p>, whereas those at the end, with a forward slash denote closing tags, for instance </p>.
Almost all the other tags come in opening and closing pairs surrounded by angled brackets.
There are two codes you should be aware of when it comes to a piece of content formatted as normal or plain text.
- New paragraphs or hard breaks
If you want a new paragraph while writing, you need to press Enter. As you’ve noticed above, each new paragraph starts with the opening tag <p> and ends with the closing tag </p>.

Then, what happens if you want to start a sentence in the next line but you don’t want it to be a separate paragraph? In that case, what you need is a soft break.
- New lines or soft breaks
While typing, you’ll just press Shift + Enter if you want a new line but without starting a new paragraph. In HTML coding, a new line starts with <br>.
Take a look at this part of Hydrate Spark home page:

When you take a look at the HTML code of this page, you will find the soft break in this part of the page:

Take a look at what happens with the text while we’re changing the HTML codes or text formatting in our example.
You see how it’s all interrelated?
The next thing you need to know is how to highlight important parts of text and how those formatting options are defined in HTML. So, keep reading to find out.
How to Define Normal or Plain Texthow to Define the Bold Tag
The most common way of emphasising important words or phrases is making them bold. Now, let’s see how applying this formatting option affects the HTML.
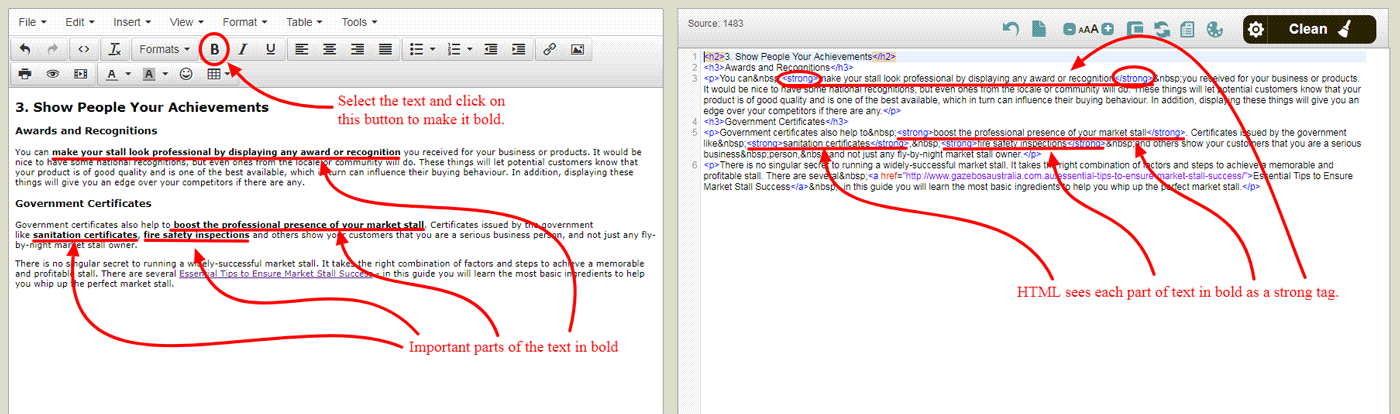
You can make a piece of text bold by selecting it and pressing the B button, as shown above, or Ctrl + B. HTML then recognises that part of text as important and defines it as a strong tag.
As you can see in our example above, there’s the opening bold tag <strong> at the beginning of each phrase in bold, as well as the closing bold tag </strong> at the end, as opposed to the regular text around those phrases.
If we delete those tags, our phrases won’t be in bold anymore. Also, if we change the text formatting, the bold tags will disappear. Check it out!
Isn’t this convenient?
How to Define the Italic Tag
Another way of making certain words or phrases stand out from the rest of the text is to italicise them. You can do it by pressing the I button, or Ctrl + I .
HTML also recognises these emphasised chunks as different and important. Similarly, the opening italic tag <em> will stand at the beginning of the italicised phrase, whereas the closing italic tag </em> will stand at its end.
Let’s make the same phrases as above italic to see what happens with the text and the HTML codes when we apply these changes.
Don’t you think it’s powerful to know these hacks?
Now it’s time to learn how to define various heading styles and what changes it makes to the HTML codes. Eager to find out? Here we go!
How to Define Headings
There are 6 types of headings. We mark them with a letter H, followed by a number (H1 – H6), where H1 is the most important and H6 the least important in the hierarchy.
ALWAYS be aware that the the main heading (H1 tag) is reserved either for a product name in a product description or a blog post headline i.e title of a blog article. All the other subheadings/subtitles should be created starting from the H2 tag.
These tags are presented in HTML as the following:
- <h1>the main headline</h1>
- <h2>less important subheading</h2>
- <h3>less important subheading</h3>
- <h4>less important subheading</h4>
- <h5>less important subheading</h5>
- <h6>the least important subheading</h6>
Let’s take a look how a CMS editor sees these tags!
As many other HTML codes, these also start with the corresponding opening tags, such as <h1>, <h2>, <h3> etc. and end with the corresponding closing tags, for instance </h1>, </h2>, </h3> and so on.
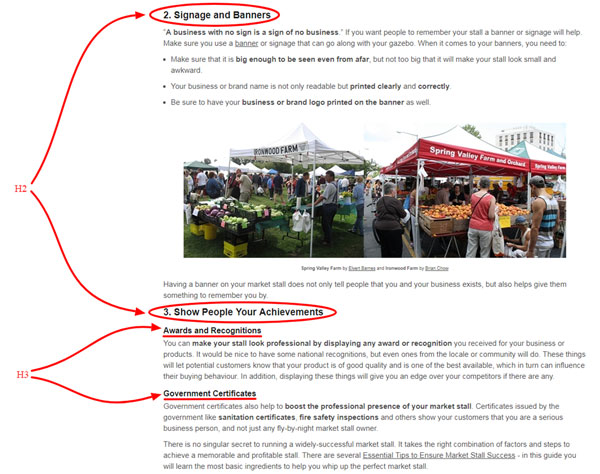
Take a glance at our example text once again, this time paying attention to different opening and closing heading tags.
And this is how a web page visitor sees it:
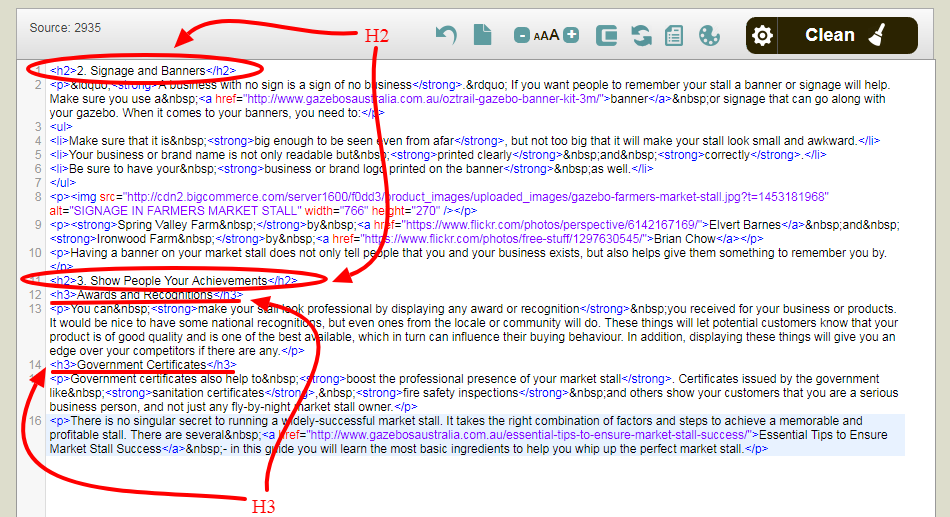
Now, pay attention to what happens when we change the text formatting and make those headings normal text instead.
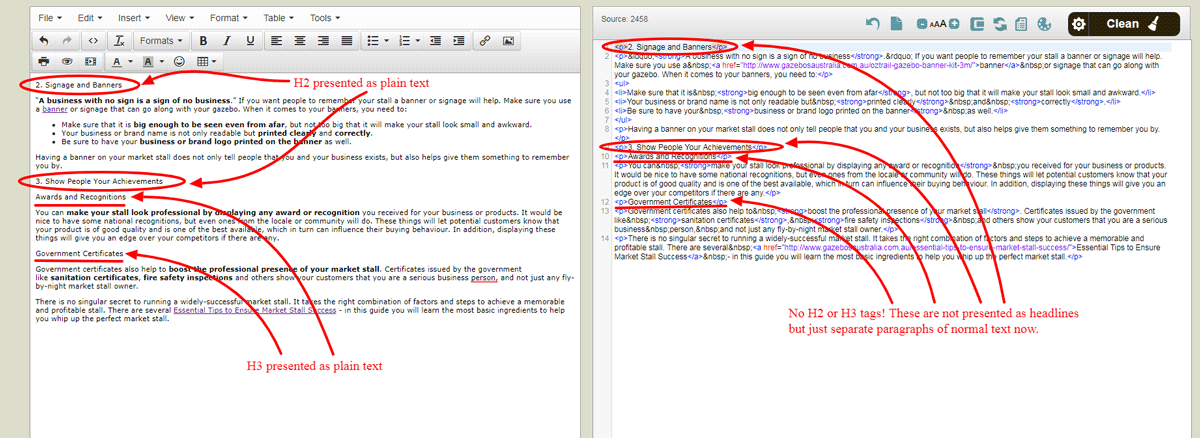
You can only notice the HTML codes for new paragraphs now: <p> and </p>. No more heading tags. You see?
You thought this was going to be difficult, but it looks much easier now, right? Great! Let’s learn more codes, then.
How to Define Lists
When it comes to formatting for web pages, it’s crucial to make them easy to skim-read. That’s where copywriters can make great use of presenting information in lists. For more details on structuring and formatting your content for the web, please, refer to our lessons on Google Docs and Blog post basics: writing process.
For instance, you can write a numbered list to denote the steps of a procedure explained in a ‘how to’ article, or a bullet list to write about product specifications on a product page.
Now, let’s see what happens when we use different lists, and what their HTML codes are.
Unordered or Bulleted Lists
Whenever you find a piece of information which could be presented in a list (e.g. product characteristics), don’t hesitate to make good use of them. Among many other advisable formatting options, lists are also what provides your readers with the opportunity to rest their eyes while reading.
Consequently, the chances they’ll read the whole text are getting bigger with every list, as well as with every short and straightforward paragraph, emphasised phrase, and the like. Remember?
OK. Now, let’s learn the HTML codes for this type of lists, which are known as unordered or bulleted lists.
Similarly to any other word processing tool such as MS Word or Google Docs, you make these lists by selecting the text and clicking on the well-known button for creating bulleted lists, as we’re going to show you below.
Each list starts with the opening tag <ul> which stands for ‘unordered list’ and ends with the closing tag </ul>, whereas each item within a list starts with the opening tag <li> and ends with the closing tag </li>.
You must admit that it’s quite logical and not that complicated!
Similarly to any previously explained point, a change occurs in the text whenever you delete or change a code. Also, HTML tags change whenever you make a change in the text.
Another type of lists is almost the same.
Ordered or Numbered Lists
You may want to use ordered or numbered lists to neatly present a sequence of orderly information such as step-by-step how-to guides.
Remember how the unordered list started with the <ul> tag? Well, now, this type of list starts with the opening tag <ol>
This denotes an ‘ordered list’ and ends with the corresponding closing tag </ol>. The HTML tags for each item within the list remain completely the same: opening <li> and closing </li>.
Let’s go back to the previous example and turn the <ul> into <ol> and see what happens!
You see? It’s a NO-brainer at all!
Now, let’s move to another helpful formatting option which can certainly boost online visibility and readability of your content – inserting hyperlinks.
How to Define Hyperlinks
Inserting hyperlinks is also pretty easy. First, you need to select the so-called anchor text and then add the link to that text. This will usually colour the text blue, underline it and make it clickable – if a person clicks on it, they will be taken to the website from the link.
How to add the link to the anchor text, you ask? Easy!
Select the text you want to use as an anchor text and click on the button that looks like two chain links. It usually opens the form in which you need to copy-paste the link, and that’s it!

You can link to a product, a category, a brand, or a page. Find what you want on the list, select it and it’s done!
In this example, the anchor text are the words choosing the right portable gazebos and the link leads the reader to another Gazebos Australia blog post.
Let’s take a look at the HTML version of this same hyperlink:
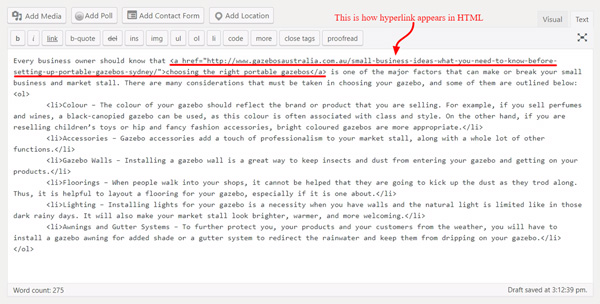
The HTML code used to create a hyperlink contains the following information:
<a href=”Source Web Address”>Anchor Text</a>
In the case of our example from above, it goes like this:
href=”http://www.gazebosaustralia.com.au/small-business-ideas-what-you-need-to-know-before-setting-up-portable-gazebos-sydney/”>choosing the right portable gazebos
Let’s analyse this:
First, the opening tag for a hyperlink is <a> whereas the closing tag is </a>. This a stands for an anchored link. And as you’ve already learnt, anchor text represents the exact words people will see on your website.
In this case, the words choosing the right portable gazebos.
Secondly, the Source web address here is actually the URL you want to direct your readers to. In this case, it is the blog post about small business ideas from the Gazebos Australia. Source web address is the same as href (hyperlink reference).
So, basically, when you type <a href= part, you are saying to the browser – This is an anchored link and here is the link to the website where I want the people to go to after clicking.
And you finish with </a> which means – I’m done with this command.
When it comes to creating hyperlinks to other credible and valuable sources, there are two options to consider regarding the way those links are opened. So, let’s briefly talk about that, as well.
Automatically opening links in a new window or tab
You can right-click on the link and choose to open it in a new window, so that you could perhaps compare and contrast the content on both web pages.
Moreover, there’s a possibility to change the code and make the link automatically open in a new window or tab with simply clicking on it. (Whether it will open in a new window or tab depends on your browser’s settings.)
You might do this when you want your readers to keep your page open while checking something else, e.g. on YouTube.
This is the HTML code which makes it possible:
<a href=”Source Web Address” target=”_blank”>Anchor Text </a>
For example, you can see here this part of the code in one of the hyperlinks on the Gazebos Australia website:
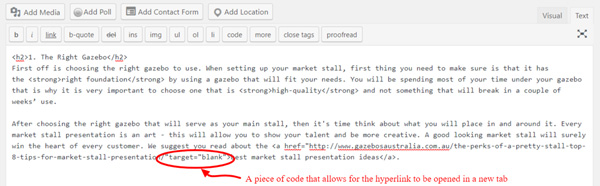
And here is how it works:

Opening links in the same window or tab
On the other hand, if you want the reader to stay on your website, you would make links open in the currently opened window or tab when you click on them.
This is the code which enables that.
<a href=”Source Web Address” target=”_self”>Anchor Text </a>
Let’s change that same piece of code on the same web page and see what happens:
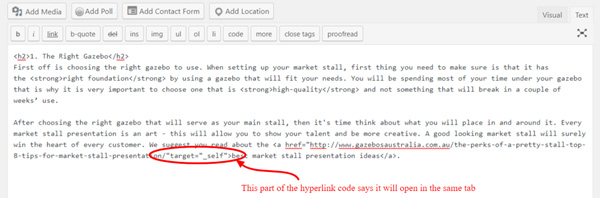
And here is how this actually works in practice:
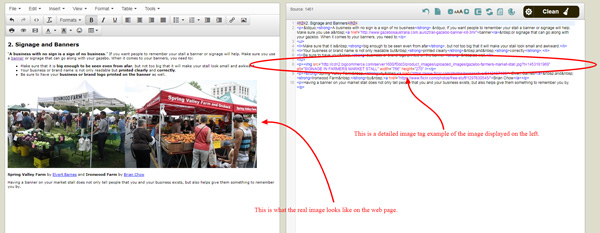
How to Define Images
You’ve already learnt that inserting images makes the content more lively and dynamic. Now, you’re going to find out how images reflect in HTML code.
Here’s what the complete image tag <img> looks like:
<img src=”Source Web Address” alt=”Alt Text” width=”No of Pixels” height=”No of Pixels” />
The src attribute represents the location/source of the image you want to use i.e. it tells the browser where to find it. The alt denotes ‘alternate text’ or a short description which tells what the image is about. The height and width are expressed in the number of pixels.
You’ve probably noticed that there’s NO closing tag here. This is also called an empty tag, which means it can only contain a list of attributes without a closing tag.
Now, let’s see what it looks like on our example.
It’s also possible to adjust the dimensions, alignment, borders and the other characteristics of an image, but that will be presented in a more advanced course.
Here is a beginners’ cheat sheet with the most common HTML tags for you to take a look at.
To fully understand how all these tags work, you have to be aware of how browsers interpret HTML. So, let’s talk about that.
How Browsers Interpret HTML
Almost all web browsers support HTML. It’s like the fact that many people in the world speak English as a universal language. HTML is a means of communication between a web server and your computer, whereas a browser is a medium (like an interpreter).
When you want to access a certain web page, you type in its URL in the search bar, press Enter and wait for the page to be displayed on your computer screen, right?
But have you ever wondered how it’s possible and what happens during the process?
After entering the URL, your browser connects to a server and requests that page. Then, the server sends it back and displays it on your computer within only a few seconds. However, HTML is what makes this possible.
It’s a computer language that describes everything you can see on a web page, from fonts, colours, images, tables, to where every single detail is placed on the page, and much more.
These are only the essentials of what’s happening ‘in the backstage’ whenever you’re trying to view a web page with your web browser, whichever you might use.
How to Transfer Content From a Writer’s Document Into a CMS
OK. You’ve written a blog article, a product description or any other content for your online store. The next step is to publish that content, right?
Or your employer might just give you a task to copy some content from any word processing document into e.g. an eBay store. Either way, you have a piece of content that needs to be published on the online store website.
In order to do that, you need to transfer the content from your working document (e.g. Google Doc or MS Word) or another word processing platform into a CMS (e.g. one within BigCommerce).
How difficult could that be now when you’re familiar with all the basics of how a CMS works?
Well, things still could get seriously complicated if you would just grab those documents and copy/paste their content into a CMS.
You wonder why? Well, there are many details in those working documents that you cannot see. Those details can slow down your webpage to the point nobody wants to bother with it.
You need to clear your HTML when doing the copy/paste and make it light, smooth, easy and efficient.
Here’s what actually happens and what to pay special attention to so that you avoid any possible problems.
How to Avoid Bad Copy/Paste Formatting and Why
If you take a look at the HTML of the document you’ve just copied and pasted from MS Word or Google Docs into a CMS, you’ll notice that it has imported a whole bunch of extra stuff. It happens because the CMS just tries to bring in the formatting from the original document, so it brings in junk HTML, too.
You’d certainly want to avoid this situation. No idea how? There’s an easy way.
NEVER copy the content directly from a Word or Google document!
Instead, use a sort of a text editor such as a notepad tool because it will strip out all the formatting and styling. Here are a few basic steps:
- Copy the content from the text editor into the CMS.
- Go through the document, select the portions of it, and apply the same formatting options within the CMS.
- Check one more time if all the content matches the style of the source document.
- Admire your new, clean and fast online content.
In other words, what a text editor does is it overrides the set CSS style guides such as font-family, size, colours, margins, and so on.
Oh, no! Not another new special term! Don’t worry! Here’s what CSS means in a nutshell.
In simple words, if HTML is the meaning/content of a web page, CSS describes the content i.e. denotes its style and presentation.
Back to the point!
Note: HTML and CSS are the only two languages you need to make a simple website. If you want to add some dynamics e.g. the elements of a website moving around, you’d use a more advanced language such as JavaScript, which has NOTHING to do with Java, by the way.
The alternative is to just copy and paste the content directly, and then examine the HTML codes carefully in order to spot and delete ALL the unnecessary tags. However, it’s advisable that you stick to the first option.
Still not sure why this is significant? Read on to find out.
How to Clean the HTML Codes Before You Add Content to the Online Store
A CMS sometimes layers too many things on top and you end up with a little bit of a mess. You need to be able to understand what’s happened so that you can fix it, and that’s when you need to read HTML.
Also, remember that browsers interpret HTML in a linear format? It means that they read across that HTML line by line and it takes time because browsers do NOT work at the speed of light but your Internet connection!
Too much HTML slows down your browser. The less stuff packed in HTML, the faster the page will load in a browser. Therefore, it’s crucial that you get rid of all the junk HTML.
Sounds nice, but what is junk HTML and how to get rid of it? Here’s what you should do.
You can view the HTML source of the content with the [HTML] button at the end of the WYSIWYG control panel. This will allow you to edit the HTML directly and to remove any junk tags. You simply need to look for them and delete them.
But, in order to find them all, you must know what they are, of course. So, here’s a list of junk HTML tags that need to be removed:
- <span> should be replaced with <p>
- </span> should be replaced with </p>
- <div> should be replaced with <p>
- </div> should be replaced with </p>
- <span lang=”EN-AU”> should be replaced with <p>
- <h2 align=”left”> and <p align=”left”> should always be replaced with just <h2> and <p>, but only when it applies to text, not an image.
- should be removed or replaced with a spacebar
- <br /> adds an extra line space. It should be removed in most cases or replaced with <p> and </p>
- <p> </p> should be removed
- ’ should be replaced with an apostrophe (‘) Eg: you’ll
- <span id=”_plain_text_marker”> is less common just should be replaced with <p>
- <p style=”text-align: left;”> should be <p>
Again, pasting directly from any word processing platform will add span, style formatting tags and escape characters such as above in the HTML code, which need to be cleared out.
For example: A simple space can and probably will be converted into . A single space is 1 character in length, whereas the corresponding escape sequence is 6 characters in length. Escape characters can also be added in for apostrophes or any other characters – all of them junk! This slows the page down!
Another reason? Escape characters can show up e.g. in product feeds and make the store’s listing look like spam if it contains escape sequences.
Spotting and deleting all the junk HTML can be a bit complicated and time-consuming if the text you have to clean is too long.
The way to do it more efficiently rather than just cleaning it by hand is to find, copy and replace them all with the corresponding character or nothing, just get rid of them. That’s definitely a faster way of making sure you get all the redundant tags out of your content.
For instance, you can speed the process up by finding all escape sequences ( ) and replace them with apostrophes.
Similarly, you can find every single span tag <span> and replace it with ‘nothing’ to delete it. You can also apply ‘replace all’ option.
After that, you can safely transfer the content (straight text) from the notepad into the CMS and apply the necessary formatting to it without worrying that some junk HTML will cause errors in the web page layout.
From the front end, your content won’t look any different, but when you check the HTML code, you’ll notice that it has fewer characters once all those junk tags are gone.
Once you’ve finished, it’s time to double-check what you’ve done before you finally save all the changes and publish the content. Here’s how to do it.
How to Check Your Work Before You Publish a Web Page
When you make changes to a website, it’s extremely important to check your work afterwards. You want that store website to look professional and trustworthy, right? Then, do everything you can to avoid any blunders, typos, inaccurate grammar, or broken links.
You doubt it’s possible to have 100% accurate content on a web page? Well, you’re wrong! It is feasible if you’re concentrated and work systematically. Here are a few steps to take in order to achieve perfection.
1: Create a Checklist
There’s no better and easier way to make sure you’ve checked every single detail than creating your own checklist based on the type of work you’re performing.
For example, it would be useful to double-check the following:
- fonts and sizes,
- language variant consistency (e.g. British vs. American English),
- whether there are any grammar or style lapses,
- heading styles and hierarchy consistency,
- whether internal and external links are all relevant and working,
- whether the images are of appropriate size, style, and content,
- whether the ALT tags are appropriate and correct,
- make sure you delete all the junk HTML.
After checking off all the items on your list one by one, you’ll know you haven’t overlooked anything.
2: Work in Stages
Another trick is to make SMALL changes and save your work in stages. Never do everything at once because it’s much easier to check your work as you go than to do it all at once. Avoid checking really long pages since the chances you’ll miss or forget a detail are increasing when you do it.
3: Always Have the Live Page Open for Checking
When editing a web page in a CMS, it’s really handy to have that page open in another window so that you see exactly what the customer sees. That’s how you’ll easily spot your mistakes and if something doesn’t work properly, for instance, there’s a broken link or heading styles are inconsistent.
Quite often, you’ll do an update to a web page in your line of work. Thus, prove to your employer you’re meticulous enough. Always remember to carefully cross-check between the old and the new content, and to compare what you see in your CMS with the real page your customers can see.
Last but not least, whenever you want to check your work after you’ve changed something, ALWAYS remember to refresh the real online store page to make sure it’s updated.
In Summary
Mind you – you certainly do NOT have to know everything about CMS and HTML unless you’re a programmer. However, here’s what you as a newbie MUST know if you don’t want to stay behind the curve once you start your online career:
- What a WYSIWYG CMS and HTML are, and how you can benefit from using them,
- How basic HTML codes work (plain text, bold, italic, headings, lists, hyperlinks, images),
- How browsers interpret HTML,
- How to transfer content from a writer’s working document into a CMS and publish it, how to clean all the redundant HTML codes before that, as well as how to edit various types of already published digital content,
- How to work in stages and carefully cross-check all the changes you’ve applied before you push content live.
Thus, it’s advisable to keep a tab on these pragmatic points.
Now, let’s see how well you’ve understood the general gist of the lesson. Go ahead, answer the quiz questions! Shine bright like a diamond! We’re looking forward to your brilliant score!
Frequently Asked Questions
1. WYSIWYG stands for:
a. When You Start Internet Work You Grow
b. World’s Youngest Internet System’s What You’ll Get
c. What You See Is What You Get
2. What are some of the benefits of a CMS?
a. It’s user-friendly, functional and affordable.
b. It allows collaborative work from anywhere at any time.
c. It enables you to have a total control over your website content without relying on an IT expert.
d. All of the above.
3. What does <em> denote?</em>
a. The opening HTML italic tag.
b. The closing HTML italic tag.
c. The strong tag.
4. What is the function of the following HTML code template: <a href=”Source Web Address” target=”_blank”>Anchor Text </a> ?
a. To insert a hyperlink which will open in the same window or tab when you click on it.
b. To insert a hyperlink which will automatically open in a new window or tab when you click on it.
c. To insert an image.
5. How can you avoid bringing in wrong style and formatting when transferring content from a writer’s working document (such as MS Word) into a CMS?
a. By copying the content first into a simple text editor, which will strip out all the bad formatting, carefully cleaning the HTML junk codes, and then transferring the content into a CMS.
b. It happens all the time and there’s no way to avoid it.
6. When checking what you’ve done before you publish the content, it’s advisable to:
a. Check the whole content at once and then hit ‘Publish’ or ‘Save’ button.
b. Create a checklist, work in stages, and have the real store page open to compare it with the working page. You should also regularly refresh it.