
Take a stick-it note, your favourite pen, and in your best handwriting, write the letters TASL on it. Stick it where you can see it at all times. These letters are your reminder about what makes good attribution.
They stand for: Title, Author, Source and License. All these things need to be included in your attribution.
Title – many photos are given names by their authors. Those titles an make integral part of the author’s effort. Therefore, acknowledge that, if the info is available to you and include it.
Author – the person who made it. The original creator of the image you want to use. Do your best to find out the real name of the author if you are taking the content from blogs or news sites. If you are using websites like Pexels or Pixabay, you should use the username of the author. If there are more authors, list them all.
Source – link to the original page where the image is posted. It should not be a homepage to the website, but the direct link to where the image can be found.
License – the type of license that protects the image. You can link to the license itself, type in the full name or simply use one of the buttons.
This doesn’t answer the question entirely, but it is far easier to look at the examples and discuss it on them. The truth is, there is no uniform way of using attributions, but there are definitely better and worse ways.
You will have to use common sense, decency and make your choices.
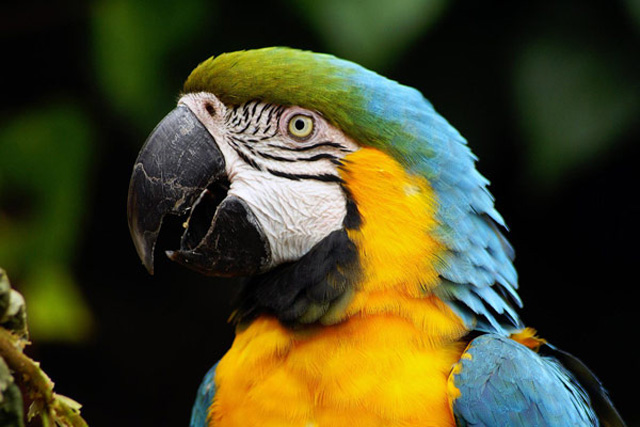
This here is a photo by Martin Pettitt named Parrots and published on Flickr under the license that allows the photo to be shared and adapted, but the author needs to be attributed.
There has to be a link to the license and if the image is altered, it needs to be stated. We will use it to show different types of attribution.
The Most Complete Attribution
“Parrots” by Martin Pettitt is licensed under CC BY 2.0
Here, “Parrots” is the title of the photo and it is linked to the direct page on Flickr where that photo is. Martin Pettitt is, obviously the name of the author, and the link on his name is to his page on Flickr. The last link leads to the Creative Commons page where the exact type of license is explained.
This is a nice and detailed way to attribute somebody’s work.
However, for many reasons, this is not always possible. You may be lacking space or info. There are other ways to go in these cases. The following case is one of the easiest and the most convenient to use.
The “Good Enough” Attribution
Photo by Martin Pettitt / CC BY
This attribution does not contain the title of the photo. However, there will be instances when the image simply isn’t named. Also, all the other info about it can be found on the link to the photo. So, indirectly, the info is still easily obtainable.
The name of the author is there, but there isn’t a link to it. Again, this info is also easily obtainable by clicking the link to the photo. There will be times when the author will not have a profile to link to.
The last, but not the least, the license link. This is important, because it shows what you can and cannot do with the image in question.
While it is not the most ideal, this way of attribution is short, elegant and contains all the basic info. It is likely that you will be using it in most cases.
The Wrong Way to Attribute a Photo
Photo: Flickr
All you said by this is that there is a photo on your page and that you found it on Flickr. That’s not much, is it? It doesn’t give the info about the photo at all. That could be any photo on the entire website and it has hundreds of thousands of photos with different authors and different copyrights.
Needless to say, but here it is one more time – never do this.
Where to Put Your Attribution
Obviously, the best place to put your attribution is right below the image. You can make a box for it, or you can just type it underneath the photo.
However, that hurts the flow of your written content a bit. It breaks it and that’s not what you want. Flow is important for a text and you don’t want it ruined. To preserve it, you can wait with your contributions until it’s done.
In other words, put all the attributions at the bottom of the page. If they contain all the usual links, it will not be hard to determine which attributions belongs to which photo.
Is There Such Thing as an “Unattributable” Image?
In short – yes! Those lovely gems really do exist. But should you use them – well, that’s more of a grey area. All images that are made before 1924 are not protected by copyright anymore. So, this doesn’t leave you with many photos of laptops and modern gadgets, but you never know.
Also, there are images that you simply cannot trace back to their source. What to do in case of these images?
Still you need to remember the golden rule of image attribution – when in doubt – don’t use it.
Life is strange, so let’s say that one of those strange situations happened to you, so that you are forced to use such an image. Even then – don’t. But, let’s say you have to. This is what you do:
First – do your best to find the source. This is done by doing a Google Search by Image.
You can search it by URL or even upload it from your computer. Google will show you where that image is online and one of those places will be it’s source.
Secondly, if you still cannot find the image and the Google Search by Image takes you to different Pinterest, Tumblr and other online image collections, at least you can add a couple of words below it saying “Photo credit: difficult to determine”.
A Word or Two on Social Media and Attribution
Blogging is not enough. You need to be present and you need to drive traffic to your website. To do so, you need to master the social media. This means posting pictures there, as well.
While photos get spread like a wildfire on social platforms such as Pinterest and Facebook, it doesn’t mean that they are free from attribution. A lot of people forget about it, but you should know better.
Here is an excellent source on how to do proper attribution on your company’s Pinterest account. While Facebook is all about posting your own content, Pinterest is based on reposting other people’s content. That is why the attribution issue is very present there.
Moreover, that is why big companies get reluctant when it comes to making a Pinterest profile – they get sued a lot. Just keep in mind that attribution is necessary, even on social media.
This serious matter is not so hard to master, is it? A couple of links and a small attribution at the bottom of your page will not take up a lot of space or a lot of you time and it will save you from a lot of trouble.
You have your desired image. Now you just need to process it, save it, name it and add good ALT attribution to it.
Firstly, let’s process that image a bit and make it just perfect for your website.
Processing the Image
Once you have the image, you need to edit it, so that it is optimised for the web and for the best user experience.
What you need to do next is do some basic editing. This includes the following actions:
- Resizing the image
- Cropping the image
- Resaving the image in the new format and dimensions
Resizing and Cropping the Image
You need to decide the size of the images and their orientation. In other words, it is important to know if the images are about to be landscape or portrait oriented.
As for the image dimensions, it all depends on the images you have at your disposal, but if you can choose, try and make them at least 1024 pixels, or 800 pixels wide. In this way, you are ensuring nice images that conveniently fit the majority of screens.
Make sure that you don’t include images that are less than 500 pixels wide, unless you are limited by the platform requirements or you are creating thumbnails and full-size images.
If you are uploading product images, learn about different platforms and their usual formats here – FastPivot: What is the best size for eCommerce Product Images?
Resizing means changing the size of your image. Obviously, right?
If you have the image width of 2000 pixels, you can just scale it down to 1024 and the image editing programs will make sure that everything that’s on your image scales down in size respectively.
Cropping means that the items on an image will remain the same, but you will eliminate the space around the relevant objects on the image and reduce it in size in that way. Take a look at this example. The lower part of the image shows which area has been cropped and the upper part shows the result:
There are many different ways to crop an image, but in this lesson, we will explain the method that was used in the example above. Also, you will notice some different terminology, such as resampling, resizing, scaling and similar. They all relate to the image size and resolution.
Here are the instructions about how to resize and crop the image for different image editing tools:
Photoshop: Adobe Help: Crop, resize, and resample images in Photoshop Elements
PhotoScape: If you want to crop or resize one image, take a look at these articles:
However, if you have a batch of images that need to be resized, PhotoScape can do that, as well. Watch it in this video:
- GIMP: Kerry Shamblin: How to Prepare Images for Web Sites using GIMP
- Canva: Canva Support: Resize and Crop Your Photo
By reading these articles above and watching the videos, you will be able to optimize your image for the web by resizing it to the dimensions that work the best. Moreover, you will be able to do it using four different pieces of software.
Now that you did that work, let’s figure out how to save it!
Saving the Image
You just click save and you have your image saved, right? Think again. There are many formats to choose from when saving your image. You can have it in JPG, PNG or GIF. Look into those a bit closer.
Choosing the Image Format
There are many different image formats, but those that are most commonly used for the web purposes are the JPG, GIF and PNG. These formats have their upsides and their downsides.
1: JPG
While JPG is among the most widely used formats on the web. It has over 16 million colours and shades and it works perfectly if you need to upload photographs on your website. Given the amount of colours it offers, the file sizes are reasonable.
There is always the option to compress the image more, but it means the loss of the image quality.
Even though, it is a great format for photographs, it should not be your choice if you want to upload graphics, logos and similar sharp line images. Due to the way JPG compresses files to make them ‘lighter’, it loses some of the information about pixels, which, consequently, results in a bit blurry lines.
Watch this video from the beginning, up to the 2.10 minute mark, to see JPG explained in good detail and in very understandable terms.
2: GIF
If you are looking for a format that will deal well with graphic images, use GIF or PNG. GIF creates sharp-edged images easily and those files are usually quite small and easy to upload. GIF also supports animation and offers transparency.
However, GIF only has 256 colours. If your picture has several blocks of, let’s say, different shades of red – GIF will choose one shade of red and present all those blocks in that shade. It’s obvious this doesn’t work that well with photographs.
Learn more about GIFs by watching this video:
3: PNG
This format was created because GIF was a paid format. PNG brought some improvements like better-looking images, smaller image size and improved transparency.
The only downside PNG has in comparison to GIF is that it doesn’t work that well with old browsers. They have been created long before PNG existed, so they don’t recognise it.
- Prepressure: The GIF File Format
- Atalasoft: Benefits of the PNG Image Format
- Envato Tuts+: Image Types and Usage in Web Design
- WebDesigner: Understanding the Most Popular Image File Types and Formats
- Web Style Guide: Graphic File Formats
- Images That Are Too Large Could Be Harming Your Website
Some of the applications will have their own format and, by default, you will not be offered some of the web types for your image. You need to figure out how to export them in the format you need.
4: Photoshop
Adobe Help: Save image You will see that Photoshop already has a Save for Web option in it. If you choose it, it will compress the image while trying to conserve as much quality as you choose.
5: PhotoScape
Photo Software Blog: How to Save Edited Photos in PhotoScape without Backup Duplicates This article explains that the PhotoScape creates a folder in which it saves your originals, as well. In time, that can consume a lot of your storage place on your PC.
Therefore, besides learning how to save your image in different formats, you will learn how to make sure it does or doesn’t save the original image, as well. While saving originals does save up a lot of space, it is useful in some cases when you might need it.
6: GIMP
Docs GIMP: Export file. GIMP actually has its own file format. If you leave it as it is, it will save all your image files in XCF. To get JPG, GIF and PNG files, use the Export function as described in the article.
7: Canva
Canva Support: How saving works in Canva. Since Canva is an online app, you will have the option to save your current work so that it doesn’t get lost in case of connectivity issues. However, once you are done and you want to download your work, you will be shown a dialog that will offer you the possibility to save your image in different formats.
Naming the Image
The first thing you should do is ask your employer if they already have some file naming protocols you should follow. If they don’t figure out a system on your own.
Here are the most important pointers concerning the file naming.
- File naming should be relevant to your business
- Be indicative and descriptive
- Each file name should be unique
- Be consistent with your file naming
- Go from general to more specific information in your file names
- Use lower case
- Don’t use spaces or special characters
Let’s just put in a line or two explaining this a bit.
File naming should be relevant for your business – For example, it you work for a company that sells shoes, there’s no need to add the word “shoe” into your product descriptions. It is enough to name them after the brand or a model name.
nike-air-max-270-white.jpg
From this file description, you can see it is a Nike shoe and that the model is Air Mac 270. You can also see the colour of the shoe. However, what you don’t see here is the word “shoe” in the file name.
File name should be indicative and descriptive – Are there images of different positions of those shoes? Are there shoes in different colours? How will you know? In order to search your files quickly, it is necessary to add those details in the file name. Just like in the example above: nike-air-max-270-white.jpg.
Each file name should be unique – this simply means that you should not save different files under the same file name. It is obvious why this could create confusion, isn’t it? Therefore, always add one specific detail in the file name to be able to recognise it.
Each file name should be consistent with the rules – Your rules won’t matter much if you are not consistent in implementing them. Browsing your file names in search for the precise image you are looking for will be a matter of seconds if you name your files consistently.
File name elements should go from the more general to the more specific – Give that example another look: nike-air-max-270-white.jpg The elements go from the more general to the more specific. First, you browse Nike brand. This brand has more than one model. In this case it is Air Max. There are even more Air Max types, and this is the 270. The last and the most specific is the colour of the model – white.
File name should have proper formatting – There are several rules to follow when formatting your file names. They are as follows:
- Use hyphens (-) not underscores (_) between words in the file name. For example, it is nike-air-max-270-white.jpg. NOT nike_air_max_270_white.jpg
- Do not use spaces between words. For example, it is nike-air-max-270-white.jpg. NOT nike air max 270 white.jpg
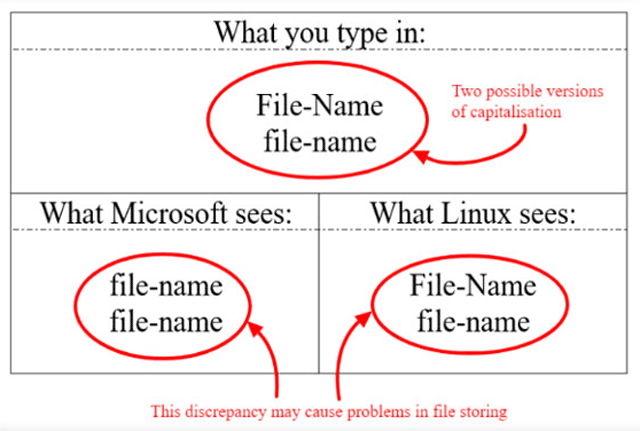
- There is no preferences between using uppercase or lowercase or file names, but when possible use all lowercase. The reason for this is possible migration in different systems:
- Don’t use joining words like “the” or “and”. They are a waste of character space.
- Don’t use more than 25 characters and/or 5 words.
Here are some more details about this topic that you can learn from.
- https://saradoesseo.com/seo-basics/what-should-i-name-images-for-seo/
- https://louisem.com/3596/how-to-name-images-seo
Adding Alt Text to the Image
Sometimes, your image cannot be displayed, for some reason. You’ve probably already seen this happen. There is an icon of a broken image and there is a bit of text, usually, that says what’s on that image. Something like a filename. In reality, it is the ALT text.
ALT text explains to both Google and users what is on the image. That is why you need to be very careful how you create it. It can influence your page rankings by informing the Google crawlers about the image relevance. Your ALT text should include keywords, but not too many of them to avoid keyword stuffing.
Read more on this subject here:
- Yoast: Image SEO: Optimizing images for search engines
- Shopify: 10 Must Know Image Optimization Tips
- aHrefs: Image SEO: 12 Actionable Tips (for More Organic Traffic)
Frequently Asked Questions
1. Why are positive images better?
a. The inspire positive emotions that can be associated with your store.
b. Negative images cost more money
c. It doesn’t matter, as long as the image is shocking
2. Why is it important to provide proper attribution to every image you use?
a. Because it’s simply polite to recognise and acknowledge the effort of the image author
b. Because the website owner may get sued
c. Because you can be fined if you don’t properly attribute the image author
d. All of the above
3. What information should you include to attribute an image properly?
a. Title, author, source, license
b. Author, title
c. Alt text, name and link
d. License
4. Where should you put your image attribution?
a. The best place for it is right underneath the image
b. If the previous option breaks the flow of your written content, you can place all the attributions at the bottom of the page
c. All of the above, depending on the circumstances
5. It is NOT necessary that you provide attribution when you’ve found images on the popular social media platforms such as Facebook or Pinterest.
a. True. All images shared on social media belong to everyone and are totally free from attribution.
b. False. Attribution is necessary even on social media!
6. What are two possible image orientations?
a. Left and right
b. Landscape and portrait
c. Vertical and horizontal
7. What is cropping?
a. Selecting one section of the image and trimming the other parts of the image
b. Changing the dimensions of the entire image
c. Changing pixel dimensions of an image
8. What is resizing?
a. Selecting one section of the image and getting rid of the rest
b. Changing the dimensions of the entire image
c. Changing pixel dimensions within an image
9. What does resample mean for Adobe Photoshop?
a. Selecting one section of the image and getting rid of the rest
b. Changing the dimensions of the entire image
c. Changing pixel dimensions of an image
10. What are two possible ways to crop an image in PhotoScape?
a. Crop freely and crop with preset ratio
b. Crop freely and crop round
c. Crop square and crop round
11. What is the best way to do scaling?
a. From a smaller to a larger image
b. From a larger to a smaller image
c. From a large image to an image section
12. How to resize more than one image in PhotoScape?
a. Use a Batch Editor tab
b. Use the Editor tab
c. Use a Multi-image Editor tab
13. What is the option that helps you resize an image in GIMP?
a. Scale
b. Resize
c. Crop
14. What is the easiest way to resize or crop images in Canva?
a. Using tools
b. Dragging the corners of the image
c. Pre-setting the dimensions
15. Which app has the Save for web option?
a. PhotoScape
b. Canva
c. Photoshop
d. GIMP
16. Which app saves the original image as well?
a. PhotoScape
b. Canva
c. Photoshop
d. GIMP
17. Which app normally saves images in its own format?
a. PhotoScape
b. Canva
c. Photoshop
d. GIMP
18. Which app is online and you need to download the image once you are done?
a. PhotoScape
b. Canva
c. Photoshop
d. GIMP
19. How long should a filename be?
a. 5 words
b. 25 characters
c. 5 words if they fit into 25 characters
20. What are stop words?
a. Short words like in, and, on that eat up characters but don’t add meaning to file names
b. Words at the end of the file names or sentences
c. Words such as “stop”, “warning”, “cease”
21. What is Alt text?
a. Alternating text: you create two versions of the same text and they are displayed one after the other
b. Alternative text: text that is displayed instead of an image that cannot be displayed
c. Alternative text: the backup text that is displayed if the text on the website doesn’t perform well