
Can you imagine going to a professional hairdresser’s only to realise that they actually don’t know how to use scissors properly to style your hair? Don’t they use this tool every day? How come they can’t handle it? Unbelievable, isn’t it? Undoubtedly!
Now, can you imagine an eCommerce professional, whatever their job title might be, being considered a specialist and being useful to their team without knowing how to use Google Docs to its full potential?
Furthermore, do you think such a person would be considered for a job if they’re NOT familiar with the basic tools of the industry? Definitely not!
Google Docs is to an eCommerce professional what scissors are to the hairdresser in their day-to-day work – a piece of equipment one cannot be taken seriously without being able to use it.
However, Google Docs is only a part of a whole suite of products within Google Drive besides Google Sheets, Slides, Forms used for creating documents, presentations, spreadsheets, and much more.
Here’s a short YouTube video from the official Google channel as an introduction to Google Drive for you to get the gist and see what we’re talking about before you learn more and get started with this precious online tool.
For those who are eager to dive a bit deeper into Google Drive immediately, here’s a video tutorial to watch.
No matter what exactly online career you start pursuing in the eCommerce industry, you cannot possibly imagine a single working day without using this tool. Just like a professional hairdresser cannot imagine spending a day at work without using their scissors.
Feeling a bit afraid because you’ve (almost) never used it and haven’t got a clue how to do so? Don’t worry!
That’s why this lesson exists so read on and don’t hesitate to explore this free tool yourself. What you need is only a free Google account and the Internet access.
In this lesson, you’re going to learn the following:
- who needs to use Google Docs in their day-to-day eCommerce business,
- why Google Docs are important and how they’re beneficial in one’s eCommerce working life,
- how to get started with Google Docs i.e. how to create, name, save, and find a document,
- how to format your content for blog articles in Google Docs,
- what extra features of Google Docs you can benefit from in eCommerce, such as Voice typing, Explore function, and Personal dictionary.
So, let’s start with figuring out who would use Google Docs on a daily basis and why they’re important in the eCommerce industry.
Who Needs to Use Google Docs in Their Day-To-Day Business?
When it comes to the question who uses this tool in their day-to-day online business, the answer is simple – almost every single eCommerce professional. Perhaps you didn’t expect it?
Let’s reassure you and think about the situations and daily tasks of a few most common eCommerce professionals in which they can’t live and work without Google Docs.
- First, there are Virtual Assistants (VAs) who need to learn at least a bit about Google Docs. Why would they need this tool?
- Well, they might have to collect some customers’ testimonials, write a short piece of content about a product, or check/edit the copywriter’s work online, or sometimes even add/edit product photos or videos, conduct research within the document, create product ads or email templates, or even just put down their thoughts before they email someone or before they publish a social media post.
- Then, they might have to create attachments, download documents in different formats and convert them (e.g. an MS Word document into a Google Doc or vice versa). They might keep track of relevant keywords if they take care of search engine optimisation (SEO), or create, monitor, or update to-do lists for the other team members, allocating tasks to them daily or weekly, as well as writing reports or meeting minutes.
- In other words, they make use of Google Docs in managing the whole team and almost every aspect of their business online on a daily basis in real time from wherever they are.
- More than enough reasons to master this tool if you want to become a VA, right? But that’s just the beginning!
- Customer Service Representatives (CSRs) need to be familiar with Google Docs, as well. You can’t figure out the reasons why?
- For example, they may need it for writing live chat templates or drafts for answers which will be published on the store’s FAQ page. It would help them save a lot of precious time because by compiling and altering the old content they would have ready-made answers to the questions customers keep repeating.
- The only thing they need to do is adjust the content a bit or compile several points of the old answers into a new one that suits the customer’s needs at that moment. It’s how this tool makes their tasks simple and quick, isn’t it?
- A CRS’s job is to guide the customers through the sales process and to provide human support ensuring that a store’s website offers the customers seamless shopping experiences.
- There’s a wide array of daily business correspondence tasks they perform and using Google Docs, among other tools, helps them work more quickly and efficiently.
- Copywriters who want a career in eCommerce also cannot get it without knowing the basics of Google Docs because they will write a lot and this is a popular tool they’ll need to use.
- Now you probably wonder why a copywriter working as a part of an online team would want to use Google Docs. Why wouldn’t they just use MS Word instead or any other word processing tool?
- We’re going to talk more about the benefits of Google Docs in one of the following sections below, but let’s just briefly mention here that anyone with a permission in an online team can access, view, or edit a document at any time, wherever on the planet they are, online or offline, from any device: computer, tablet, or telephone.
- Amazing, isn’t it? All this certainly cannot be achieved as successfully with another word processing tool, e.g. MS Word.
- Thus, copywriters have to use this tool whether they’re writing blog articles for an online store, product descriptions, CTAs, certain store website pages such as About us page, FAQ page, Why buy from us page, Contact page, Help Page, or any other content within their scope of duties.
- Then, they might also need to use this tool when editing or proofreading other copywriter’s or any other teammate’s work, when brainstorming with colleagues to generate ideas for blog posts or to come up with a perfectly catchy headline for their blog article, as well as when creating content for e.g. social networks advertising campaigns.
In a nutshell, whether you’d like to work as a VA, CSR, copywriter, Graphic designer, Marketer, or any other professional within an eCommerce team, you simply can’t and shouldn’t avoid common online tools such as this one.
Being able to use Google Docs goes without saying if you want to be taken into consideration for any position mentioned above.
You still can’t figure out why someone would need to use it every single day? Let’s see.
Why Is Google Docs Important in eCommerce?
One might think that it’s not a big deal and that literally anyone can learn how to use Google Docs on the job and just make it up as they go, which makes this type of training completely unnecessary according to their opinion, right?
Well, NO!
You’re here not because you just want any online career but primarily because you are determined to become a REAL professional in eCommerce better than others. That’s the spirit!
You want all the benefits that come from being able to work from home or a co-working space, don’t you? It’s nice when you can start and stop working when it suits you. This tool enables it, among many others you’re going to learn how to use.
Isn’t it awesome when you’re able to take a break whenever you need in order to, let’s say, pop out to the shops or go and get your kids from school in the middle of your working hours?
YES!
But to be offered such great working conditions from your employer, you MUST be skilled enough and worth it.
That’s exactly why you’d want to take it one step further – REALLY LEARN what the tools could do – so that you could set yourself apart from other people who are just turning up online and thinking they can use all the tools just because they’ve got two eyes, two hands, and some common sense.
Remember that a person with such an attitude can never be observed as a real professional.
Back to the hairdresser from the beginning of our lesson.
Anyone can use scissors to cut i.e. a piece of paper or cloth, but NOT anyone knows how to use those scissors to cut someone’s hair and style it perfectly to match the person’s face shape, hair type, attitude, preferences, complexion and so forth.
That’s what only a truly dedicated professional knows. Don’t you agree?
Now, we’re going to present briefly some of the reasons why (i.e. the tasks in which) one would use Google Docs to demonstrate to you why it is important in eCommerce, regardless of your job position.
- Firstly, if you have to write, let’s say product descriptions that need to be approved before they are loaded onto the store’s website, the perfect place for them to be written and stored is Google Docs.
- Why? Because the person who writes and the one whose job is to check, approve, and load the content may (and probably do) live and work in different time zones.
- Thus, it would be a hassle to send multiple emails and attachments with different versions of the text back and forth and track changes. What’s more, it would probably last for a few days. Actually, the more people involved, the more chaotic and frustrating process it would turn into.
- With Google Docs, anyone with a relevant permission can access the content any time and see its previous versions in a single document. It’s also possible to make suggestions, leave comments, or even chat within a document, collaborating more efficiently in this way. More about this a bit later.
- Secondly, the same goes if you have to write, let’s say, a product review or comparison, or meta titles and descriptions, although these are typically downloaded and formatted in a spreadsheet. However, using Google Docs for these tasks makes it easier to see the relationship between each piece and do word counts.
- Thirdly, if you’re writing a blog article or press release that needs to be checked and sub-edited before being transferred to an online store’s blog section, you can’t make it easily without Google Docs for the reasons mentioned above, as well as the ones we’re going to talk about in detail in the next section.
- Then, this tool is of incalculable value, for instance, if you’re tasked with creating an SOP (standard operating procedures) and you need to get some input before adding a complete document to the company’s library.
- With Google Docs you have a living document you can make changes to and update. Then, when you’re sure you’ve completed a satisfactory version of it, you can transfer the clean content into the library without making a mess within it.
- Similarly, you can always get back to your document to adjust it, adding or removing some portions of the content.
All in all, the tasks we’ve mentioned here are NOT even close to a full list of tasks for an eCommerce professional whether working remotely as a VA, CSR, copywriter, or any other online store’s team member.
They’re listed here as a few examples to illustrate the main point – the importance of using Google Docs in eCommerce.
In the following section, we’re going to deal with the benefits of Google Docs to your eCommerce career in more detail. So, let’s start.
Benefits of Google Docs to Your eCommerce Working Life
Having seen why every online professional within the eCommerce industry has to have this type of training and to be highly skilled in using the tools of the trade, you’ll be shown how they (i.e. you, once you start working) can benefit from Google Docs precisely.
Google Docs Is Collaborative
Working remotely within an online team of 5, 10 or 50 people from all over the world can become quite challenging if your company hasn’t found a sustainable way of collaborating among its team members.
Luckily, one of the primary functions and advantages of G Suite (Google Docs being a part of it) is the collaboration feature.
What exactly does it mean in the context of professionals working in eCommerce?
It means that all the members of a team with a permission can take part in creating and editing a document (e.g. a blog article, a product description, or any other content for an online store). In other words, they can:
- add and reply to comments, leave notes, ask and answer questions,
- chat within the document in real time,
- highlight and suggest edits for specific parts of text, accept or reject them, or
- simply make changes directly in the document,
- add a team member as a collaborator at any stage of the working process,
- always see what changes and edits other team members have made to the document and when,
- know who is responsible for which contributions, and the like.
Moreover, you can perform all these actions mentioned above either in real time or anytime that suits you. Amazing, isn’t it?
Furthermore, your co-workers and you can get email notifications whenever someone answers your comments within the document.
Another option is for all the members of your team working on the same document to open it right away and engage in a real-time discussion via Skype or Google Hangouts. This way one can teach the others, talk them through the changes to the content they’re making and explain why they’re making those changes to that particular text.
Here are a couple of short videos showing how teams use Google Docs to collaborate effectively.
Doesn’t this tool make remote team members’ lives much easier? Sure it does.
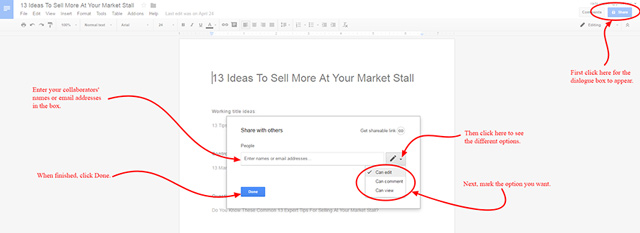
Of course, in order to collaborate with the other team members in this way, all of you have to be granted access to the same document. When you share your document with collaborators, Google Docs will offer you four access levels i.e. four different permissions:
- Can view
- Can edit
- Can comment
- Is owner
With these options, which appear to be self-explanatory, you can easily control over the access to your documents.
Another great feature is that you can set your teammates’ access to expire after a certain amount of time/days.
Here’s how to share a document with your co-workers and to set their levels of access to it (although you could see it in the videos included in the lesson).
How convenient, isn’t it?
With all these features once you start working as a copywriter, for instance, you can easily get feedback on your work and your boss can always see where you’re up to and check your work regularly.
This tool is fully interactive and collaborative. It completely eliminates the time lag which existed with emailing documents back and forth earlier, which further simplifies the whole collaboration process and makes communication much easier.
Google Docs Is Always Available
With this tool eCommerce team members can access their database from anywhere across the globe 24/7 using any device which is at their disposal. It enables you to work on the go wherever you happen to be, whenever it suits you best.
Such accessibility and flexibility are extremely helpful because they increase productivity. One of the most beneficial features of this cloud system is exactly this omnipresent availability – it enables even those who need to travel a lot to work collaboratively and efficiently within a team.
Google Docs Lends Itself to Version Control
As you already know, working in the eCommerce industry usually implies working in an offshore team – a store owner and other workers living in different countries/continents/time zones.
It means a number of people work together on the same document either simultaneously or at different times.
In such situations the version control option comes in super handy. You wonder why?
Imagine five to ten people working on the same text document (e.g. a blog article) from different places and time zones:
- some of them are highlighting specific sections, commenting on them or asking questions about them;
- the others are leaving replies to those comments;
- a few are communicating through a built-in chat;
- some are editing the content directly in Google Docs melting some chunks together or rearranging some paragraphs;
- whereas others are suggesting edits which someone else in the team accepts or rejects later.
This way you end up having a valuable living document that’s highly collaborative as well. It’s great to have this real collaboration tool which helps you work together and have a good result, isn’t it?
However, it can also turn into a complete mess. For example, during the whole working process, occasionally someone may accidentally overwrite their entire work or delete something important and ruin a really good version of it, right?
But with version control nothing’s lost! Luckily, you can always get the old version of the document back! Don’t you think it’s fabulous?
Thanks to this option available in Google Docs, you can always see what someone else wrote, that is to say, different previous versions of the same text are available. It’s how you’ll always know who contributed to the document and at what time.
All you need to click on is File > See Revision History. It will open up a sidebar showing you all the previous revisions of the text and giving you the option to restore an older version.
This is extremely useful because people do make mistakes when they’re working as a team in an online environment so they really need to be able to go back to the original version of any document.
This way they have that unlimited revision history which can be kept indefinitely without occupying their precious storage space.
Google Docs Is Extremely Flexible
- It’s available for many different file types: .docx, .pdf, .txt, .html, and the other popular formats. This means you can view these files and import them into your Google Docs and they’ll be editable.
- Moreover, you can convert all those file types into Google Docs format and vice versa quickly and easily. It goes without saying that the original files remain intact.
- Just go to File > Download as, as shown below, and you’ll see all the available formats you can work with.
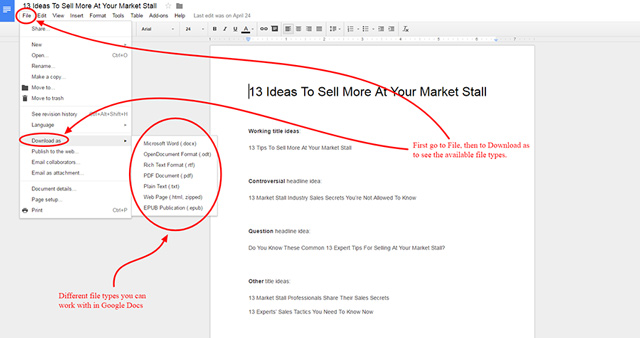
- No more restrictions! No need to worry, let’s say, whether someone’s sent you a .doc or .docx file via email and whether your computer will be able to open it or not.
- What’s more, all MS Office files in Gmail attachments can also be converted and edited directly with Google Docs.
- It’s also accessible from many devices: a laptop or desktop computer, mobile phone, or other mobile devices such as iPhone, iPad, Android – literally from almost any smart device.
- For instance, as we’ve already mentioned, Google Docs makes it possible for those who need to travel a lot to work from their mobile devices, which is a great advantage.
- It isn’t a problem anymore if you’re at a concert or a football game and your teammates ask you to quickly alter or adjust a document a bit. It’s a piece of cake now because you can do it from your mobile phone in a blink of an eye and continue enjoying the show.
- Not only can you create or edit content and share documents in Google Docs online, but there’s a possibility for you to do it even when you’re offline. No more limitations!
- Yes, you’ve heard it properly – you can now work e.g. from a remote rural area with NO Internet connection or during a plane flight and this awesome tool will automatically sync the changes you’ve made to a document as soon as the Internet connection is restored.
- The only thing that needs to be done is that your G Suite admin provides you with the offline access to Google Docs. Here’s more about how to enable offline editing in Google Docs.
- Have we mentioned that all the changes are saved automatically, which means you’ll NEVER have to hit that Save button again?
- The best thing about this valuable free tool with all the storage you need is that it’s extremely simple and straightforward, which makes it easy to learn. Anyone who has ever used any word processing tool such as e.g. MS Word won’t find it difficult to pick up on how to use various options Google Docs offers at all.
Getting Started With Google Docs
In order to utilise Google Docs, the first step is to create a free Google account. Here’s a guide on how to set it up in 7 simple steps.
Now when you’ve created your new Google account, which was pretty quick and straightforward, you’re ready to master Google Docs, aren’t you?
In the sections to come, we’re going to explore some basic menu bar and toolbar options such as creating a new document, naming/renaming it, saving, and finding it. Later on, you’ll learn more about formatting options, as well.
So, here we go.
How to Create and Name Google Docs
Let’s start with getting into your Google Drive from your Google account email/Gmail screen. There’s an Apps button in the top right corner. Click on it to see all the different Apps you can use.
One of them will be Google Drive – that’s what you need to click on. Once you do that, it’ll open a new tab showing you all the items you have in it.
It looks like this.

Another way of accessing your Google Drive is to type in drive.google.com in Google search bar.
There are also different ways of creating and naming a document. Here’s one of them.
To create a new document, you can click on the New button (on the left) and choose Document from the drop-down menu. Then, click on the arrow on the right and choose the option Blank document. It’s going to open a new document in a new tab. There you have it! You can start typing and editing your text now.
However, it’s still called the Untitled document and you’ll probably want to name it, right? Don’t worry, it’s a piece of cake!
You just need to go up to the top left corner of your document, click on Untitled document, type in a new document name, and press Enter.
Another way of doing it is choosing the option Rename under the File menu. The rest is the same. You repeat the same steps any time you want to change the name of a document.
Could it be more simple? No way!
For those of you who are more visual types of learners, here are two short videos guiding you through the whole process.
Creating a new document:
Renaming a document:
Now you’re ready to move on. Let’s learn how to save and store Google documents.
How to Save and Store Google Docs
We’ve already mentioned that you’ll never need to hit that Save button again if you work in Google Docs. It’s because everything you do with a document (e.g. rename it, type in some text, edit it, insert a hyperlink or an image, delete something etc.) is saved automatically.
Marvellous, isn’t it?
You can choose the location of your document by creating it within a particular folder or by simply dragging it to another desired location. By the way, you create folders the same way as documents, just click Create and choose Folder.
How to Find Google Docs
If there are thousands of documents stored in your Google Drive and you need to find a particular document within a few seconds, this tool has backed you up here, as well.
Just click on the search bar of your Google Drive (it says Search Drive) and you’ll get various options displayed, as illustrated in the example below.
Let’s say you’d like to find the file 13 Ideas To Sell More At Your Market Stall as soon as possible but you cannot even remember its full name/title.
If number 13 is the only part of its name you can remember, type ‘13′ in the search bar of your Google Drive and press Enter.
You see how it works?
If you don’t remember any part of the document full title but you know e.g. it’s been saved as a text document, you can simply click within the same search bar and it will offer you to search your Drive for a particular type of the document:
- PDFs,
- Text documents,
- Spreadsheets,
- Presentations,
- Photos & images, or
- Videos.
Then you choose the document type you’re looking for and it lists all the documents of that very type.
Another option you can chose is More search tools, which can be found last on the list of the document types mentioned above or when you click on the small arrow on the right side of the Drive search bar.
A new box with various other search filters will pop up when you click on this search option. It will allow you to filter your search further according to:
- the file type,
- owner of the file,
- the file location,
- the date it was last modified,
- the file title/item name,
- words/phrases found within the file,
- who it was shared with,
- follow up (such as action items assigned to you, or suggestions in files you own).
To narrow your search, choose one of these options and click Search to find the document you need.
A real no-brainer, right?
Similarly, you can find your files stored in the following locations, too:
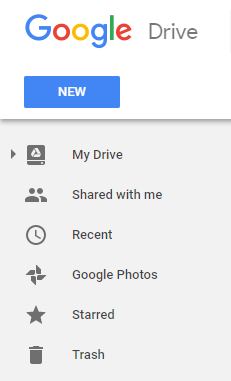
Most of those you create will be saved in My Drive, whereas you’ll find the files other people shared with you in Shared with me and those you’ve recently opened in Recent.
Now when you’ve learnt the essentials i.e. how to create, (re)name, save, find, share, download, and convert documents, as well as how to use them to collaborate, it’s time to further explore all the options and possibilities of Google Docs you may find helpful once you join the eCommerce industry.
In the following subsection, we’re going to teach you how to format your content for blog articles using Google Docs.
Formatting Your Content for Blog Articles in Google Docs
Once you start working within an online store team, sooner or later it’s very likely that you’ll be assigned a task of applying different formatting options on a piece of content for the store’s blog, regardless of your position because it’s a type of work every online worker is expected to know how to do.
When you finish reading this lesson, you’ll be aware of all the key elements used in formatting that make a blog article readable on the web, so you’ll also be able to state proudly that you know how to format content for online store blogs.
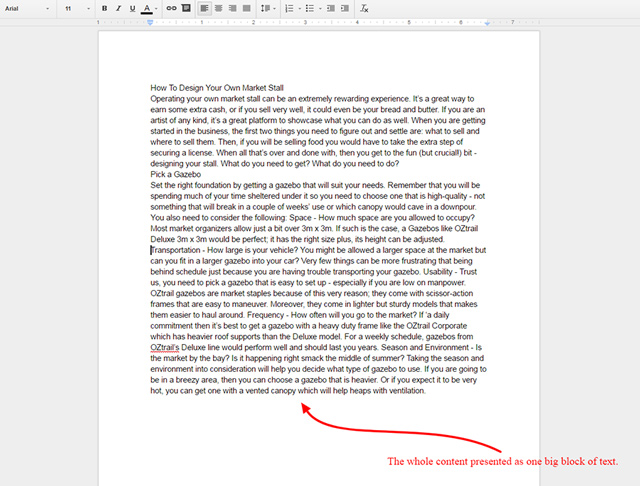
Here are a few important guidelines for you to follow when doing formatting, all illustrated with a real blog post example from Gazebos Australia: How To Design Your Own Market Stall, as well as with their other suitable blog posts.
First, please, take a glance at the initial example of a part of our blog post with NO formatting applied whatsoever.
Feel tempted to read it? We doubt it!
Now we’re going to give you some tips on how to make it more appealing and suitable for an online store blog. In addition, we’re going to tell you how your content gets transferred to a web page using HTML – a standard language for creating web pages.
Have no clue about how HTML works? Don’t worry! That’s why you’re here – to learn and perfect new skills. The answer is just a click away from you! Don’t hesitate to follow the link and find out more.
After you’ve read through each of our formatting tips carefully and analysed some other similar examples, you’ll be presented with the video guides on how to implement all these helpful pieces of advice in our initial example.
You’ll notice how the content changes right in front of your eyes and the big block of text gets a better shape with each click, experiencing in this way the different effects it has on your target audience. What’s more, you’ll be aware of what’s going on behind what you can see. Interesting, isn’t it?
Ready? Let’s start!
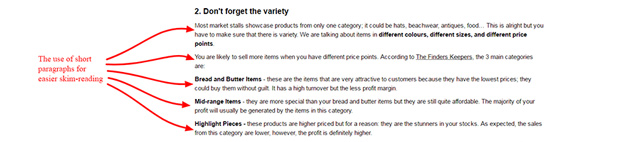
Use Short Paragraphs
No need to tell you why using short paragraphs in blog posts is important especially for scanning and skim-reading, which have been proven to be the most usual ways people read on the Internet. Just take another glance at a part of our example blog article presented as a big block of text in case you can’t remember it.
Then, take a look at a subheading from another Gazebos Australia blog post to rest your eyes a bit.
You see the difference?
The thumb rule in formatting blog articles is to AVOID huge blocks of text because they’re really difficult to read and extremely unappealing to the reader.
You should aim at presenting ONLY ONE idea per paragraph while keeping your paragraphs as short as possible – NO longer than 3-4 lines.
To mark the beginning of a new paragraph, position your cursor at the end of the previous paragraph and press Enter on your keyboard. This is also known as a hard return or break, as opposed to a soft return (Shift+Enter) which denotes only the beginning of a new line and is inserted automatically by a word processor depending on its word wrap capability.
Of course, you can also use it to force a line break without inserting a new paragraph.
Here’s a video explaining the difference between soft and hard breaks in MS Word documents, but it’s also applicable to Google Docs so take a peek.
Although these returns are not always visible, writers have to be aware of them since they are transferred into blog articles. Here’s more about how web browsers display paragraphs, soft and hard breaks depending on the HTML elements involved.
Be Aware of Headings Hierarchy
Every blog article has a heading (its title or headline) and some subheadings (subtitles). The main heading which starts right at the top of every article is marked H1.
The following subheadings are marked in order of the importance as H2, H3, H4 etc. as illustrated in the example below.
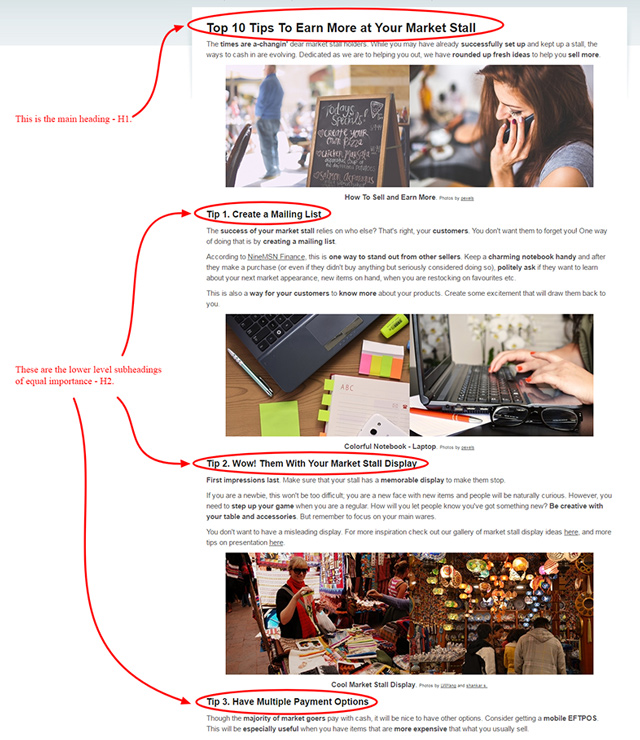
Different formatting options (font, size etc.) are applied to different types of headings. There are always some default options to use or you can create your own heading styles according to your employer’s or your own preferences.
Note: This will be demonstrated in the video at the end of this subsection.
It sometimes happens that newbie writers use Heading 1 all the time because they think is just a heading – nothing special. But is that really so? Definitely NOT! You shouldn’t neglect them!
Apart from being a heading, it’s actually a semantic HTML that it gets transferred into and there’s a certain hierarchy you should always be aware of. You wonder what happens ‘behind the scene’?
Well, let’s say it’s a bit like a translation process going on from e.g. English into French. All these various headings from your Google document get translated across into a blog article on a web page because all stores are online, right?
So, you must know that a certain bit from your Google Document (e.g. Heading 2) is going to get translated into another bit on the web page (e.g. H2) and to use these headings accordingly and consistently.
In other words, H1 starts at the top as the main and the most important headline. For the other subheadings you can use H2 (as many as you want to). If you divide H2 parts of the text into smaller units, you’ll have to use H3 and so on (the last one being the least important).
Since it’s all converted into HTML, it has to be used in order 1, 2, 3, 4, NOT e.g. 1, 4, 4, 3, 2, 1 or any other random order. Got it?
There HAS to be a sequence because it’s how the web works. Thus it’s very important for a VA, copywriters and the other team members of an online store to UNDERSTAND and pay special attention to the headings hierarchy.
One more important point – on NO account should you use headings to emphasise any other important parts of your text just to make them big enough to stand out!
There’s a bold option (among others) to achieve that effect. Keep reading and find out how to use it.
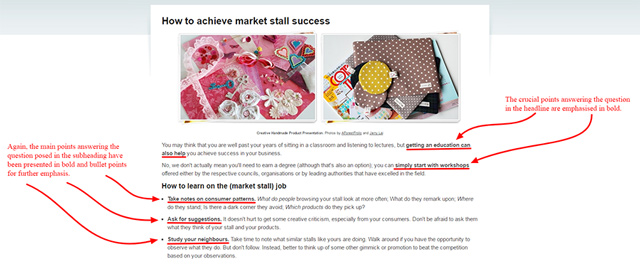
Bold Your Important Points
Another useful formatting option you must know how and when to apply is bold. When you bold a chunk of text, it means that the customer’s attention in an eCommerce store is attracted to that chunk in bold.
Therefore, be careful with bold text in your blog articles. Only use it for customer-oriented words or phrases i.e. expressions the customer can benefit from or for keywords important for SEO (search engine optimisation).
Take a look at the smart use of bold in the following blog post example from Gazebos Australia.
On the other hand, be careful NOT to overuse bold. If you emphasise entire sentences, unimportant words such as conjunctions, or too many phrases within a single paragraph, bold will lose its point. Nothing will stand out that way.
Besides using bold for important expressions, you’ll notice the use of short paragraphs and a bullet list, as well. All these features foster skim-reading.
Also, be aware that whenever you bold a phrase in your blog content you’re creating in a Google document, it gets translated to the strong tag in HTML (as shown in this example), which defines important, emphasised text.
Use Bullet Lists
Why wouldn’t you make good use of bullet lists in writing your blog posts for online stores? They also bring about easier skim-reading, as we’ve said before.
What could you possibly use them for? Well, they could be great for e.g. presenting characteristics of a product, as in the example below.
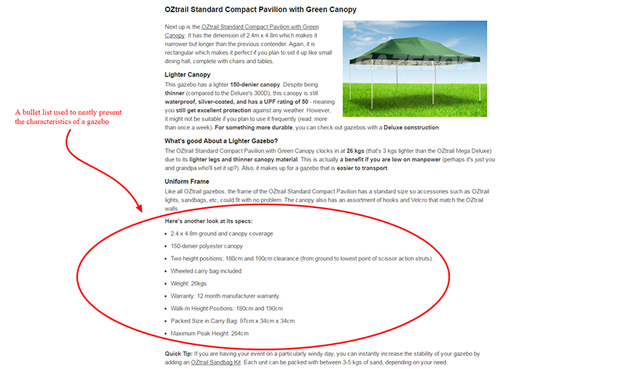
Not only that. You can use various types of bullet points whenever you want to organise your ideas, tips, ‘how to’ procedures explained step by step, and the like and to present them neatly within a blog article.
Here’s another example:

The ideal length of your lists would be between 5 to 7 bullet points.
Insert Hyperlinks
Inserting hyperlinks is very typical for blog writing. There’s always need to hyperlink either to a store’s internal pages (product pages or other non-product pages such as blog articles within one store’s website) or to external websites of other sources.
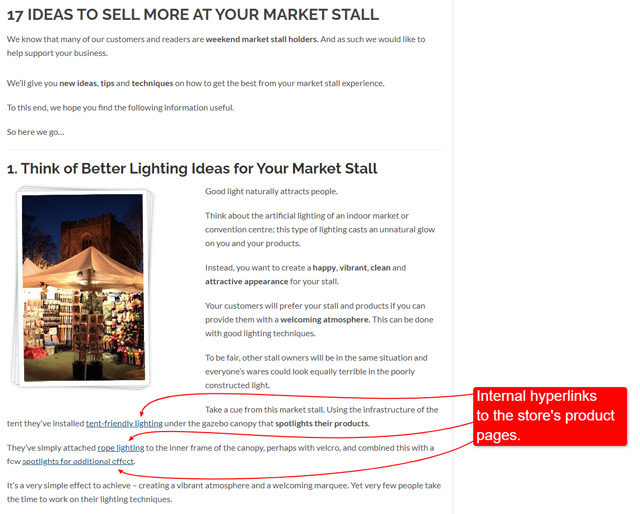
Here’s an example of a blog article from Gazebos Australia that links out to the store’s product pages.
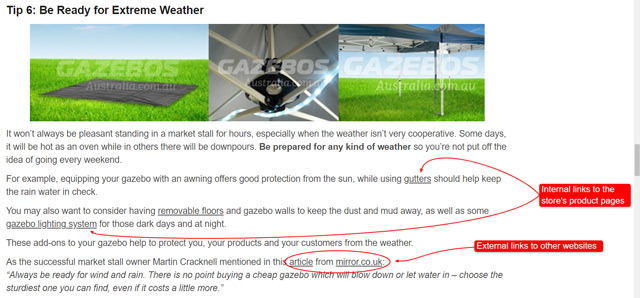
Here’s another similar example with both internal and external hyperlinks inserted.
Why is inserting hyperlinks so beneficial for an online store? Because Google simply LOVES following links! So, don’t miss this great opportunity to boost your store’s search engine ranking.
Here’s some more information and examples on how it works with HTML. You shouldn’t neglect what’s going on ‘in the backstage’, remember?
OK.But you probably wonder which steps to take in order to insert hyperlinks in your blog post, right? Here’s what you should do:
- Select the part of the text you want to make a hyperlink
- Click the Insert link button, or use the shortcut Ctrl+K
- Type the address in the Link field, or Copy (Ctrl+C) and Paste (Ctrl+V) it
- Click Apply to get a hyperlink
Now, when you click on that part of text, you’ll be able to view that URL in a new tab.
Insert and Edit Images
Now our piece of content looks better. It is easily readable but if you want to make it more dynamic and visually appealing, it would be wise to insert an image in it, right?
You can start with Insert > Image and then select the one of the options you need (more details about the options and how to insert, delete, or edit images in the link provided).
In the following video, we’re going to show you how you can insert an image into a Google document quickly and easily.
Now, let’s see how to edit it (resize and crop it) and a bit more.
As simple as that!
Whenever you insert an image or any other visual into your blog post, make sure you cite its sources properly.
Thus, here’s more on using free and paid image sources, how to identify good images and how to understand Creative Commons license definitions.
Also, make sure you refer to our lessons Understand Creative Commons and Image attribution to learn everything you need on that topic.
When it comes to collaborating with other team members e.g. the Web Developers who are supposed to embed that image in the blog webpage, the procedure is the same as with text.
To add a comment for an image, just click on it and click on the comment icon that will appear to write a comment about the image.
Now, when you’ve watched all the videos, you’ve seen what we can do to make a block of text more readable and enticing. Moreover, you’ve learnt how to do it yourself. Isn’t that a great feeling?
Nevertheless, there are some more extra options this tool offers and we would like to teach you how to use those, as well, because you’ll certainly find them extremely useful in your future eCommerce career.
Ready? Let’s waste no time!
Some Useful Extra Features in Google Docs
A life of an eCommerce professional will be easier if they know how to take advantage of the following helpful extra features in Google Docs you’ll find within the Tools menu.
Voice Typing
Can you imagine how interesting and useful typing without your fingers touching the keyboard can actually be? Especially for those who type slowly or can’t spell words properly.
This option of dictating what’s on your mind is a saver for those who have to put their thoughts down onto a page very quickly e.g. when they’re taking notes during a meeting, which they can edit later.
Google Docs has this absolutely brilliant feature you can simply turn on by going to Tools > Voice typing and click on the microphone when you’re ready to speak. It can only be used in an up-to-date Chrome browser and here’s more about how to use it.
Not only can you create documents using this cool feature, but you can also edit and format them! Here’s a video showing you how to use Voice typing to format your Google Docs.
We strongly recommend that you have a closer look at the Help box and explore all the available voice typing commands you can utilise within your Google Docs.
Check out all those commands which will help you to edit and format your content with less time and effort, whether you’ll need them to compose letters, write blog articles, live chat/FAQ section answer templates, or any other content.
Now, we encourage you to imagine you’re working as a copywriter and you were asked to write a blog article e.g. about the best type of gazebo for a family and to submit it till the end of the day.
If you know something about the topic, this is the way you can get ideas down onto the page really fast. It would be much easier to subedit and move all that content around then, right?
Perhaps you’ve found some inspiring content or image on another website? You can grab it a blink of an eye by simply talking what’s going on in that image or on that webpage. You’ll have to open those websites and your working document in separate parallelly visible windows in that case.
All this makes the whole writing process more time-saving and efficient. Test it to see how it works!
What would you write i.e. say if you were this copywriter? Maybe your very first unshaped ideas would sound like this:
The best type of gazebo for a family is something that’s waterproof so that it can keep the rain away during inclement weather. It would be something with walls to protect people from rain, snow, and wind.’
Go ahead – create a new Google Doc and dictate this piece and your own thoughts on the topic to check whether the tool can recognise your accent. Note that you must choose a language first, speak clearly, at a moderate pace, and to say your punctuation aloud.
Isn’t it fun to pretend you have a personal digital secretary? You can have more fun by trying to find some other creative ways of using this feature in the eCommerce industry if you please.
Luckily, this awesome function is NOT the only one you can make good use of in your online career! There are some more.
The Explore Function
Another handy function for you to play and work with is the Explore function. It enables you to create better work faster by finding whatever you need on the web (images, research, citations…), grabbing it and pulling it into your document without leaving the page.
To access this amazing feature, you just need to go to Tools > Explore and it will open up on the side. You can also find it in the bottom right corner and launch it by clicking on the icon of the small star.
With this impressive option, whatever the concept of your document might be, you’ll be able to add more valuable information to it by exploring the web, images, or your Google Drive.
What’s more, it will save your time by focusing on the most relevant topics and provide you with instant suggestions based on the content of your document. Having those data-driven suggestions presented in three separate tabs, it will be a lot easier for you to:
- Search the web and learn more from its automatically recommended related topics/sources based on the keywords found in your document,
- Insert pertaining images – you need those licensed to be used with minimal restrictions (labelled for commercial reuse with modification), or
- Find another relevant document from your Drive (in case you forget what’s in there).
In addition, it’ll allow you to search the Internet manually within the document without opening a separate browser tab. Just type in your search term in the search box and hit Enter. This will make your work (research and writing) more productive and efficient for sure.
According to Google, this is
‘like having a researcher, analyst and designer by your side.’
That’s why this tool’s worth checking out. So, let’s do it.
Once you start working as a copywriter, the Explore feature will help you make your blog articles more attractive and media-rich by adding images, quotations, Tweets and the like quickly and easily from the web straight into your working document.
Not only can you search for e.g. images of market stalls from all over the web (by typing in your search term in the search bar) but you can also use the ‘site:’ operator to search for images within a desired website.
For example, in this case you’d type ‘market stalls site:pexels.com’ in the search bar to find the free stock images of market stalls on the pexels site.
Why wouldn’t you create a Google document and practice a bit? Go ahead! Have fun learning!
Here are more options to explore and learn how to use.
Make Your Own Personal Dictionary With eCommerce Terms
Another incredibly useful feature you can also find in Tools is Personal dictionary. Why would an eCommerce worker need it? Let’s see.
Suppose you’re working as a CSR, a VA, or a copywriter for Alsco, writing articles for their blog Greenroom. Every time you write the word Greenroom into your Google document, Google will automatically try to correct it into Green Room, which is NOT actually correct in your case.
However, Google doesn’t know it and will always try to autocorrect it, which can drive you crazy at times. Here is where this tool can help you a lot!
Namely, you just need to add the term Greenroom to your Personal dictionary and then Google will know that you don’t want it corrected. As simple as that!
Therefore, for instance, if the online store you’re working for or your client has a funny or ambiguous name (such as Goggle, Bigcommerce, Godaddy and the like) and you’re constantly using those words in your copywriting or in your work as a VA, make sure you’ve added them to your Personal dictionary.
This way you’ll show Google you do NOT want these words corrected and it’s a really great time-saver because there’s a whole bunch of such words that are usually used as jargon (e.g. CTA, breadcrumb, checkout, API, DIY).
With all these tools and options you have on your disposal creating a valuable, dynamic, and visually appealing blog post sounds no more that difficult, right?
We bet you’re looking forward to showing the world your new skills and playing with all these interesting options within your brand new Google document! Hold on a moment, please.
Further Resources
In case this was not enough to you and you want to learn more or revise what you’ve learnt, here are some suggested resources to consider. You might also explore the Internet yourself.
- Google Docs – The Document Toolbar and Menu Bars
- Google Docs – Tutorial 01 – Learn the Basics
- Google Docs – 5 great features
- 7 Google Docs Tips & Tricks You’re Probably Not Using
- Google Docs – 4 Important Things to Know
- Google Docs – 4 Terrific Time-Saving Tips!
- How To Wrap Text Around An Image In Google Docs
- Google Support – Adding charts or tables
- Google Support – Adding headers, footers and page numbers
- Google Support – Inserting special characters
- Google Support – Adding, editing, removing a link, bookmark, or page break
- Google Support – Using find and replace
- Google Support – Using spell-check and autocorrect
- Google Support – Keyboard shortcuts for Google Docs
- Google Support – Formatting paragraphs
- Google Support – Adding table of contents
- Google Support – Publishing and embedding Google Docs
Before you get down to exploring Google Docs in great depth, let’s summarise the main points presented in this lesson.
In Summary
Since you’re here, it’s obvious that you want to gain knowledge and perfect the skills necessary for any serious eCommerce specialist. One of those skills is using Google Docs to its full potential.
If you want to be considered a real professional in the industry, you’ll have to master all the necessary tools of the trade. Moreover, always be aware of their importance and how you can benefit from them when performing your daily tasks.
So, here are the essentials you MUST know about using this tool:
- How to create, name/rename, save, and find Google Docs;
- What to use the main functions in the toolbar for when creating, editing, or formatting text;
- How to make this tool a great asset when collaborating with your co-workers from all over the world living and working in different time zones (share a document, edit it, make suggestions and comments, accept/reject/answer them, download a document as a different file type, see different versions of the text, control the progress and see who contributed to the document and at what time, and the like);
- How to format your content for blog articles in Google Docs (using short paragraphs, different headings, bold, bullet lists, inserting hyperlinks and images, and the like);
- How every formatting option you apply gets transferred to the web page and what HTML has to do with it;
- How to use some helpful extra features of this tool, such as Voice typing, Explore function, and Personal dictionary to increase productivity.
All in all, this knowledge will make getting a better online job and collaborating with your teammates a breeze so don’t hesitate to grab it.
Now, we’re ready to see what skills you’ve honed so far. Go ahead and show us what you’ve learnt. Do the quiz and complete these interesting exercises. Enjoy yourselves.
Frequently Asked Questions
1. Who needs to use Google Docs in their everyday eCommerce business?
a. No one
b. Only the store owners and copywriters
c. Every eCommerce professional
2. What are the benefits of Google Docs for online workers?
a. Google Docs are interactive, collaborative and available from all around the world 24/7
b. They are available for various file types and accessible from different devices
c. You can always restore previous versions of a document
d. All of the above
3. If you want to save what you’ve written in your Google document, you have to click the Save button every 5 minutes.
a. True. Otherwise, everything you write will be lost forever
b. False. There’s no Save button in Google Docs because all changes are saved automatically
4. In order to make your eCommerce blog articles more appealing and easily readable on the web, you have to apply these formatting options:
a. Write short paragraphs (3-4lines), mind the headings hierarchy (H1, H2, H3…), bold your important points to make them stand out, clearly present your ideas using bullet lists (5-7 bullets long), insert internal and external hyperlinks and images to make your content more dynamic and interesting.
b. Write bigger blocks of text using only Heading 1 for subtitles if necessary. Don’t use bold because it’s ‘shouting’. Similarly, don’t add colourful images and hyperlinks because it will not look professional and serious enough.
5. Voice typing is an extra feature in Google Docs meant mainly for online store owners to use it as a substitute when their secretaries or VAs take a day off or go on holiday.
a. Yes. This option has NO other purpose.
b. No. All eCommerce professionals can use it whenever they need to put their ideas down quickly and then edit and shape them later.
« Previous
Next »