
The aim of this guide is to ensure that access to the tools and systems you use is as secure as it can be. Employees tend to come and go from a company, and if someone leaves on bad terms then you need to be able to lock them out of our systems as fast as possible.
We use Passpack for our password storage system. You can use any system that you prefer and then adapt this how-to guide for your own Knowledge Base. You can see a copy of this guide in our example Knowledge Base here.
All login and passwords, and information relating to servers, hosting, domains and third-party software tools are stored at Passpack in the “StoreName” account. We use Passpack because it provides us with an easy and secure online system that is device independent. It can be used from anywhere, by anyone with an account. When you start working with us, you will need to setup a Passpack account. It is free to use.
Step 1: Setup A New Staff Account
- Go to Passpack. Sign up for a new account. It is free.
- Choose a UserID (eg: yourname), Password and Unpacking Key.
- Check your email and confirm your registration.
- Go back to Passpack and click on Settings
- Click on ‘Activate Now! for Collaboration’
- Leave all settings as they are, click OK
- Enable Sharing
- You will now be able to share passwords with the storename master account.
- Send an email to the admin@storename.com with your UserID. The master will check Passpack for your request and activate sharing of passwords on an ‘as needed’ basis.
- You may need to logout and login again to see the new Passwords in your account.
If you do not have a password in your Passpack account you can request it from admin@storename.com
Step 2: Add Passwords To Passpack

There are a few guidelines for adding passwords to Passpack. If we all follow the same system then it will be easier to find passwords that other people have added! 🙂 Name Field
- Use the Store Name and What It Is.
- For example, Store Name WordPress Admin would be used to tell people that this is a password for Store Name and the WordPress tool with the Administrator’s login.
- Another example, Store Name Bigcommerce Admin would be used to tell people that this is the password to give access to Store Name via the Bigcommerce Administrator’s account. You would switch “Admin” for “Staff” to denote a different account access.
- Passpack is able to read all the words in the Name field and uses these in the search function. If you search for “Admin” it will find all the passwords that contain Admin in the title.
User ID
- This is usually given to you by the software or service you are setting up. Otherwise, choose something easy to type and remember. Eg: storename
Password
- Always allow Passpack to generate the password for you. Ideally you should use at least 8 characters and a combination of uppercase and lowercase, with a few numbers.
- If you generate passwords using symbols these also offer very high security but can be painful if you have to re-type them on your mobile device if it’s an emergency. Just a tip!
Link
- Copy the link for the login screen of the service or tool. Eg: www.website.com/my-account
- Avoid copying the link to the home page of the service. Eg: www.website.com. You will waste time for other people who have to use the system as they’ll then need to find the login page, if no login is available on the home page.
- Always use admin@storename.com or storename@gmail.com to register the account. The admin@storename.com is a restricted email so it is not accessible by the whole team. However, the storename@gmail.com is accessed by everyone on the team. Use your common sense to decide whether the tool/service you are registering for should require the higher or lower access levels.
Notes
- Add the date of registration to the Notes field. This helps us to remember whether this is an old or new account.
- Add any other details that might be useful. For example, if the new tool asks for a birthday (We always use 1st January 1970) then you can add this to the Notes field.
- Add alternative URLs to the notes field. For example, a domain is sometimes replaced with an IP address when initially setting up accounts. You would store 251.34.155.53/cpanel in the notes field, if storename.com/cpanel was already stored in the Link field.
Owner
- Always transfer ownership of this password entry to User ID of Master Account. See the instructions below. The Owner can then share the password with other people on the team.
Step 3: Transfer Ownership Of Passwords to StoreName Account
It is important that all passwords for all systems and tools are stored centrally in one “master” account on Passpack. If you create a new account you will add that entry to Passpack, and then transfer ownership to the “master” account. The master account will need to accept the entry before it is completely transferred.
- After you have created the new entry, click on the OWNER tab.
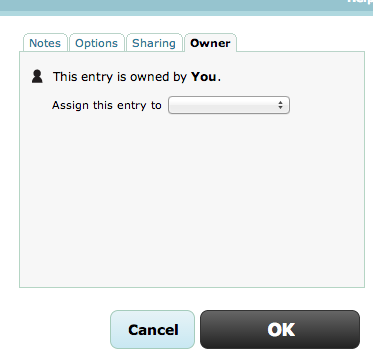
- Choose the master account which is titled storename
- Save the password
- Thank you 🙂
Final Checklist
Access to tools and systems should always be secured even when employees come and go from your company. To make sure your passwords and related information are always safe, make sure you do the following:
- Setup new staff account in Passpack.
- Add your passwords to Passpack.
- Transfer ownership of passwords to the store name account.