
The aim of this guide is to help you create your own Knowledge Base, learn how to organize it, and also to keep building upon it with more processes and guides of your own.
A Knowledge Base without organization is next to useless. We need to organize it in a logical format so it is largely intuitive to use.
Ideally, your Knowledge Base will cover the following points.
- It must be easy for you and your employees to locate the process or steps that you would like to go through.
- It should guide new employees to learn everything in a systematic way.
- It should be easy to understand when it has a good structure.
- It should save time and effort, and enable processes to be repeated easily.
Being in a remote team gives us communication challenges since it doesn’t have a direct employer to employee human contact. So virtual communication must be well-written and organized in order to get the job done successfully and efficiently.
Step 1: Copy Our eCommerce Knowledge Base
We already know that Knowledge Base is important and setting up your own is likely to be your next move. However, it could be a lot of work to do everything from scratch. Possibly the best way to learn is by example, so we have made a copy of our KB structure available for anyone to view.
You can either create a complete copy of the KB or make your own structure in your own tool of choice.
[button size=”large” color=”red” url=”https://sites.google.com/site/ecommerceknowledgebase/home”]View The Knowledge Base[/button]
https://sites.google.com/site/ecommerceknowledgebase/home
Step 2: Create The Top Level Pages
A Knowledge Base is sometimes referred to as an Ops Manual (or Operations Manual). This has all the necessary information about the store’s policies, work instructions and procedures.
To start with, we need to create the top level pages first. This would be the list of your store in general, what you do, and what you wish to implement. This should be a short list that you get to expand when you add all the sub-pages to it.
We use …
New? Start Here …
This section is used to bring employees into your company as quickly and efficiently as possible. We give them an understanding of how they should manage their tasks, their role within the business, how they are accountable for their time spent and where to access and store files and systems.
Recent News
We use this section to maintain organization-wide communication. We ask employees to subscribe to this page. They will be notified when updates are made to the Knowledge Base that affect them.
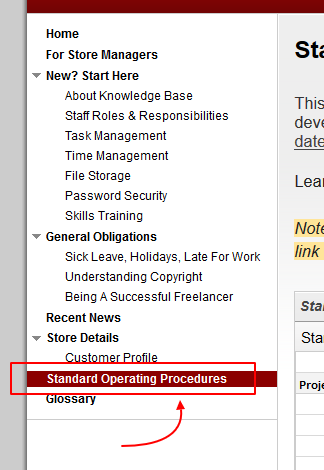
Store Details
This section is used to store general details about your store such as social media URLs, contact details, customer profile information, content strategy and miscellaneous snippets of information.
If you are running multiple stores you would change this section to Storename Details.
Standard Operating Procedures
The Standard Operating Procedures section contains the bulk of the processes and guidelines that your employees can use to build, run and maintain an eCommerce store.
The heart of the Knowledge Base is a spreadsheet which lists all the SOPs, the recommended job role, and the recommended billing code.
Glossary
Not everyone on your team will be an eCommerce expert. The Glossary is a quick look-up tool so that anyone unfamiliar with a concept can gain some insight.
You may check the following examples of Knowledge Base or Ops Manual. This will give you an idea on how to structure and organize your own main pages.
Example 1: Food and Dairy. This Ops Manual delivers a unique way of using top-level pages by using a question. This would let readers think and the answers and their instructions would set as the sub-pages.

Example 2: Food Chain. It lists all necessary information about the business, its aim to provide quality and safety as well practices in their workplace.
Step 3: Set Up The SOP List
Once you’ve done creating your top-level pages, you’re going to add sub-pages to it to create the detailed instructions or standard operating procedures for every process you have in your store.
This would make it easier for old and new employees to refer to instructions whenever they need guidance. This would also ensure that the quality standard is always being followed.
To organize this list, we use a spreadsheet because Google Sites doesn’t yet have the ability to easily manipulate a multi-column list of information.
It is a bit of double-handling, but we’ve found it’s quite easy to manipulate once you get the hang of it.
We provide a pre-written list for Standard Operating Procedures that you can check and follow here -> https://sites.google.com/site/ecommerceknowledgebase/standard-operating-procedures
Step 4: Copy And Make Your Own Spreadsheet
1. From the Standard Operating Procedures page provided above, click on the Open Standard Operation Procedures link at the bottom of the page.
2. It will open the spreadsheet in a different window. Then click on Make a Copy to automatically create a copy for you on your Google Drive. You can also use Download as option if you prefer.
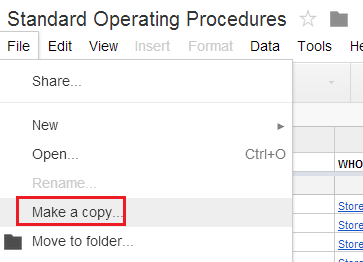
3. Now you have your own copy of Standard Operating Procedure that you can follow, reconstruct and reorganize to go well with your store.
Step 5: Add A New Process Page In The SOP’s Spreadsheet
From time to time, we add new processes in the SOP spreadsheet, you may follow these steps so you’ll be guided accordingly.
1. When you’re on the KB section, click on your desired section (where you’ll add a new page). And then click on the New Page icon.

2. Create a name of the page and place it under “Name your page” field.
3. Make sure it is set to the right location. If not, use the “Choose a different location” option.
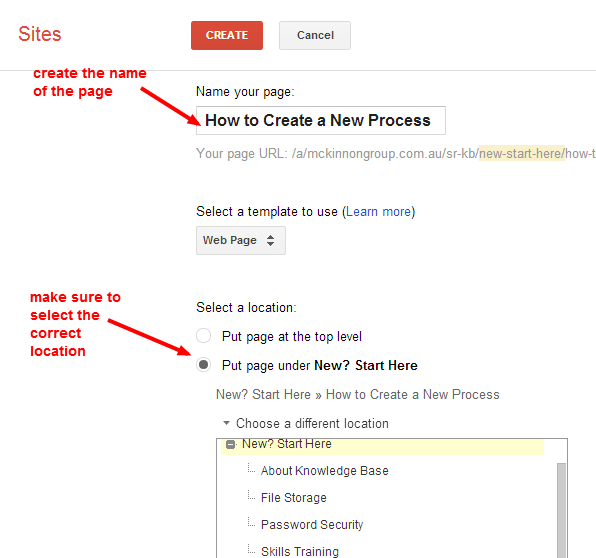
4. Then it will take you to the new page where you can add contents to the page.
Step 6: Add New Lines Into The Spreadsheet
You can update your spreadsheet with new Standard Operating Procedure articles and add links to them.
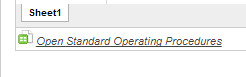
1. On your Standard Operating Procedure KB page, click on the Open Standard Operating Procedure Spreadsheet at the bottom of the page.
2. Since you have created a new page for your Knowledge Base, you can then copy the URL of the new page that you created and add it into the spreadsheet.
2. Add the name of the page under the right category.
3. Add a hyperlink to the name in this format: =hyperlink(“<URL of the page>”;”<name of the page>”)
Example: =hyperlink(“https://sites.google.com/site/ecommerceknowledgebase/standard-operating-procedures/choose-store-name”;”Choose a Store Name”)
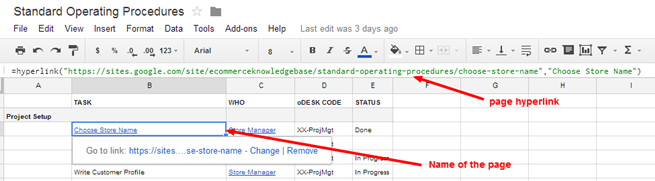
Note: When you’re done, make sure to place the cursor at the very end of the hyperlink and then click out. This will make sure that it will properly set and won’t disappear.
Step 7: Reorder Pages On the Side Bar
When you add pages on your Knowledge Base, Google Site automatically displays them on the sidebar at the left side of your Knowledge Base and organize them by default. There are times that you want to hide some pages or move pages up or down depending on your Knowledge Base structure.
Or you can follow these simple steps:
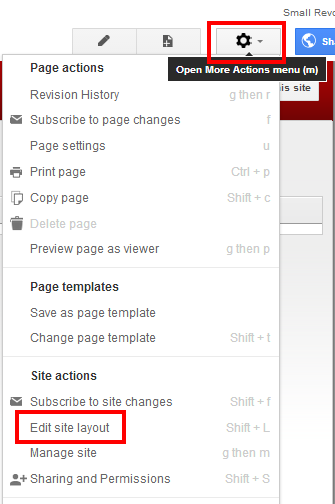
1. Click on the “More actions” icon at the top right portion of the page to see the drop-down Menu.
2. Then select and click on the “Edit Site Layout” option.
3. On the Side Bar area, click on any of the Side Bar to reveal the Configure Navigation pop-up options. Or click the Navigation option.
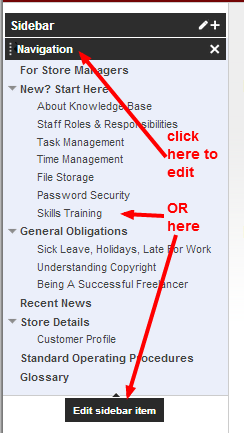
4. Once the Configuration Navigation pop-up is displayed, uncheck the checkbox that says “Automatically organize my navigation”. This will allow you to manually select pages to add on the Side Bar navigation.
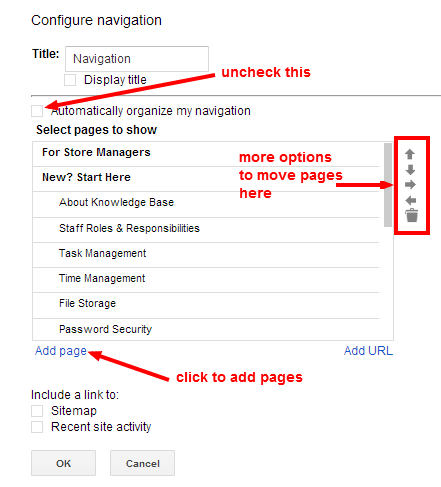
5. Click on the Add Page and look for the title of the page that you want to add. Then click on OK.
6. Other options include:
- Move Up
- Move Down
- Indent
- Outdent
- Delete
7. Once you’re satisfied with the Side Bar Navigation, click on OK. And click the Close button so you can review the page.
Step 8: Customize Pages With Tables Layout
There are times when it is easier to organize the contents when they’re on a table. To add tables to your Knowledge Base page, you can follow these simple steps:
1. On the page where you want to add tables, click on the Edit icon at the top right corner of the page.
2. Then click on Table > Insert table.
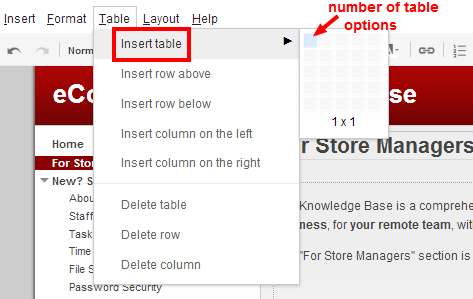
3. Choose how many columns and rows you want to add.
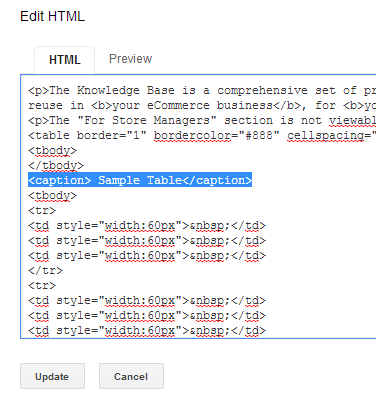
4. If you want to add captions or heading to your table, set your cursor inside the table you’ve inserted and click on the HTML icon on the Menu options bar.
Final Checklist
Make sure that you take note of the following steps so you can properly organize your store’s knowledge base. This would benefit you as well as your employees.
- Copy our eCommerce Knowledge Base
- Create your top-level pages
- Set up your SOP list
- Make your own copy of the spreadsheet
- Add your own processes into the spreadsheet
- Reorder the pages on the sidebar
- Add new lines if necessary
- And, customize the page with your preferred layout