
The aim of this guide is to teach you how to use milestones, pins and highlights features of Facebook so you can put emphasis on your store’s events or posts as well as to maximize them to make your Facebook page more attractive and interactive.
Facebook provides options to promote your store through your Facebook Fan page. It lets you highlight, emphasize specific posts and events from the rest in your timeline.
This is through creating Milestones, highlighting posts and pinning posts to the top. You can use these features so you can maximize the use of your Facebook Fan Page for your store. With a well-organized timeline, surely fans and visitors will get busy on your page.
Step 1: Add Milestones Of Important Happenings
If you want to highlight a specific key moments in your page, you can add it as a milestone. Milestone is like telling a story about your store with chosen images and words.
You can add important events for the current date or even go back as far as needed so you can add important happenings in your life. Once you’ve created a Milestone, it will be stretched across the entire width of the Timeline so it will be highlighted and emphasized.
- To add a milestone, look for the “Event, Milestone +” option just below the About section on your Fan Page. Click on it and click on Milestone.

- Then provide the needed information. Add a title, location, date and the details for your milestone. The earliest date you can use for your Milestone is January 1, 1000.

- Choose a photo whether through your albums or upload a new photo. Milestone photos are displayed at 843 x 403 pixels.
- Click Save to save the settings.
Step 2: Maximize The Milestones Feature
Many stores might have missed to look at marketing opportunities in using Milestones. Some might have added events as milestones but did not really make the most out of using it.
There are strategic ways to use Facebook’s Milestones feature to help fans and potential customers to know more about your products as well as create more traffic through your page while creating more engagement and interactions. You may include the following in your Milestone:
A Catchy And Captivating Photo
This will let your milestone stand out and capture the attention of your fans and visitors. A captivating image will draw people to learn and read more. They might even like and comment on it.
An Interesting Comment Or Caption
When people don’t get the message directly from the photo, describe it in words. Make it as short, compelling and readable as possible to capture the interest of readers and fans. Make sure to make it a keyword-rich as well.
A Call To Action
Telling people about the milestone may not just be enough. It is best to give them an option to act on it and learn more. You can include a short call to action phrase and direct them to a link where they can learn more about the milestone.
This can even improve your backlinking and SERP at the same time, build a stronger relationship with your fans and potential customers as they get engaged in your activities and learning more about you.
Step 3: Pin Posts In Your Timeline
Facebook also gives us an option to pin a specific post right on top of your timeline. That means it will not slip down the timeline as you continue to add more posts to your page.
It’s like a featured image that stays on top of the timeline for seven straight days unless you unpin it.
After that period, it will go back to its original date on the timeline.
Do take note that you can only pin a post if you’re logged in as the administrator of the page.
- To pin a post, go to your timeline and look for the post that you want to highlight.
- Hover over the top-right corner of the post and click the “Arrow Down” button.
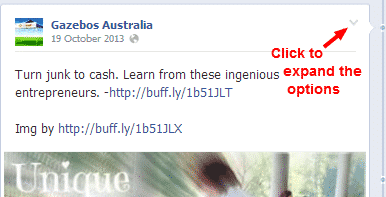
- Select the Pin to Top option. If you wish to unpin it, simply click on the “Arrow Down” button again and click on Unpin from Top.

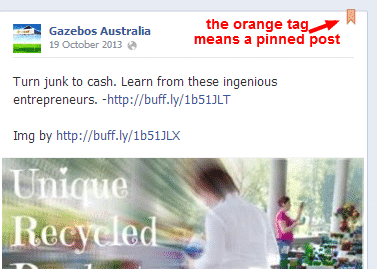
- A pinned post has an orange tag on top of it.
Step 4: Maximize The Pinning Feature
As there can only be one pinned post at a time, be sure to select which post to feature. You can use this to promote upcoming events so your fans can easily get details without scrolling up and down your timeline or you can use it to build a fan base or set an email list, and you can pin a post that is mostly relevant and interesting at the time.
Step 5: Select Posts To Be Starred Or Highlighted
Facebook also gives us an option to highlight a post so it will stretch entirely across the entire timeline width. This will give your fans and potential customers a way to easily notice the post that you want them to notice.
- To highlight a post, go to your timeline and look for the post that you want to highlight.
- Hover over the top-right corner of the post and click the “Arrow Down” button.
- Select the Star Highlight option. If you wish to set it back to normal and unhighlight it, select the Remove from Highlights option.

Step 6: Maximize The Highlighting Feature
Unlike pinning, highlighted or starred post does not stay on top. They remain in chronological order. You can use this feature to highlight customer testimonials when they thank you for your great service or exceptional products that they received. Include their photo and their comments in the post and highlight them.
That should be a great way to show your fans and potential customers that you’re not just an ordinary store, but a store that meets customer satisfaction. You can also use it to highlight promotional posts to increase its visibility.
Final Checklist
To sum it up, there are three Facebook features that you can use to tell your stories and share events to your fans. These are:
- Milestones, which lets you add important events and history of your store.
- Pins, which lets you pin post right on top of your timeline, great for advertising upcoming events.
- And Highlights, which lets you highlight posts and stretch it so it can easily be noticed. This is excellent for highlighting customer testimonials and satisfactions.