
The aim of this how-to guide is to show you how easy it is to create your own photography studio. It’s important that your photos have a professional look about them, but that doesn’t mean you have to go to the expense of hiring a professional photographer – you can set up a studio in your own kitchen at home.
What is essential is that you create a consistent background for your products, as it is this feature that ensures you achieve that professional look.
Setting up your own DIY studio at home is pretty easy, with most of the materials available around the home, and most of the rest easily sourced at your local office supplies or hardware store.
We’ve put together this simple step-by-step guide to help you set things up. Once completed, then you can start taking good quality product photos at home.
In this section:
- Building a general purpose studio background
- Building a studio background for photographing clothes
Time to complete:
- 30 to 45 minutes for DIY Studio setup
- Plus extra time to obtain any necessary items for your chosen setup
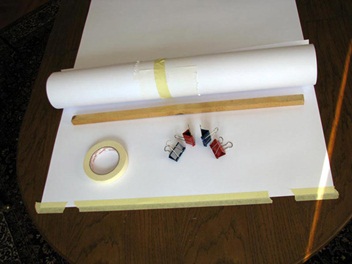
What you will need:
- 1 Kitchen Desk
- 1 Kitchen Chair
- 1 to 3 Sheets of Craft Paper
- 2 to 5 Bulldog Clips
- 1 Roll of Masking Tape
- 1 Length of Stick*
*The length of the stick should be about the same as the width of the craft paper. It should be thick enough to support the weight of the paper, but thin enough to be securely grasped by the bulldog clips.
Optional:
- A tripod (if your images are turning out blurry)
- Full spectrum light bulbs (if you are forced to shoot under artificial lighting and aren’t happy with the results)
- Scissors, hobby knives, glue, blu-tack can all be useful in making a more customized setup
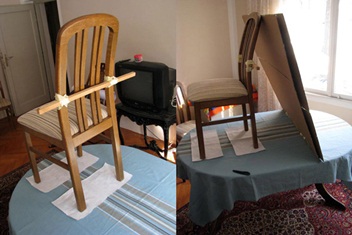
Step 1: Build A General Purpose Studio Background
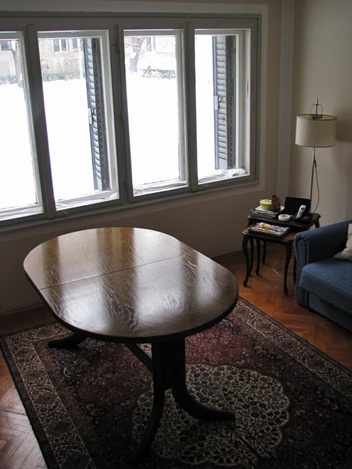
1. Place the kitchen table close to a window, but leave enough room for you to move around the table. You do not want the table in direct sunlight, but the window should be a generous size.
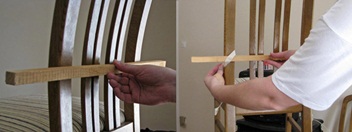
2. Use masking tape (blu-tack can help too) to mount the length of stick to the back of the kitchen chair. A good height at which to secure the stick to the chair is about halfway, so that your craft paper sheets still have enough length to flow down onto the table below.
3. Good light is important to place the chair on the far side of the table, with the back facing the window. Place the sheet of white paper on the table between the window and the chair.
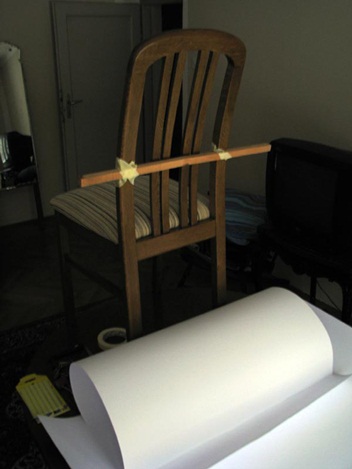
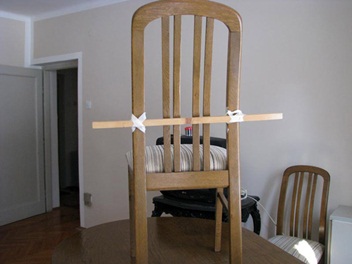
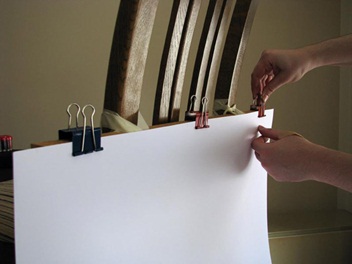
4. Fix the paper to the wooden stick with bulldog clips. To make sure it won’t slip, it’s best to clasp them together with three clips.
5. It is important that there is no ‘edge’ in the paper. You should not fold the paper, and avoid getting it creased. The ‘ramp’ effect the paper creates will help create a professional background for your photography.


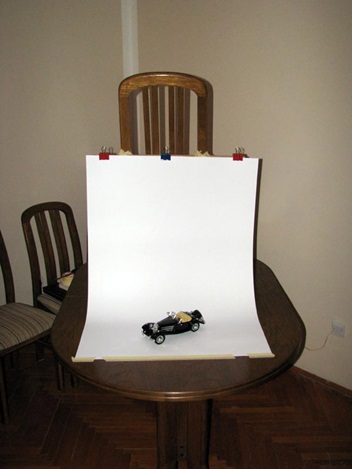
6. Now, your general purpose DIY studio background is ready. Place your product on the craft paper and start snapping. Of course, your camera settings are important too. You will find useful photography tips and sound practices further on in this section.
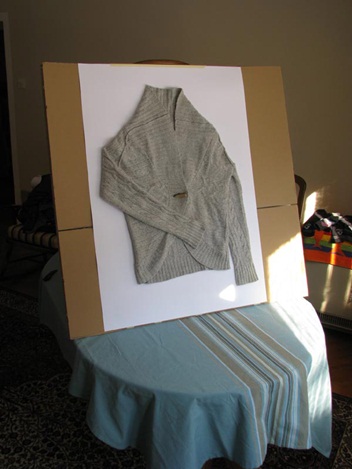
Step 2: Build A Studio Background For Photographing Clothes
Photographing clothes for online sale calls for a somewhat more specific setup. So, here are some steps we would recommend you follow to build an inexpensive DIY background for photographing clothing.
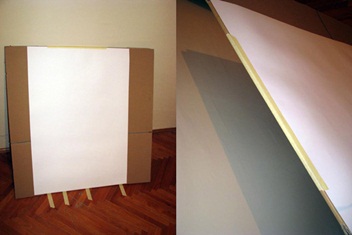
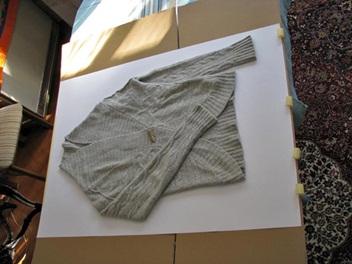
1. Use masking tape to fix the sheet of craft paper to the cardboard or styrofoam board. We are using an unassembled five-layer cardboard box.
2. Place the board, with the paper attached, flat on the table and lay out the piece of clothing you will be photographing. Arrange the clothing the way you want it to be laid out in the shot.
3. Use needles to pin the piece of clothing to the background. You can hide the pins behind folds, being careful to attach only the back of the clothing to the board. Also, insert the needles at an upward angle so the clothing cannot slip off.
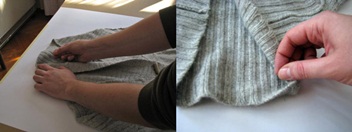
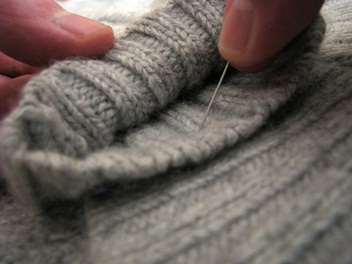
You can further secure the pins to the cardboard by placing a small piece of blue-tack between the clothing and the cardboard. This will help the pins to ‘stick’.
4. Once the clothing is secured to the background, place the chair on the table – again with the back facing the window – and let the background rest against it. A tablecloth will prevent the cardboard from sliding across the smooth surface of the table. Alternatively, use a strip of masking tape.
5. Now, your DIY studio background is ready to host any clothing you want to photograph.
Step 3: Set Up The Lighting
Good lighting makes for at least 50% of a good photograph.
Natural Lighting
Place your improvised background close to a window (north window if you are in the northern hemisphere, south if you are in the southern) and photograph your products in a couple of hours before and after noon.
This will ensure several key elements check out:
- You will have plenty of light to work with, which will allow you to shoot from hand and capture images that are both sharp and free of digital noise.
- By avoiding artificial lighting, you will avoid color casts and noise created by non-full spectrum lighting.
- You will achieve soft, unobtrusive shadows.
- By doing the work around midday you will stay close to the ideal color temperature.
Artificial Lighting
If you absolutely have to shoot with artificial lighting, perhaps due to the weather, then there are some guidelines you should follow:
- Try to avoid mixing different light sources, such as combining incandescent and fluorescent lighting.
- Using ordinary incandescent lightbulbs will produce mediocre results. Swapping ordinary bulbs with full-spectrum replacements will help you achieve more natural colors.
- Unless you are working with a large number of artificial light sources, you will likely need a tripod to help keep the camera steady and the images sharp.
If you have to shoot with artificial lighting, try to avoid mixing different light sources. The difference in spectral characteristics and color hues of many different lighting sources will not help your product photos.
Flash Lighting
If you are using a flash to light your photos, try to point it upwards against a white ceiling to diffuse the light and avoid hard shadows.
Take a look at the different paths of flash light when operating with (right side) and without a flash diffuser.
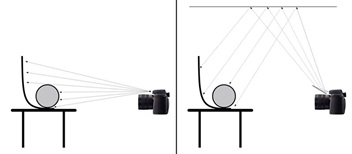
And how this affects the outcome:

You can read more about how diffusing the flash affects your photos in this article:
http://www.photomatters.org/direct-flash-vs-bounce
If your camera does not have a moveable flash, take a look at these guides to making your own DIY flash diffusers:
http://www.diyphotography.net/the-party-bouncer-is-back-in-business
Useful link: How to Make an Inexpensive DIY Light Tent
http://www.digital-photography-school.com/how-to-make-a-inexpensive-light-tent
Step 4: Set Up The Camera & Shooting Methods
Most digital cameras will allow you to control the following settings and increase your chances of making a quality product photograph.
ISO Setting
The ISO value describes the sensitivity of the CCD sensor in your camera – the higher the ISO setting the more sensitive your camera is to light.
Higher ISO values allow you to make shots in low light conditions at the cost of introducing a lot of grain and noise. Lower ISO settings produce smoother and sharper photos – provided you have the lighting of sufficient intensity.
Many cameras set on “Auto” mode will adjust the ISO setting in addition to shutter speed and aperture.
Consult your camera manual to determine if you can set your ISO speed manually. If you can, always try to keep it as low as possible. ISO 100 should be the default value you use when making your photos, and you should not go beyond ISO 200 under any circumstances.
For more information on ISO settings, take a look at these videos:
http://www.youtube.com/watch?v=wh6VFzRCZxI
White Balance
Many cameras will allow you to manually set the white balance and thereby ensure the photos you take have the correct color values.
Consult your camera manual to determine whether or not you can manually adjust white balance.
Use the clear sheet of white paper which is your improvised background to set the manual white balance. If your camera does not allow manual white balance, you will most probably have to choose between presets, the most common of which are “Daylight”, “Incandescent”, “Fluorescent”, “Cloudy” and “Auto”.
If you are stuck with presets, avoid using the “Auto” option – it makes your camera make an educated guess (which is inaccurate more often than not) with each new shot.
If you are following our advice on using indirect midday sunlight choose the “Daylight” preset. If you are shooting with artificial lighting go for the “Incandescent” or “Fluorescent” settings, depending on the kind of light source you are working with.
The following video is specific to Canon cameras but should help you get a better understanding of the process regardless of your camera make and model: http://www.youtube.com/watch?v=bq3yzTPb1Ng
Keeping It Sharp
If you followed our advice on lighting, you should be able to get enough light on your products to be able to shoot from hand. If your photos are still turning out blurry the most likely reason is the lack of light, which prompts your camera to adjust the shutter speed to a thirtieth of a second or slower.
One solution for this problem is to try boosting the light level by using your camera’s flash coupled with one of the DIY diffuser methods mentioned above. A better solution is to turn to tripods.
While most professional photographers would not settle for anything less than a full-size ball-bearing tripod, there are small tabletop tripods out there (some as cheap as $5) that will do the job just as well.
Picking Your Spots
One of the crudest mistakes and one of the easiest to avoid is choosing the best position and angle from which to take your product photos.
Horizontal position: You want your camera to be centered along the width of the background and facing it head-on. If you want to display side views or back views of your product, or anything in between, rotate the product instead of moving the camera.
By keeping the camera in place you ensure the least amount of interference from light that may be coming from the sides of the setup, as well as improve consistency across photos of different products.
Height and vertical angle: Choosing the right height and vertical angle for your shots can make all the difference. You don’t want the camera shooting up at the product, and you definitely do not want it to be shooting too steeply down.
The best practice is to try to make photos look like they are just below the eye level, so look for a height that lets the customer see a little of the top side of the product.
Learn From Others
You should aim to shoot the product at a slightly downward angle and try to make the photo appear as if the subject was just below eye level. Take a look at these examples of good and bad practices.
Bad Practice Sample 1
This photo was shot using direct sunlight. Ample light makes sharp images possible even when shooting from hand but creates hard, uncomplimentary shadows. Here, the camera is positioned too high up and is shooting down on the product at too steep an angle.
Bad Practice Sample 2
This photo was taken using only the camera flash while shooting from hand. The shadows created in this way are even harder and the image loses a sense of depth. This is because the highly reflective parts of the product bounce the flash light hard, producing over-exposed parts of the image.
Bad Practice Sample 3
This photo was lit using only a single 200W incandescent lightbulb and shot from hand.
The relative lack of light produces images that are blurry and moderately affected by digital noise. The camera is positioned too low and is only effectively showcasing the side of the product.
Bad Practice Sample 4
This photo used a combination of a 200W incandescent lightbulb and the camera flash for lighting. The combination of two different light sources produces strange color casts of the entire image, most visible on what should be a white background.
The image sharpness is variable, the shadows hard and the color shifted, and the image over-exposed where the flash reflects off shiny surfaces.
The camera is also positioned too low.
Bad Practice Sample 5
This photo was lit with a single 200W incandescent lightbulb but was shot from a tripod. The results are better than the other bad practice samples since the image is sharp and evenly lit, but the shadows remain hard and the image suffers from some degree of digital noise.
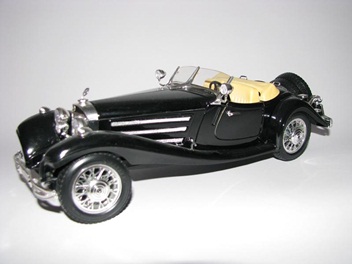
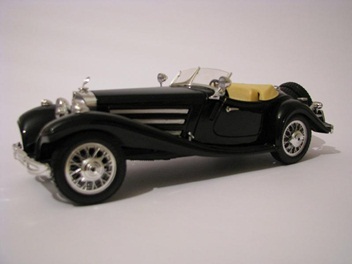
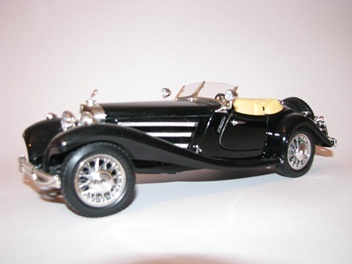
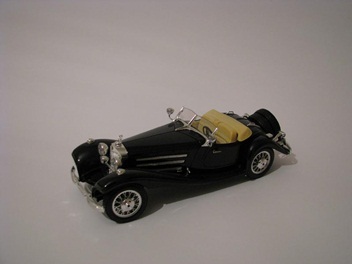
Good Practice Sample — General Products
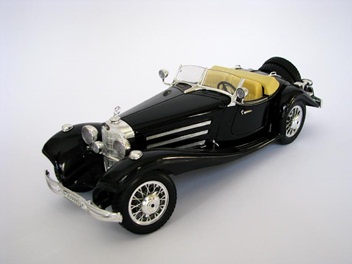
This would serve as a great main photo for the product. The camera is positioned in a way that showcases the side, front and top of the product very well in one image. It is sharp, free of digital noise and features soft shadows that do not affect the perception of the product.
Indirect daylight around noon provides ample light, allowing shooting from hand with no worries about the sharpness of the resulting images.
Good Practice Sample — Clothing
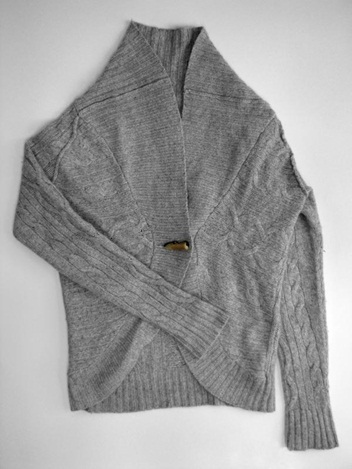
This is the kind of result you can expect when adhering to our guide for shooting clothes. Use a couple of hours before and after noon to get that indirect sunlight which will very effectively bring out the texture of the fabric.
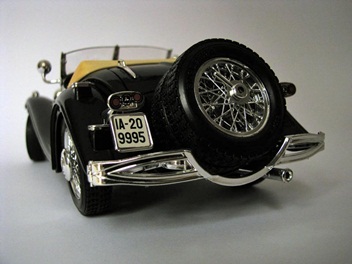
Shooting Details
If you want to provide close-up photos of buttons, seams, or any other small detail of your product, start by locating the Macro switch on your camera.
Most point and click consumer cameras produced in the last few years will have this option, and almost all semi-professional SLR cameras should. The Macro switch is usually marked by a flower icon.
Once you have activated the Macro mode you will need to approach the part of the product you want to photograph up close – the camera lens should be no more than a couple of centimeters away from the detail you are shooting.
Try to approach the detail from a slight angle to the background rather than directly in front. That only puts you between the product and the light source, thereby creating a shadow.
Here are the kinds of results you can achieve in this way:
Final Checklist
In order to create good product photos on your own, you need to prepare and find the best spot in your home to ensure good results. Taking time in getting to know some basic photo shooting methods and techniques will help you get the most out of your DIY photo studio.
- Choose a generous-sized window to get enough natural light for your DIY photo shoot.
- Make sure you have room to move around the kitchen table you’ll use for the photo shoot.
- Take note of how the DIY materials are used when setting up products and clothing before the shoot.
- Make use of natural lighting as much as possible to avoid unnecessary noise and color casts on the resulting photos.
- If you need to use artificial light, make sure to take note of the various techniques/tips mentioned in this guide to ensure better results.
- Use ideal camera setup and shooting methods to improve your resulting product photos.
- Take note of the ‘good and bad’ practices to help you avoid mistakes and to improve your own product photography.