
The aim of this guide is to provide a step-by-step instructions that would help store owners create an email account using BigCommerce email service and switch from BigCommerce to Google as your email service provider.
Like every other form of business, your online store has to provide customers with a way of direct contact. So, it’s essential you set up an e-mail account with your store’s domain name in it.
BigCommerce makes the whole process pretty straightforward and easy, so there is little you need to worry about if your are not the most technically minded.
Step 1: Include the Domain Name
It is tempting to simply go straight to one of the establish email service providers, like Gmail and Hotmail, but this not the wisest option, for two main reasons.
Firstly, many business emails that end in generic email providers are linked with scams. The last thing you want is for your store to be greeted with suspicion or associated with any illegal activity.
Secondly, an email address that includes the company domain name projects a professional image. People feel more confident in dealing with a company established enough to have their domain names in their email addresses.
The username at the front of the email address is also important, and it’s worth being imaginative with your choice.
The generic contact address, for example, reads as ‘admin@randomizedstore.com’, but people tend to associate ‘admin’ with busy administration departments, where their queries might get lost in the system.
Projecting a different image is more beneficial, so consider some more direct, pro-active and even caring usernames, like ‘help’, ‘helpme’ or ‘myquery’ etc.
Step 2: Create Your E-Mail Account
As part of your store, you can create email accounts at your store’s domain using the BigCommerce email service. You can then setup these accounts in Outlook, Thunderbird, or your mobile device.
1: Login to BigCommerce, and to your store’s control panel
2: Click on the ‘Setup and Tools’ button at the top of the page, and select ‘Email Accounts’ from the Menu.
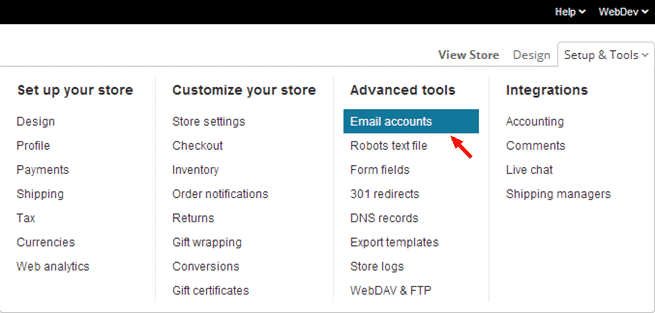
3: Choose ‘Create an Email Account…’ button
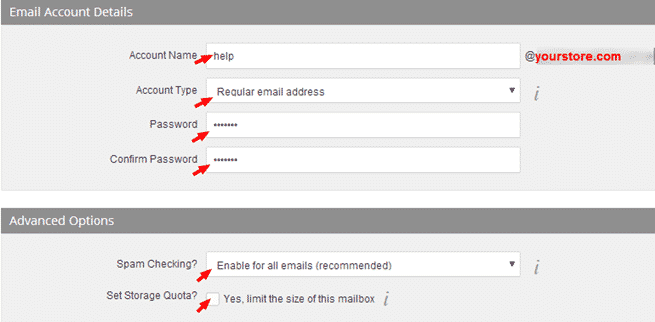
4: Fill in the requested Email Account Details
- Account Name– fill in your preferred choice. BigCommerce will confirm if it is unique. If it isn’t just try again.
- Account Type – choose between a Regular Email Address or to Forward Email Address, where emails will be forwarded to another (perhaps a personal) account. Identify which address you want your store email to be forwarded to.
- Password/Confirm Password – choose a password and confirm it, but don’t make it too easy
5: Fill in the Advanced Options
- Spam Checking? – No need to change this. Disabling the built-in spam checking program is asking for trouble.
- Set Storage Quota? – Limiting the storage quota saves a lot of space on the disk. But be realistic as emails received after the limit is reached will be bounced back to the sender. Regular mailbox clean-ups will be necessary when quotas are small.
6: Press on the ‘Save & Exit’ button, or the ‘Save & Add Another’ button if you want to add a second email address, but this shouldn’t be necessary for now.
Google Apps And Third Party Email Services
It’s important to note that BigCommerce does not provide a mail interface, so it is necessary to open an account with a third-party email provider.
BigCommerce lists several options, including Gmail, AppleMac, Windows Mail and iPhone, and provide step-by-step details on how to set up a BigCommerce email address with each of them. But there is an alternative – Google Apps.
The chief advantage with choosing Google to manage your email activities is that the mailbox takes up no room on your store’s disk space on BigCommerce. So, there is practically no email limit.
To send your BigCommerce emails to a Google Apps inbox, it’s necessary to configure your domain. This means creating and adding MX records (7), a CNAME record and a TXT record.
An MX (Mail Exchange) record essentially identifies the server that will handle your email messages. MX records are listed with a priority value to ensure that if there is a problem with the first, then messages will be sent to the second etc.
As technical as it might seem, the process for setting up Google Apps as your email service provider is quite simple.
Step 3: Set Up Your Google Apps
1: Login to your store’s Control Panel.
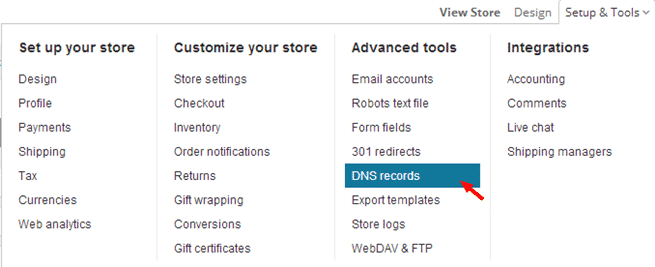
2: Click on the ‘Setup and Tools’ button at the top of the page, and select ‘DNS Records’ from the menu.
3: Add the new MX records with the format: ‘mail.randomizedstore.com – MX – ASPMX.L.GOOGLE.COM’.

Then follow with ‘ALT1.ASPMX.L.GOOGLE.COM’, ‘ALT2.ASPMX.L.GOOGLE.COM’, then ‘ASPMX2.L.GOOGLEMAIL.COM’ etc.
4: Set the Priority Rating for each in the space to the far left.
5: Add CNAME record in the format: ‘mail.randonizedstore.com – CNAME – ghs.google.com’.
6: Add a TXT record (or SPF record) in the format: ‘randomizedstore.com – TXT – v=spf1 +a +mx include:_spf.bigcommerce.com include:_spf.google.com ~all’.
7: Delete 2 of the original MX records to avoid malfunctions due to conflicting addresses. Click the red minus icon on the far right.
Step 4: Change SMTP Server
If you are going to switch from BigCommerce to Google as your email service provider, the SMTP mail server should also be changed to Google. The SMTP server handles vital outgoing messages like order confirmations and order status updates.
Make The Switch
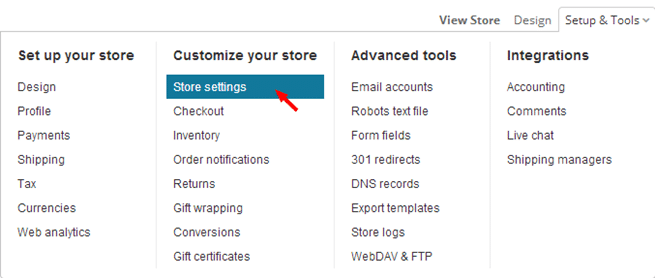
1: Choose the ‘Store Setting’ button on your store’s control panel.
2: Choose ‘Miscellaneous’ at the end of the options bar.
3: At ‘Use SMTP Server’, click the ‘Let Me Specify My Own SMTP Server Details’ option.
4: Fill in the ‘SMTP Hostname’ box with ‘ssl://smtp.googlemail.com’.
5: Enter ‘SMTP Username’ – it’s your full email address on Google Apps.
6: Enter ‘SMTP Password’ – it’s the same as your Google Apps account password.
7: Set ‘SMPT Port’ to 465.
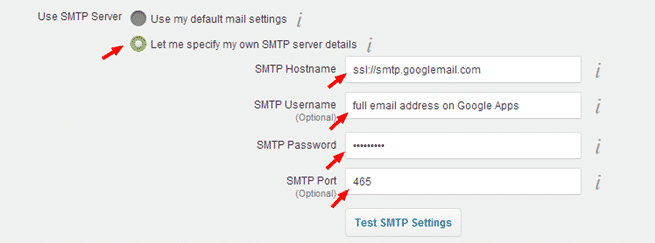
8: Click on ‘Save’ at the top of the page.
Final Checklist
To set up an email account in BigCommerce, make sure that you:
- Include the domain name of your store in the email address.
- Create your BigCommerce email account through their email service.
- Use Google Apps as your email service provider.
- Switch from BigCommerce to Google by setting up the SMTP mail server.
1 Comment
Excellent website. A lot of helpful info here. I am sending it to
a few pals ans also sharing in delicious.
And certainly, thanks to your effort!