
The aim of this guide is to help you get the BEST looking product photos as QUICK and EASY as possible without costing you a fortune in the process.
Selling the product is the main goal of any and every online store owner. Even though the internet has made it possible to reach out to more potential customers than before has made one the issue of the customer not being able to look at the product itself has become more important than ever.
This is where showing your customers pictures of your product will help them decide whether or not to continue with their purchase.
As you might have noticed, these pictures are now the key to making your online store business a success or failure.
Product photo styling isn’t exactly new to the industry, but it has never been as important as with the rise of the digital age of business and marketing. This is why having great-looking product photos speak volumes to customers.
As the saying goes, “A picture is worth a thousand words”. With that in mind we’re here to help you with a step-by-step guide on how to properly style your products for a photo shoot.
Step 1: Preparing the Product
The first thing you need to do is prepare your products for the photo shoot. Any professional photographer will tell you there will be a lot of things that will go wrong in a photo shoot and most of the time it is out of your hands like the weather or natural lighting.
But there are things that you will have full control of and one of them is how your product will look under the lens.
So here are a couple of things you can do to your product that will make it look perfect and enticing to your customers.
- Taking pictures of any type of apparel is a challenge since they will form creases and will make it look unattractive under certain conditions and lighting.
- So make sure the clothes are clean and there are no creases, fold marks, loose threads, damages or wear and tear in general.
- Ironing clothes is one way to get rid of creases and having a good model or stationary manikin will also help prevent it. Just make sure that the clothes can be ironed.
- Remove any tags, stickers, or unnecessary attachments which can cause damage to the clothing as well.
- If possible, always use the newest stock so that the product will look its best. This is especially true to apparel since it will have little to no creases and fold marks.
- Make sure that there aren’t any parts of the product that will reflect unnecessary lighting to the camera that might alter the quality of the photos.
- If there are too many reflective parts, make sure to use little to no lighting during the shoot or adjust your camera settings.
Step 2: Preparing the Props
No photo shoot will be complete without having some sort of props to add more style and class to the products and quality to the pictures as well. Of course you don’t have to spend a lot of money on props since most of them should come off as accessories to the products or background.
Conveying the Product’s Functionality and Usefulness
One thing to remember when choosing props for your photo shoot is to think of how it can convey the product’s’ functionality or usefulness to your potential customers.
For example, if you’re selling a product like headphones, it is natural to have them connected to a music player or mobile device like shown below.
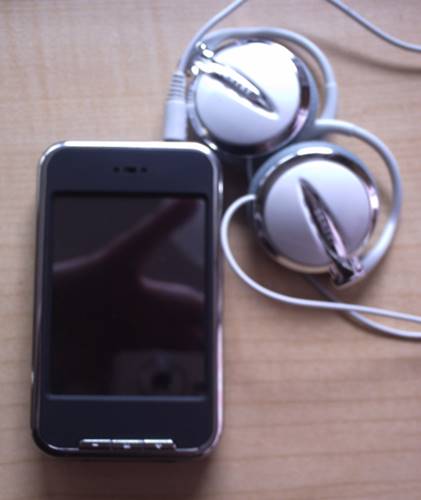
NOTE: When taking photos of other products, make sure you don’t use copyrighted material such as certain mobile devices, other brands of clothing you don’t have the rights to sell or advertise, and so on.
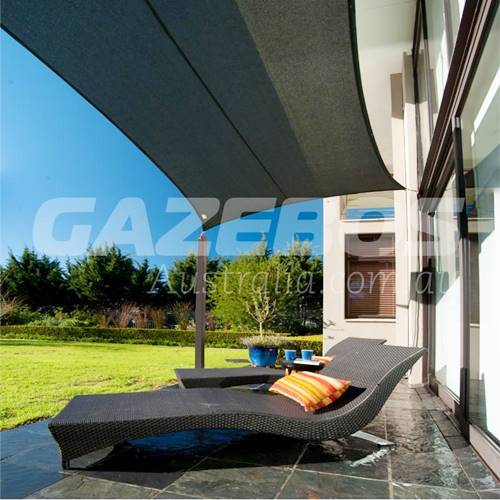
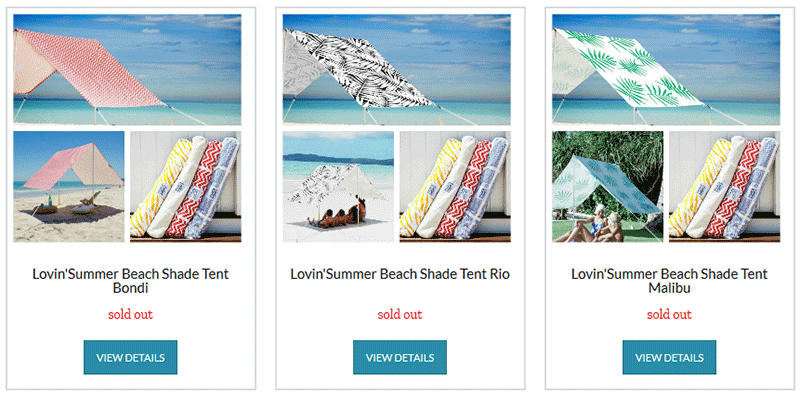
Another example is when your product is a shade sail but it doesn’t necessarily have any accessories to go with it.
But you can always add props to make it look like it is being used in the proper setting or manner.
So if your product is a shade sail, then you add props like tables, chairs, and food since it helps convey its functionality and usefulness as to cast a nice shade for your dining table or a certain area like as shown below.
Human Perspective
Another useful and easy way to enhance your photo shoot with the use of props is to create an illusion that makes it look like there are people that are actually using the product. It sounds confusing at first but let us show you how it is done with a couple of examples.
For example, if the product is a camping tent that has a capacity for two people or more then all you have to do to create the illusion of the “human perspective” is to simply add in two chairs and a table as shown below.
This gives the idea that the tent is big enough for two people while also having enough room for a table to get cozy and comfy while camping.

Below is the same concept except with the product being a shade sail and using a “natural background” which we will discuss later on this article.
Step 3: Preparing the Background
The background of the photo shoot is just as important as the product itself since it will be one of the determining factors of how well the product is portrayed under certain circumstances that the background will provide.
Indoor and Outdoor
With that being said, there are two options you can go for when choosing a background, namely indoor or outdoor setting.
- Smaller products like electronic gadgets, jewelry, clothing, and so on, are usually photographed indoors since there is no need for them to be displayed outdoors to display their functionality or usefulness.
- Of course the rule to the exception is that the product itself, no matter how small, is made for outdoor use.
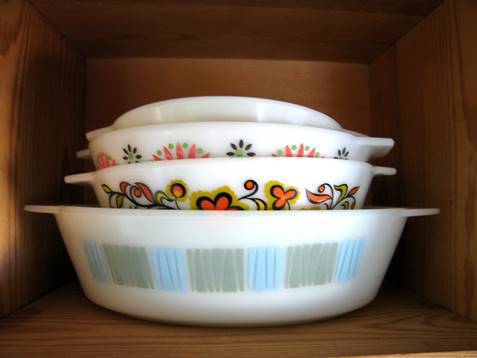
- Using plain, solid colors such as a white background is common practice for indoor product photo shoots.
- You can use colorful backgrounds that will highlight your product as long as it doesn’t look like an eyesore (colors too strong or saturated or the product can’t be clearly seen with the background colors).
- Using wooden floors, textured boards, or fabrics is a great way to add more depth and contrast to your product. A good example of this is putting an electronic gadget against a wooden textured background to emphasize the contrast between something inorganic (technology) and organic (nature).
- When using an outdoor background for your product photo shoot, remember to have ample lighting to display the product properly.
- Also remember to mind the changes in weather which might affect the lighting and the overall look of the product photo shoot entirely.
- Make sure that the outdoor background properly contrasts and displays your product so that it can be easily distinguished by the customer.
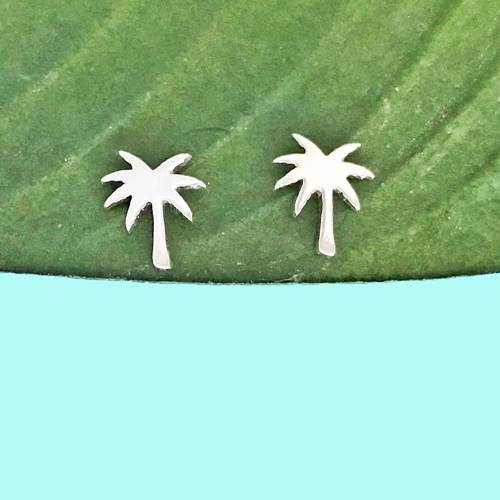
The product picture below shows the use of textured background to highlight the product. The contrast between the product which is metallic and background which is natural makes the product really stand out and eye-catching.
They also use a good close-up shot to get a better view of the product since it is very small.
“Natural Background/Environment” for your Product
Another simple and great background to use for your product photo shoot is one that comes off as a natural environment for your product. What we mean by this is that you choose a background or setting that your product will most likely be used.
We stated this earlier on with outdoor products being used in an outdoor background. For example, think of a product like our beach shelter and notice that our photos and pictures of our product clearly show that it is being used on the beach because of the ocean and sandy background.

Another example are these tent for kids which have great outdoors backgrounds to give you the idea that it is for outdoor use. If you check out the other pictures, they also show them being used on beaches as well.
Proper Lighting
Lighting is probably one of the most important aspects of taking pictures. You can ask any professional photographer and more often than not, they will tell you that lighting is their top priority in a photo shoot.
Lighting itself makes us able to see and without light and reflections, we wouldn’t be able to see anything in the world.
So how do we manipulate the lighting to make the product look amazing during a photo shoot? Without going into the very technical aspect of it, there are a couple of things you can do.
One of the fundamentals of lighting is using natural light that comes from the sun. You don’t need to know a lot of the technical stuff, just remember to choose the best spot in your home near a huge window where natural light comes in.
Using artificial lighting or artificial light sources is a lot more complicated but is more rewarding for those who are willing to put the time and effort to get the desired lighting effect.
So if you’re willing to do that, check out our detailed DIY Photo Studio Guide and go to Step 3: Set Up the Lighting for more details.
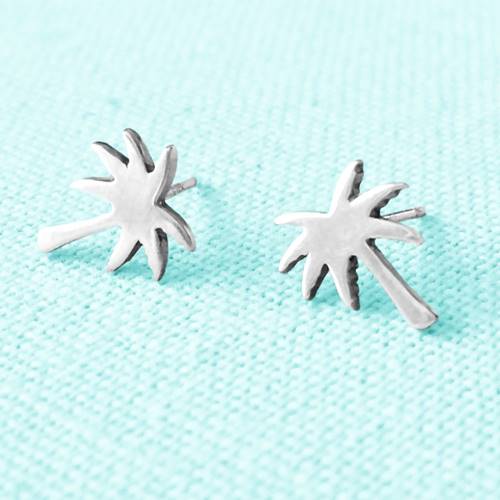
The example below is kitchenware products which often have reflective surfaces. Any photographer knows that reflections are a pain to deal with so you need to set the proper lighting, ISO, and shutter settings for this shot.
You should also notice that the picture below uses natural light coming from a nearby window which gives it a more natural look.
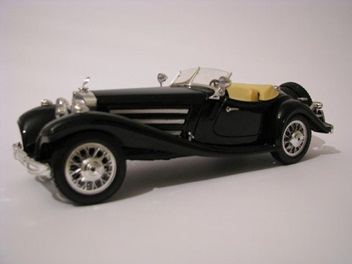
Below is a comparison of a product which uses good lighting and bad lighting along with angle adjustments and more.
The first picture uses a 200W incandescent light bulb for the source of lighting and the angle of the shot doesn’t display the other sides of the product which gives it a 2D look.
Also notice that the camera position is too low and the image is over-exposed giving you unwanted reflections. Not to mention the colors of the product has shifted into something duller than it actually is.
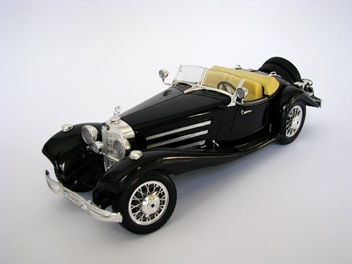
Now compare the first picture to the one below. This one uses natural, indirect daylight which was shot around noon and you can clearly see amazing results already. The angle of the shot gives you clear view of the top, front, and side of the product making it look more 3D.
The shadows being cast are soft and don’t distort the perception of the product. Plus the overall look doesn’t make it seem like a cheap product.
Step 4: Taking Lots of Shots
Now that you have made all the preparations for your product, props, and background, it is time to make them all come together as one and take the shot. We won’t be teaching you specific photography shooting techniques since we’re here to help you style your products for a photo shoot.
But if you are interested in learning the basic photography shooting techniques, check out our How-To Guide on creating a DIY Photo Studio which covers a lot of the fundamentals of photography.
In this part of the guide we will just give you one of the simpler and most basic techniques of a photo shoot and that is to take a lot of shots or pictures.
Taking multiple shots of the product with props and background will help you get the best results since you will be getting different pictures that may or may not have the right angle, lighting, perspective, position, arrangement, and so on.
By taking multiple pictures of your product you will be able to have more room for mistakes and not just rely on one shot. It will also give you more options to choose from and more pictures to show to your customers on your online store as well.
Remember that customers generally would like to look at the product in a 3D perspective in real life, so take different pictures at different angles and views to give them the feeling that they are closely inspecting the product with their hands and eyes.
Take a look at the two pictures below and see the difference of taking multiple shots with different angles and lighting. As you can see the first picture doesn’t look as shiny as the second one.
Final Checklist
Creating an effective and enticing product photo will not only help your online store sell more products but also make your online store more trustworthy when it comes to products’ fidelity to the photo.
This makes your online store have a reputation of “what you see is what you get” which is very good not only for startups but also well-established online stores and businesses.
But before we finish this guide, here is a final checklist to make sure you go over the steps of the entire guide and not missing out on the little details necessary to make your product photo shoot a success.
- Prepare your product before the photo shoot. Always remember to use the newest stock and check for any sort of damages.
- Prepare additional props that you are going to use to highlight your products. Remember to use props that convey the usefulness and functionality of your product.
- Prepare the background you will be using for the entire photo shoot. Don’t be afraid to mix it up and alternate between backgrounds like white or solid colored backgrounds, natural environments, textured backgrounds, deciding to use indoors or outdoors settings and so on.
- Always make sure you have the right lighting to display your product properly. Bad lighting will make your product look worse and even undesirable.
- Take lots of pictures of your product to get the right one or to have multiple versions to help your customers get a better look at your products.
We hope that you have learned something from our how-to guide on styling your products for a photo shoot and use the techniques and steps from this guide to boost the appeal of your products as well as the reputation of your online store.
Remember that a good looking product means more chances of making a sale. So go out there and style your product for a photo shoot!