
The aim of this guide is to help store owners install our Google Analytics dashboard in order to have the most important information at a glance. It gives you top level overview of your web analytics data so you can easily identify opportunities and errors.
We understand that running eCommerce store is a very demanding job. There is often no time to look at the Google Analytics reports. You need to devote time to understand and time to find insights from reports. It often takes too much time.
However, Google Analytics gives us an option to create dashboards where we can have up to 12 widgets with all the data we want. Dashboards are essentially one page documents with key data on them. You can always find a way to do it yourself, but for your convenience, we made one for you. We will explain how to import it to your Google Analytics account.
You can revisit dashboards any time you want by logging into your Google Analytics account or you set up an automatic email that will be sent to you with this data.
Step 1: Import Small Revolution Dashboard To Your Google Analytics Account
Fortunately, it is very easy to import a pre-made dashboard into your Google Analytics account. All you need to do is click the link and choose the correct account.
To import our Small Revolution eCommerce Dashboard click this link. If you are not already logged in, it will first require you to fill in your username and password. On the next page you will need to select a view under the correct account. Most of you will only have one account and one view. After you are sure you’ve selected the right account and view, click “Create”.
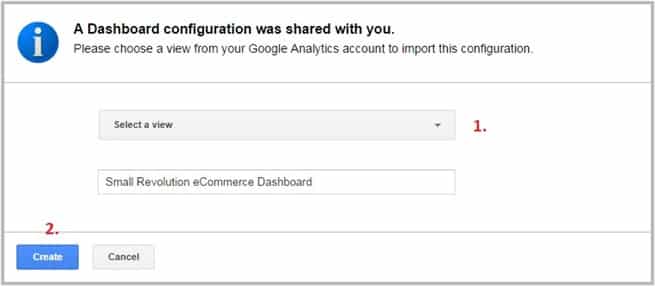
You will be redirected straight to your new dashboard.
Step 2: Schedule Your Dashboard To Be Mailed To You (optional)
Like with majority of reports in Google Analytics, dashboard can automatically be mailed to you. You won’t need to log in every time you want to see it. You can choose how often you’d like to receive those emails.
Right below the name of the dashboard there is the “Email” button. After clicking it, you will need to fill in the form. Choose the destination email (separate with commas if you want more than one). You can change subject line, choose a format of the attached files, choose frequency of the mail and give some description for those emails. Click “Send”.
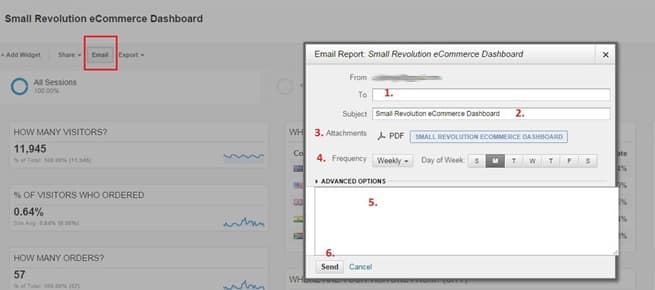
Now you will receive emails at any frequency you want.
Step 3: Understand The Data
Looking at the dashboard and not understanding what it means doesn’t give you much value. The whole purpose of Google Analytics and any other web analytics tool is to give you understandable insights so you can act accordingly.
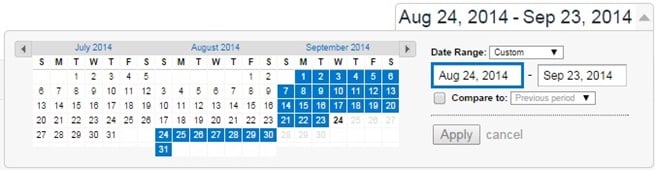
Take notice of your time period on the right side of the screen. Choose whatever period you would like to analyze.
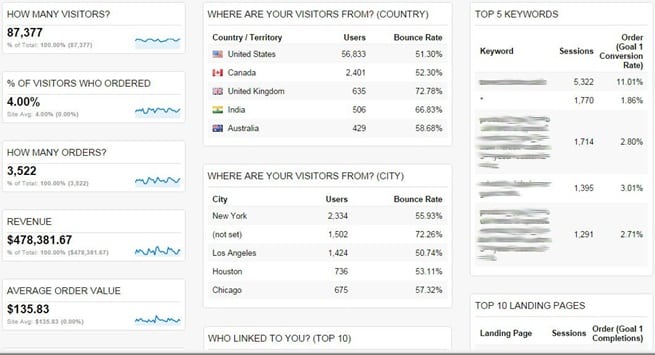
Now we will explain every part of your new eCommerce dashboard.

This is the number of visits to your store in the selected time period. Any time someone comes to your online store it is counted as a visit. Keep an eye on the big changes in that number. It may change due to nature of your business (seasonality), increase or decrease in your advertising efforts, site problems, etc.

This is the percentage of visitors who placed an order. It is also called a conversion rate. In this example 4% of all visitors made a purchase. This number depends on the vertical you are in, your site speed, site layout, shopping cart funnel, etc. Take note of big changes and dig deeper into the reports if you have big spikes or drops.

It is a very easy number to understand. It is a number of orders placed in selected time range.

The amount of revenue you generated inside the selected time range.

This number shows you how much revenue you generated from each order in average. It’s calculated by dividing the revenue by the number of orders. Big changes in this number can be due to changes in your offers, seasonality, changes in advertising efforts, design, etc.


This number represents the percentage of visitors that entered your purchase funnel and then exited without completing the purchase. This means they liked your product, but didn’t like something in your funnel. This may be your shipping address form, shipping prices, delivery date, methods of payment and other.
If you see a big number here, you have a problem. You should check other reports in your Google Analytics account to find our which step is most problematic and then see what you can do about it. Getting this number low has a huge impact on your revenue and the general success of your store.
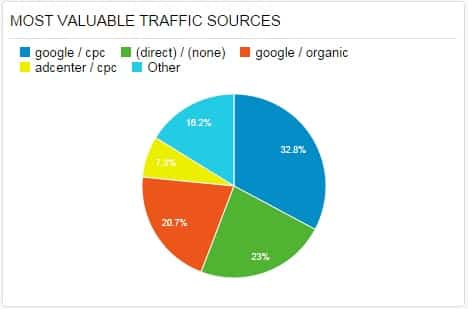
This pie chart shows you percentages of revenue the top 4 traffic sources generated for your store. This can help you reallocate fund to different channels based on their performance. You can compare your SEO and PPC efforts and decide to allocate your funds differently. Big shifts in those numbers should be investigated further.
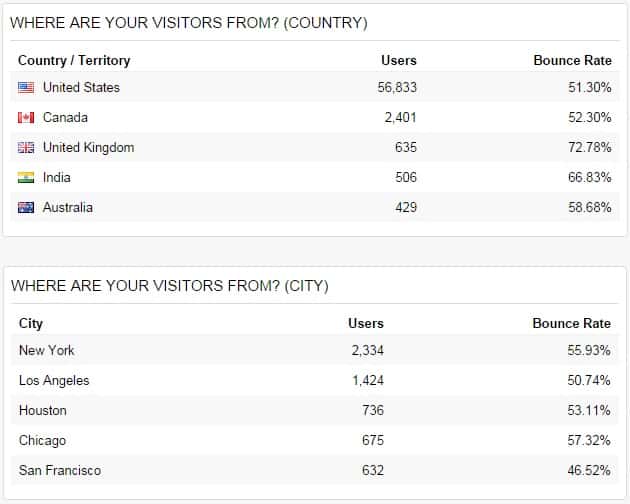
Those two widgets show you the top 5 countries and cities your visitors are from (they visited your site from those locations). You already have an idea about where are your visitors from because you see those locations in their orders. However, you can see how many visitors you have from each country or city and corresponding Bounce Rate.
Bounce is a visit in which a visitor lands on one of your page and doesn’t visit any other page. 50% Bounce Rate from Houston means the half of visitors from this location only visited one of your pages and then left. If Bounce Rate is high it may indicate a problem that needs to be addressed by looking at other Google Analytics reports.
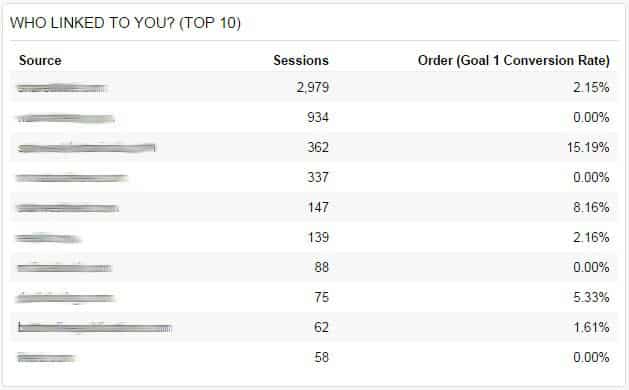
Every site that links to your store is called a referral. This widget shows you your top 10 referrals listed by the number of visits (now called sessions). Order conversion rate shows you what percentage of visits from each referral resulted in a placed order.
This can help you identify potential partnership opportunities, where to put more of your links, visitors of which site also like you, etc. There is a variety of ways to use this information and they are unique to your business.
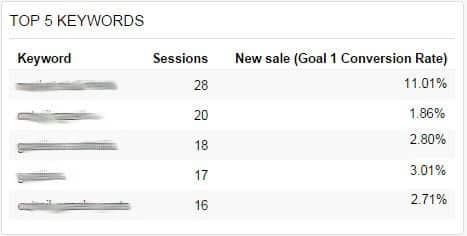
Keywords are words that your visitors used on search engines to find your site. Keywords are really a focus in your PPC campaigns (AdWords, Bing Ads, etc.) and SEO efforts.
This is why it is important to have this widget. Identifying the best keywords lets you adjust bids in your PPC campaigns to make sure you have a high position on search results pages or to aim your SEO efforts towards high positions for those keywords. Those are your best keywords and your site should be visible whenever someone types them into a search engine.
If you have a high amount of traffic from certain keyword, but it has a low conversion rate, you should stop bidding on it or stop your SEO efforts aimed at that keyword. You are investing money into it and it doesn’t give you any returns. In the opposite case, you should increase your efforts because certain keyword has a high conversion rate.
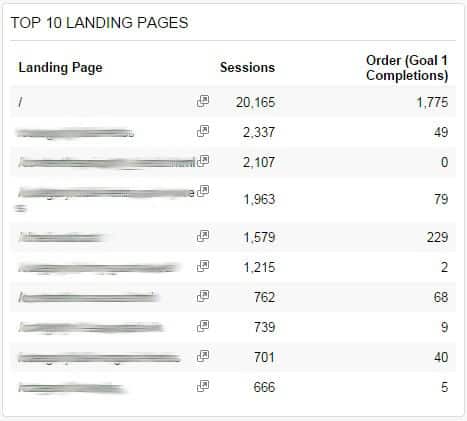
Landing page is the first page of your store a visitor visits (lands on). A big portion of your visitors won’t land on your homepage, but on many other pages. Landing page is the equivalent of the first impression in the online world. Knowing which pages are performing well as landing pages gives you a chance to send traffic from paid channels to that page. Better landing pages result in more orders.
This widget shows how many visits each of the top 10 landing pages had and the resulting orders. Landing pages that result in more orders should receive a lot of traffic and those that don’t shouldn’t. You can control how much traffic you are sending to each one by adjusting your advertising efforts.
Now you have your eCommerce dashboard installed and you understand the data in it. Use it regularly and take necessary actions to make your store as good as it can be.
Final Checklist
To give you a short summary of everything we explained in this guide, here is a short checklist to put everything in perspective:
- Import Small Revolution dashboard to your Google Analytics account
- Schedule your dashboard to be mailed to you (optional)
- Understand the data
You need this how-to guide to get your eCommerce dashboard and understand the data it presents. It will save you a lot of time looking through many different reports in Google Analytics. This way you will have a good overview of your analytics and dig deeper only if you need to.
Photo courtesy of Pexels from Negative Space